Triggers provide a uniform mechanism for subscribing to events from the Connector platforms. It gives you the flexibility to automatically start automations or workflows in Orchestrator.
1. Prerequisites
Before you can configure Triggers, make sure the following conditions are met:
- The App Connect is enabled and provisioned for your tenant
- The Triggers tab is displayed in the Integrations window
2. Creating your workflow
Create your workflow in akaBot Studio as you would normally do. Using the App Connect, any automation can be triggered for any workflow.
To receive the details of a record, you can also follow the indications below:
If you want to know the actual Connector, Event, Record Type or Record that triggered the process in your workflow, you can define the following input arguments of type String in your workflow.
App Connect will populate them automatically when it starts the task.
- akaBotEventConnector
- akaBotEvent
- akaBotEventObjectType
akaBotEventObjectId
3. Publishing your workflow
Publish your workflow to akaBot Center to as you would normally do. You can publish it to a shared folder or a personal workspace. Make sure to create a workflow out of your package.
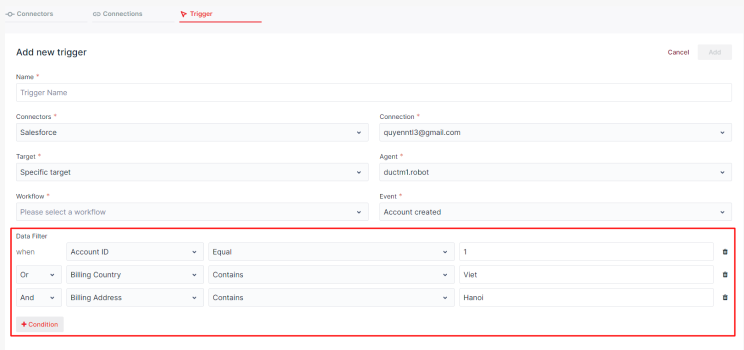
4. Configuring your trigger
To add a Trigger, you will have to:
- Access the akaBot Center.
- On the left-side menu, click on App Connect. The App Connect window includes three separate tabs: Connectors, Connections, and Triggers.

- Access the Triggers tab and click on the Add Trigger button.

- Select the desired Connector and Connection from their respective dropdown menus. If there is only one connection configured for that particular connector, it will be selected automatically.
Select the desired Event and Record from their respective dropdown menus.
- Select the Workflow to execute.
- Click the Add Trigger button to create your trigger and activate it.
Alternatively, you can create a new trigger from the Connections tab. To do that, you will have to:
- Click on a connection's More Actions button.
- Select the Manage triggers option.
- Click button "Add trigger"
- Select the desired Event and Record Type from their respective dropdown menus. In this case, the Connector and Connection are already selected and cannot be changed.
- On the right, select the Workflow to execute and the respective Runtime license.
Click the Add Trigger button to create your trigger and activate it.
NOTE:Event monitoring is currently set to poll every 5 minutes. As such, it could take up to 5 minutes before the associated workflow starts.
You can see a Task's details under the Tasks tab in your Center. A task started from App Connect will show its source as App Connect.
5. Events
Connectors support events through a Polling mechanism. This is supported for the majority of the connector catalog.
6. Data filters
When you define an event for your trigger, you can add more specific filtering.
With Data filters, you can configure triggers that match specific data patterns. This means fewer launches of your robot and not having to apply additional filtering within your automation.
7. Trigger Run History
You can view a trigger's run history by simply clicking on it in the Triggers tab. In the new page, the Attempts' history is displayed in the lower part of the interface.
This history shows events that were received by the App Connect and whether the workflow was successfully launched, in which case it shows the word Successful in the State column.
NOTE: The Successful state only indicates that the job was successfully launched. It does not reflect whether the job was successfully executed to the end or not.
IMPORTANT: In case a job fails to start, its State will appear as Failed. Hover with the mouse cursor over the Failed state to view the error message.
To check if a job was successfully executed, click the View job logs button. It will redirect you to Orchestrator, where all the necessary information on job execution is displayed.
8. Deleting a trigger
Go to the Triggers tab in the App Connect window. Click the More Actions button corresponding to your trigger and select Delete.
9. Trigger details view
Simply click on a trigger to view its details.
10. Activating/deactivating a trigger
To activate or deactivate a trigger, you will first have to click on it to view its details. Then click the switch located in the upper-left side of the window.
11. Automatically disabling a trigger upon failure
A trigger is disabled and set to an error state if you are not able to start the job after 11 attempts (~34 hours) for a single event or if the job does not start for the last 100 events.
The 10 retries for every event are done with an exponential back-off strategy. Each subsequent retry attempt comes after a delay twice as long as the previous attempt.
12. Renaming a trigger
Follow the steps below to rename a trigger:
- Access the Triggers tab.
Hover with the mouse cursor over the name of the trigger you wish to modify and you should now see the Edit button displayed.
NOTE: Alternatively, you can select your trigger from the list to access the detailed view. The Edit button is located on the right side of your trigger name.
- Click the Edit button and you can choose a new name for your trigger.