Center Installation Guide For High Availability Model on Redhat v9.x
1. Before you start
This document aims to guide you to install new akaBot Center in High Availability model (“Fail Over” model) as below:
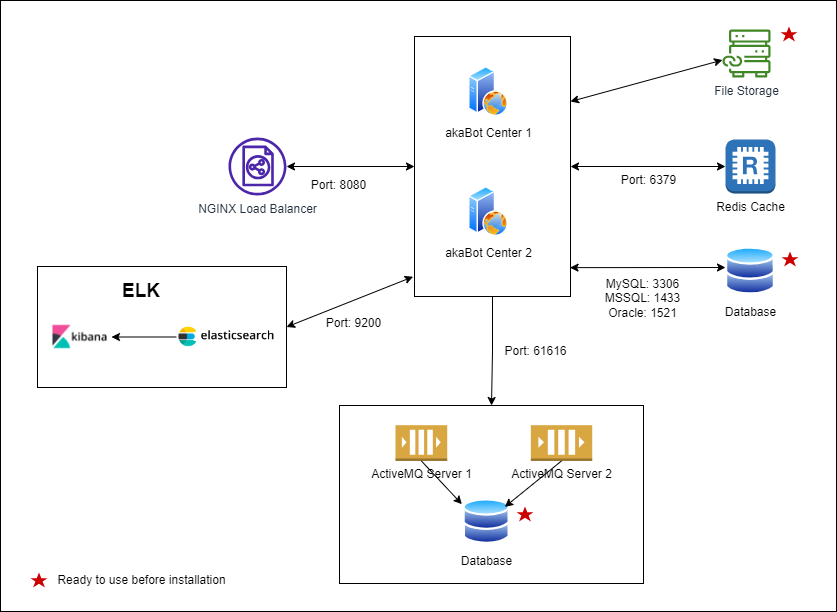
Model Components:
# Component Description 1 Nginx Load Balancer Nginx load balancer acts as the “traffic cop” sitting in front of your akaBot Center servers and routing client requests across all akaBot Center servers capable of fulfilling those requests in a manner that maximizes speed and capacity utilization and ensures that no one server is overworked, which could degrade performance. 2 akaBot Center The akaBot Center lets you manage the creation, monitoring, and deployment of the akaBot Agent in your environment. 3 ActiveMQ Service Messaging application that support the queue-related functions in akaBot Center. 4 ELK Stack Comprehensive log analysis solution that aids in deep searching, analyzing, and displaying logs produced by akaBot Centers. 5 Redis Cache In-memory data structure store used as a database, cache, message broker, and streaming engine, allows for fewer database accesses, which helps to reduce the amount of traffic and instances required. For other models or upgrading akaBot Center, please contact the project coordinator (if have) or send email to [email protected] to get the guidance.
akaBot team is always here to support your installation success.
Please read below sections CAREFULLY and prepare necessary resources/information before you start to achieve a successful installation.
1.1. Hardware Requirements
To install and use akaBot Center in High Availability model, you need to prepare below hardware requirements:
# Server Quantity Core RAM SSD Note 1 akaBot Center server 2 08 or more 32GB or more 500GB or more Server to install akaBot Center 2 ActiveMQ Server 2 08 or more 16GB or more 250GB or more Server to install ActiveMQ service. 3 ELK Server 1 16 or more 16 or more 100GB or more Server to install indexing service. 4 Redis Cache server 1 04 or more 4GB or more 100GB or more Server to install caching service. 5 Nginx Server 1 04 or more 4GB or more 100GB or more Server to install the load balancer service. 1.2. Database requirements
This installation model needs 2 databases:
- 01 database for akaBot Center
- 01 database for ActiveMQ services
Please make sure that these databases are ready to use and prepare below information of each database for connecting:
# Information Description 1 DB-SERVER Database IP Address.
Ex: 3.112.124.1762 DB-USER Database user name.
Ex: AKA_CENTER_013 DB-PASSWORD User name's password
Ex: akaBot1234 DB-PORT Database port.
Ex: 15215 DB-SID/SERVICE NAME Database SID/Service Name
Ex: Orcl1.3. File Storage requirements
Please make sure that you have a dedicated folder on your File Storage server to save Nuget packages and akaBot Center server will have access permissions Read/Write on this folder.
Ex: NFS-NUGET
1.4. Permission requirement
Your user accounts to run installation on each machine needs to have Run permission as Sudo.
1.5. Prepare Installation Packages
Please make sure that your akaBot Center machine has below installation packages with exact version.
# Platform name Package name Version Description Download 1 JDK/JRE openlogic-openjdk-11.0.16+8-linux-x64-el.rpm 11.0.16 OpenJDK Download 2 Apache tomcat apache-tomcat-8.5.57.tar.gz 8.5.57 Web server Apache Tomcat Download 3 ActiveMQ apache-activemq-5.15.1-bin.tar.gz 5.15.1 ActiveMQ is used for queue-related features in akaBot Center Download 4 akaBot Center akaBot-center-x.x.x.x.war 3.0.1.2 or later akaBot Center installation package akaBot provides. Please contact project coordinator or [email protected] 5 Oracle JDBC driver ojdbc8.jar ojdbc8 Oracle JDBC driver Download 6 Nginx Load Balancer nginx-1.22.1-1.el8.ngx.x86_64.rpm 1.22.1 NGINX Load Balancer package Download 7 Redis Cache redis-5.0.3-5.module+el8.4.0+12927+b9845322
.x86_64.rpm5.0.3 Redis Cache package Download 8 Kibana kibana-7.17.12-x86_64.rpm 7.17.12 Kibana package (Optional) Download 9 Elastic Search elasticsearch-7.17.12-x86_64.rpm 7.17.12 ElasticSearch package Download 10 Logstash logstash-7.17.12-x86_64.rpm 7.17.12 Log analysis platform package Download 11 Filebeat filebeat-7.17.12-x86_64.rpm 7.17.12 Filebeat package Download Notes:
- You should use a separate folder to place installation packages in each server. In this guide, we use the folder named: /apps
1.6. Other notes
Please pay attention to below notes to prevent future errors during installation:
- Please make sure that your folder names do not have spaces.
- To prevent syntax errors:
- You should copy the command lines from this guide to your akaBot Center machine to run for convenience.
- Due to different character encoding modes, please copy the commands into Notepad file before copying again to the akaBot Center machine
- When updating configuration files, please follow strictly the syntax of the file.
2. Installation
2.1. Install Redis
On Redis server, please follow 3 simple steps to install and configure Redis service as below:
2.1.1. Step 1 – Install Redis package.
1. Update system repositories
sudo dnf update -y
2. Install Redis package
sudo rpm -ivh <package name>
Ex: sudo rpm -ivh redis-5.0.3-5.module+el8.4.0+12927+b9845322.x86_64.rpm
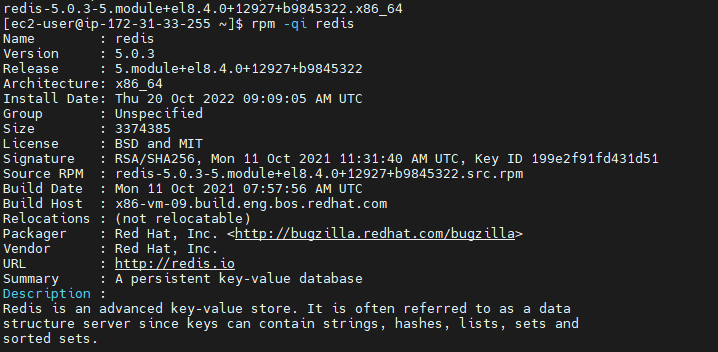
3.Verify installed Redis version:
rpm -q redis
rpm -qi redis
4. Start and enable Redis service:
sudo systemctl start redis
sudo systemctl enable redis
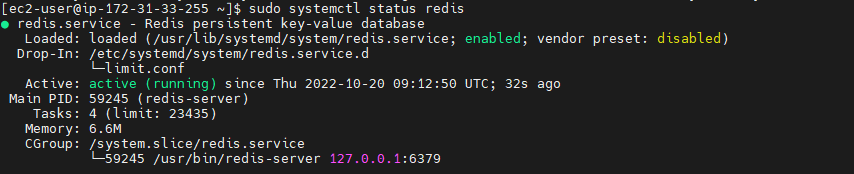
5. Verify status Redis service
sudo systemctl status redis
2.1.2. Step 2 – Configure Redis Remote Access
1. Turn of Redis service (if running)
sudo systemctl stop redis
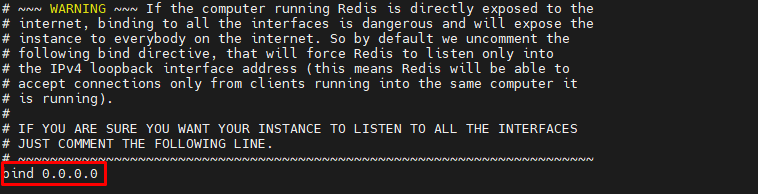
2. Open redis.conf file
sudo vi /etc/redis.conf
3. Search and update the bind parameter value from 127.0.0.1 to 0.0.0.0
3. Save changes and exit
Press ESC then type: “:wq”
4. Restart Redis service.
sudo systemctl start redis
2.1.3. Step – Configure Security Setting (optional)
1. Turn of Redis service (if running)
sudo systemctl stop redis
2. Open redis.conf file
sudo vi /etc/redis.conf
3. Search and uncomment the requirepass parameter:
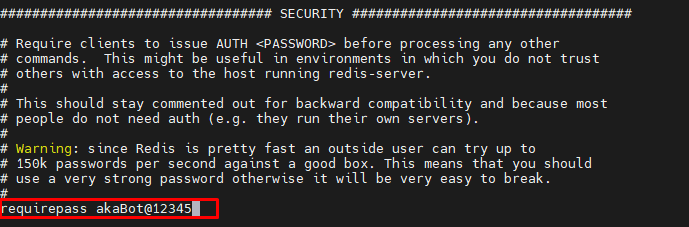
4. Save changes and exit
Press ESC then type: “:wq”
5. Restart Redis service.
sudo systemctl start redis
2.2. Install ActiveMQ
The High Availability model needs 2 ActiveMQ servers to backup for each other in failover situation.
Please repeat below steps to install and configure ActiveMQ service on 2 separate servers.
2.2.1. Step 1 - Extract installation file
1. Move to installation folder:
cd apps/
2. Create a folder: /opt/activemq
sudo mkdir /opt/activemq
3. Extract Apache ActiveMQ installation package then move to /opt/activemq folder.
sudo tar -xvzf apache-activemq-*-bin.tar.gz
sudo mv apache-activemq-5.15.1 /opt/activemq
2.2.2. Step 2 - Create group and ActiveMQ user
Create another account and run the ActiveMQ installation by this account instead of using Root account.
1. Create ActiveMQ group
sudo groupadd activemq
2. Create account ActiveMQ under group ActiveMQ and home link: /opt/activemq
sudo useradd -s /bin/false -g activemq -d /opt/activemq activemq
3. Phân quyền cho thư mục ActiveMQ
sudo chown -R activemq:activemq /opt/activemq
2.2.3. Step 3 - Configure ActiveMQ Service
1. Create configuration file: activemq.service
sudo vi /etc/systemd/system/activemq.service
2. Copy below content into this file
[Unit]
Description=Apache ActiveMQ
After=network.target
[Service]
Type=forking
User=activemq
Group=activemq
ExecStart=/bin/bash /opt/activemq/bin/activemq start
ExecStop=/bin/bash /opt/activemq/bin/activemq stop
[Install]
WantedBy=multi-user.target
3. Save changes and exit
Press ESC then type: :wq
4. Reload Daemon
sudo systemctl daemon-reload
5. Start ActiveMQ service
sudo systemctl start activemq
6. Enable ActiveMQ service
sudo systemctl enable activemq
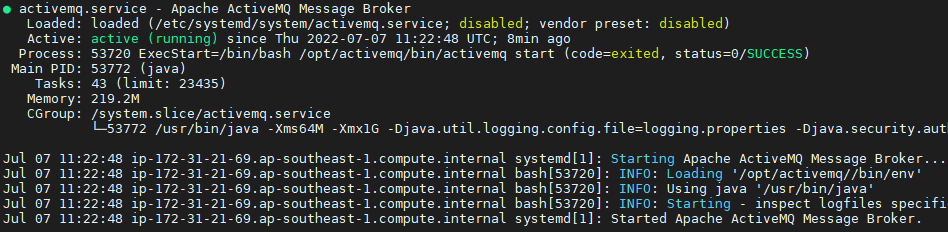
7. Check ActiveMQ status
sudo systemctl status activemq
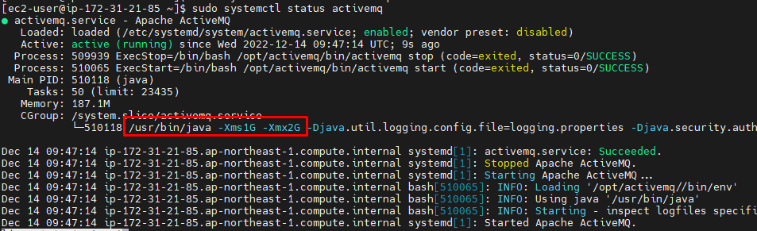
2.2.4. Step 4 - Configure Java Heap Memory of ActiveMQ Service
1. Stop ActiveMQ service
sudo systemctl stop activemq
2. Update value of Java Heap memory
- Open environment file
sudo vi /opt/activemq/bin/env
- Update below line
ACTIVEMQ_OPTS_MEMORY="-Xms1G -Xmx2G"
Note:
- Parameter -Xms: minimum Java heap size. Please set the number <= ¼ RAM capacity.
Ex: If your akaBot Center machine’s RAM = 4G, then set -Xms1G.
- Parameter -Xmx: maximum Java heap size. Please set the number <= ½ RAM capacity.
Ex: If your akaBot Center machine’s RAM = 4G, then set -Xms2G.

- Save changes and exit
Press ESC then type: :wq
3. Start again ActiveMQ service
sudo systemctl start activemq
4. Verify ActiveMQ service’s status
sudo systemctl status activemq
2.2.5. Step 5 – Configure ActiveMQ service.
1. Stop activemq service
sudo systemctl stop activemq
2. Upload and copy file ojdbc8.jar (Oracle JDBC driver) into optional library folder:
cd ~/apps/
cp ojdbc8.jar /opt/activemq/lib/optional/
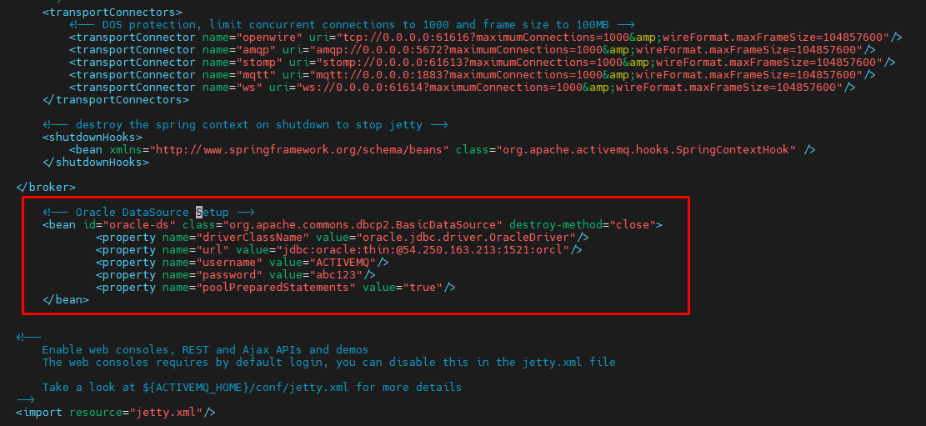
3. Configure file activemq.xml
- Open file activemq.xml
sudo vi /opt/activemq/conf/activemq.xml
- Change broker name (optional)

- Add below code section at the end of file to configure Oracle DataSource:
<bean id="oracle-ds" class="org.apache.commons.dbcp2.BasicDataSource" destroy-method="close">
<property name="driverClassName" value="oracle.jdbc.driver.OracleDriver"/>
<property name="url" value="<DB-URL>"/>
<property name="username" value="<DB-USER>"/>
<property name="password" value="<DB-PASSWORD>"/>
<property name="poolPreparedStatements" value="true"/>
</bean>
Note:
+ If your database uses SID then:
DB_URL = jdbc:oracle:thin:@<DB-SERVER>:<DB-PORT>:<DB-SID>
+ If your database uses service name then:
DB_URL = jdbc:oracle:thin:@//<HOST>:<PORT>/<SERVICE NAME>
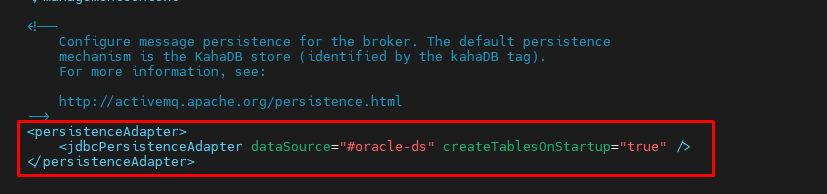
4. Change persistenceAdapter configuration:
<jdbcPersistenceAdapter dataSource="#oracle-ds" createTablesOnStartup="true" />
5. Save changes and exit
Press ESC key and type :wq!
6. Start and verify activemq service status
sudo systemctl start activemq
sudo systemctl status activemq
2.3. Install ELK Stack
ELK Stack is comprehensive log analysis solution that aids in deep searching, analyzing, and displaying logs produced by akaBot Centers.
Its components including:
- Elasticsearch is a RESTful distributed search engine built on top of Apache Lucene and released under an Apache license. It is Java-based and can ingest data as well as search and index document files in diverse formats.
- Logstash is a data collection engine that unifies data from multiple sources, offers database normalization and distributes the data.
- Kibana is an open source data visualization and exploration tool that is specialized for large volumes of streaming and real-time data. The software makes complex data streams more easily and quickly understandable through graphic representation. This component is optional to install.
- FileBeat are data shippers that are installed on servers as agents used to send different types of operational data to Elasticsearch either directly or through Logstash, where the data might be enhanced or archived.
Source: https://www.techtarget.com/searchitoperations/definition/Elastic-Stack
To install ELK Stack, please follow below steps:
2.3.1. Step 1 - Install ElasticSearch
1. Install ElasticSearch package
cd apps/
sudo rpm --install elasticsearch-7.17.12-x86_64.rpm
2. Start the ElasticSearch service
sudo rpm --install elasticsearch-7.17.12-x86_64.rpm
3. Enable ElasticSearch service
sudo systemctl enable elasticsearch
4. Verify service status
sudo systemctl status elasticsearch
5. Stop ElasticSearch service
sudo systemctl stop elasticsearch
6. Open the setting file for configuration:
sudo vi /etc/elasticsearch/elasticsearch.yml
7. Update below value:
network.host: 0.0.0.0
cluster.initial_master_nodes: ["node-1"]
8. Save changes and exit.
Press ESC then type: :wq
2.3.2. Step 2 - Instal Logstash
1. Install ElasticSearch package
cd apps/
sudo rpm --install logstash-7.17.12-x86_64.rpm
2. Enable LogStash service
sudo systemctl enable logstash
3. Start LogStash service
sudo systemctl start logstash
4. Verify LogStash service if running
sudo systemctl status logstash
5. Stop LogStash service
sudo systemctl stop logstash
6. Open LogStash configuration file:
sudo vi /etc/logstash/conf.d/logstash.conf
7. Update below code in the file:
input {
beats {
port => 5044
type => "log"
}
}
filter {
json {
source => "message"
target => "doc"
}
}
output {
elasticsearch {
hosts => "localhost:9200"
manage_template => false
index => "%{[@metadata][beat]}-%{+yyyy.ww}"
document_type => "%{[@metadata][type]}"
}
}
8. Save changes and exit.
Press ESC then type: :wq
9. Start LogStash service
sudo systemctl start logstash
2.3.3. Step 3 - Install Filebeat
1. Install FileBeat package
cd apps/
sudo rpm --install filebeat-7.17.12-x86_64.rpm
2. Enable FileBeat service
sudo systemctl enable filebeat
3. Start FileBeat service
sudo systemctl start filebeat
4. Verify FileBeat service if running
sudo systemctl status filebeat
5. Stop FileBeat service
sudo systemctl stop filebeat
6. Open FileBeat configuration file:
sudo vi /etc/filebeat/filebeat.yml
7. Update as below code in the file:
filebeat.inputs:
path:
- /opt/tomcat/logs/agents/*/*.log
8. Uncomment below code:
#output.logstash:
# The Logstash hosts
#hosts: ["localhost:5044"]
9. Save changes and exit.
Press ESC then type: :wq
10. Start FileBeat service
sudo systemctl start filebeat
2.3.5. Step 4 - Install Kibana (optional)
1. Install Kibana package
cd apps/
sudo rpm --install kibana-7.17.12-x86_64.rpm
2. Enable Kibana service
sudo systemctl enable kibana
3. Start Kibana service
sudo systemctl start kibana
4. Verify Kibana service if running
sudo systemctl status kibana
5. Stop Kibana service
sudo systemctl start kibana
6. Open Kibana configuration file:
sudo vi /etc/kibana/kibana.yml
7. Update below code in the file:
server.port: 5601
server.host: "0.0.0.0"
8. Save changes and exit.
Press ESC then type: :wq
9. Start Kibana service
sudo systemctl start kibana
2.4. Install akaBot Center
The High Availability model needs 2 akaBot Center servers to backup for each other in failover situation.
Please repeat below steps to install and configure akaBot Center service on 2 separate servers.
2.4.1. Step 1 - Install JDK
Note:
If your akaBot machine has installed the JDK:
if version is smaller than version 11, please upgrade JDK version to JDK 11
otherwise, please ignore this step.
If not, please follow below steps to install JDK.
1. Move to installation folder by using below command:
cd apps/
2. Run installation command:
sudo yum install openlogic-openjdk-11.0.16+8-linux-x64-el.rpm
3. Verify if successful installation by running below command:
java -version

2.4.2. Step 2 - Install Apache Tomcat Web Server
2.4.2.1. Step 1: Extract installation file
1. Move to installation folder:
cd apps/
2. Create a folder: /opt/tomcat
sudo mkdir /opt/tomcat
3. Extract Apache Tomcat installation package
sudo tar xzvf apache-tomcat-8*tar.gz -C /opt/tomcat --strip-components=1
2.4.2.2. Step 2: Create group and user Tomcat
You need to create another account and run the Tomcat installation by this account instead of using Root account to prevent permission-related errors during execution.
1. Create Tomcat group
sudo groupadd tomcat
2. Create account Tomcat under group Tomcat and home link: /opt/tomcat
sudo useradd -s /bin/false -g tomcat -d /opt/tomcat tomcat
3. Configure account Tomcat to get Machine code for later use of license activation for akaBot Center.
- Open vi editor
sudo visudo /etc/sudoers
- Add below command into the end of file:
tomcat ALL= NOPASSWD: ALL

- Save changes and exit vi editor.
Press ESC key and type: :wq
4. Add current user (using to ssh to akaBot Center machine) to group Tomcat.
sudo usermod -g tomcat [current_user_logged]
2.4.2.3. Step 3: Configure folder access rights
1. Change ownership of Tomcat folder:
cd /opt
sudo chown tomcat:tomcat tomcat
ls -l

2. Configure access permission on Tomcat folder:
cd /opt/tomcat
sudo chgrp -R tomcat /opt/tomcat
sudo chmod -R g+r conf
sudo chmod g+x conf
sudo chown -R tomcat webapps/ work/ temp/ logs/
ls -l
2.4.2.4 Step 4: Configure Tomcat service running
1. Get Java Installation folder
sudo update-alternatives --list | grep java

%JAVA_HOME% = /usr/lib/jvm/openlogic-openjdk-11-hotspot (WITHOUT /bin/java)
2. Create tomcat.service file
sudo vi /etc/systemd/system/tomcat.service
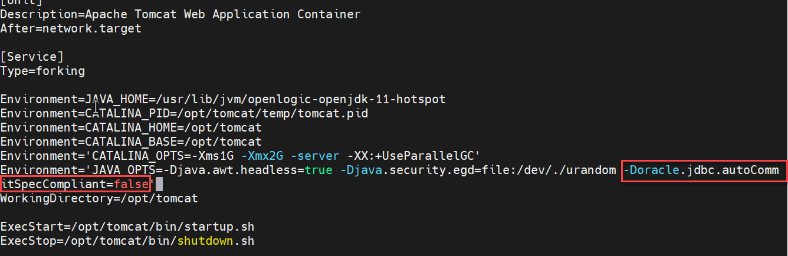
3. Copy below code into the file
[Unit]
Description=Apache Tomcat Web Application Container
After=network.target
[Service]
Type=forking
Environment=JAVA_HOME=/usr/lib/jvm/openlogic-openjdk-11-hotspot
Environment=CATALINA_PID=/opt/tomcat/temp/tomcat.pid
Environment=CATALINA_HOME=/opt/tomcat
Environment=CATALINA_BASE=/opt/tomcat
Environment='CATALINA_OPTS=-Xms1G -Xmx2G -server -XX:+UseParallelGC'
Environment='JAVA_OPTS=-Djava.awt.headless=true -Djava.security.egd=file:/dev/./urandom'
WorkingDirectory=/opt/tomcat
ExecStart=/opt/tomcat/bin/startup.sh
ExecStop=/opt/tomcat/bin/shutdown.sh
User=tomcat
Group=tomcat
RestartSec=10
Restart=always
[Install]
WantedBy=multi-user.target
4. Update Java Home variable:
Environment=JAVA_HOME=%JAVA_HOME%
Environment=JAVA_HOME=/usr/lib/jvm/openlogic-openjdk-11-hotspot
5. Change Java Heap memory size:
Environment='CATALINA_OPTS=-Xms1G -Xmx2G -server -XX:+UseParallelGC'
Parameter -Xms: minimum Java heap size. Please set the number <= ¼ RAM capacity.
Ex: If your akaBot Center machine’s RAM = 4G, then set -Xms1G.
Parameter -Xmx: maximum Java heap size. Please set the number <= ½ RAM capacity.
Ex: If your akaBot Center machine’s RAM = 4G, then set -Xms2G.
6. Save changes and exit
Press ESC then type: :wq
7. Reload Daemon
sudo systemctl daemon-reload
8. Start Tomcat service
Note: Please make sure that there is only ROOT folder in /opt/tomcat/webapps folder before starting Tomcat service.
sudo systemctl start tomcat
9. Enable Tomcat service
sudo systemctl enable tomcat
10. Check Tomcat status
sudo systemctl status tomcat

curl localhost:8080

11. Change owner and group ownership to logs folder.
sudo chown -R tomcat /opt/tomcat/logs
sudo chgrp -R tomcat /opt/tomcat/logs
2.4.3. Step 3 - Install akaBot Center package
2.4.3.1. Extract installation folder
1. Stop Tomcat service (if running)
sudo systemctl stop tomcat
2. Remove all folders inside /opt/tomcat/webapps
sudo rm -rf /opt/tomcat/webapps/*
3. Copy akaBot-center-x.x.x.x.war into /opt/tomcat/webapps/ then change its name to ROOT.war.
Note: x.x.x.x is akaBot Center version
cd ~/apps
sudo cp akaBot-center-3.0.1.2.war /opt/tomcat/webapps/ROOT.war
4. Start Tomcat service and wait for Tomcat running to extract the file ROOT.war out to ROOT folder.
sudo systemctl start tomcat
cd /opt/tomcat/webapps
ls –l
5. Stop Tomcat service and delete ROOT.war file.
sudo systemctl stop tomcat
sudo rm /opt/tomcat/webapps/ROOT.war
2.4.3.2. Configure akaBot Center
To akaBot Center can interact with database, cache, queue services, you need to configure it as below:
A. Configure file quartz.properties
1. Open file quartz.properties
sudo vi /opt/tomcat/webapps/ROOT/WEB-INF/classes/quartz.properties
2. Depending on the database type you use (Oracle or MSSQL or MySQL), you perform as below:
+ Enable your database type’s setting by uncommenting the line of driverDelegateClass variable of your database type:
Ex: You use Oracle database, then uncomment the line of Oracle:
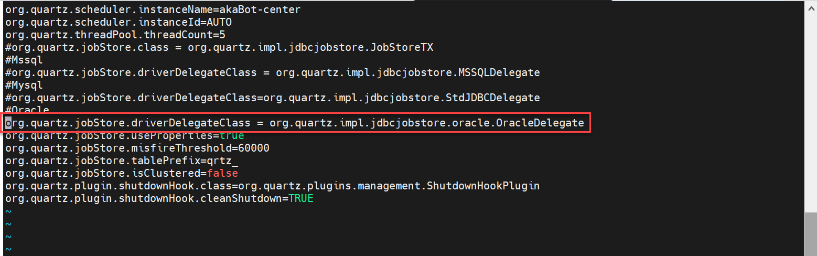
+ Disable other database type’s setting by commenting out the lines of driverDelegateClass variable other database types:
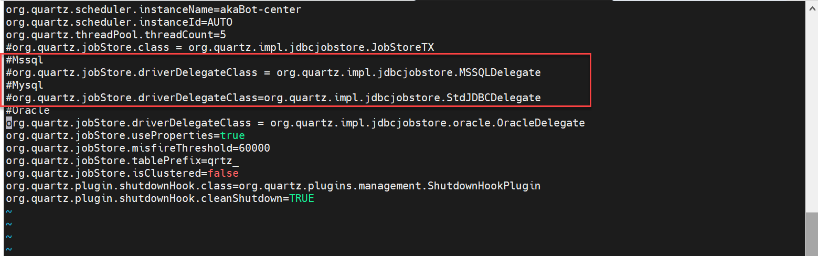
3. Save changes and exit
Press ESC then type: :wq
B. Configure Logback Setting
1. Open the logback setting file
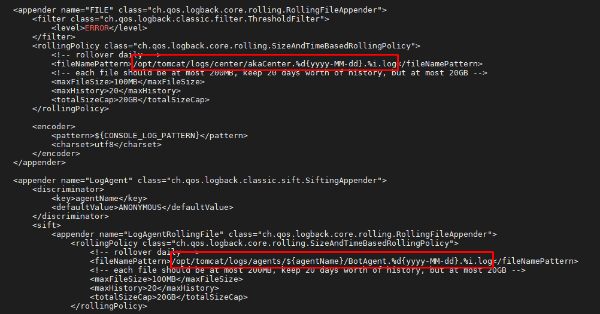
sudo vi /opt/tomcat/webapps/ROOT/WEB-INF/classes/logback-spring.xml
2. Update the line:
${application.home:-.}/logs/center/akaCenter.%d{yyyy-MM-dd}.%i.log
To:
/opt/tomcat/logs/center/akaCenter.%d{yyyy-MM-dd}.%i.log
3. Update the line
${application.home:-.}/logs/agents/${agentName}/BotAgent.%d{yyyy-MM-dd}.%i.log
To:
/opt/tomcat/logs/agents/${agentName}/BotAgent.%d{yyyy-MM-dd}.%i.log
4. Save changes and exit
Press ESC then type: :wq
C. Configure Database connection
1. Open the file application-prod.yml
cd /opt/tomcat/webapps/ROOT/WEB-INF/classes/config/
sudo vi application-prod.yml
2. Depending on the database type you use (Oracle or MSSQL or MySQL), update the file as below:
Ex: your database type is Oracle.
a. Update database URL
+ Uncomment your database’s URL line and update corresponding URL.
+ Comment out other databases’ URL lines.
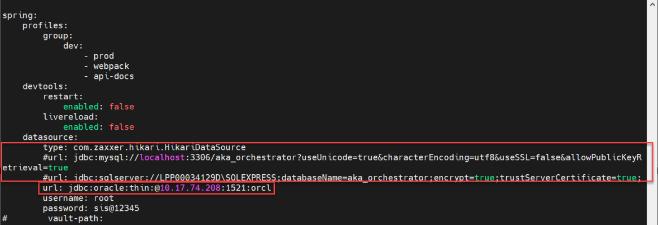
Note:
Oralce URL format:
+ If you use service’s SID, then URL format should be:
url: jdbc:oracle:thin:@<DB-SERVER>:<DB-PORT>:<DB-SID>

+ If you use service’s name, then JDBC URL format should be:
url: jdbc:oracle:thin:@//<DB-SERVER>:<PORT>/<SERVICE NAME>

MSSQL URL format:
url: jdbc:sqlserver://<DB-SERVER>:<DB-PORT>;databaseName=<DB- NAME>;encrypt=true;trustServerCertificate=true;
MySQL URL format:
url: jdbc:mysql://< DB-SERVER >:<DB-PORT>/<DB-NAME>
b. Update your database’s username & password

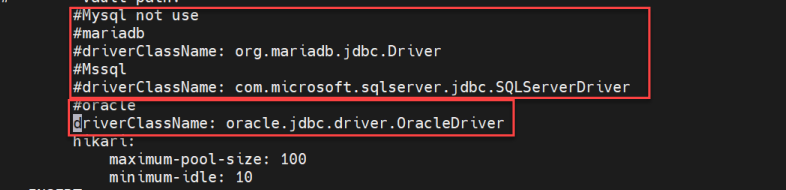
c. Update driverClassName variable:
+ Uncomment the line of driverClassName variable of your database type.
+ Comment out the line of driverClassName variable of other database types.
d. Update database-platform and database variable
+ Uncomment the lines of database-platform and database variables of your database type.
+ Comment the lines of database-platform and database variables of other database types.
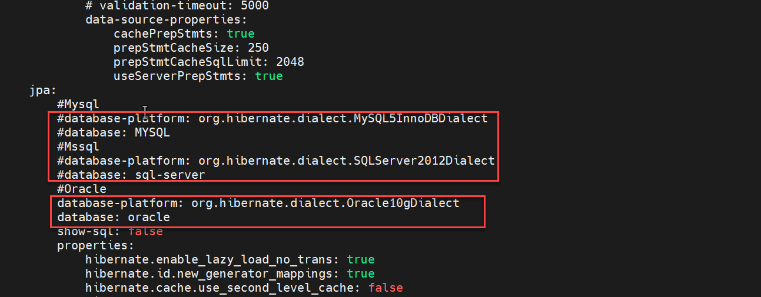
e. Save changes and exit
Press ESC then type: :wq
3. Configure for the file application-dev.yml
a. Open the file application-dev.yml
sudo vi application-dev.yml
b. Repeat the same from step 2 to step 3 to configure the file application-dev.yml
D. Configure ActiveMQ connection
1. Open the file application.yml
cd /opt/tomcat/webapps/ROOT/WEB-INF/classes/config/
sudo vi application.yml
2. Update value for brokerURL variable:
brokerURL: failover:(tcp://<IP-ACTIVEMQ-01>:61616,tcp://<IP-ACTIVEMQ-02>:61616)?randomize=false&jms.messagePrioritySupported=true&nested.wireFormat.maxInactivityDurationInitalDelay=30000
in which:
+ <IP-ACTIVEMQ-01>: the IP address of ActiveMQ server 01
+ <IP-ACTIVEMQ-02>: the IP address of ActiveMQ server 02
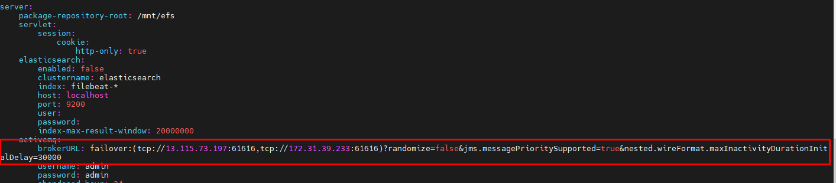
3. Save changes and exit
Press ESC then type: “:wq”
E. Configure Redis Cache connection
1. Open the file application-prod.yml
cd /opt/tomcat/webapps/ROOT/WEB-INF/classes/config/
sudo vi application-prod.yml
2. Update the file as below:
+ Update mode variable’s value to 1
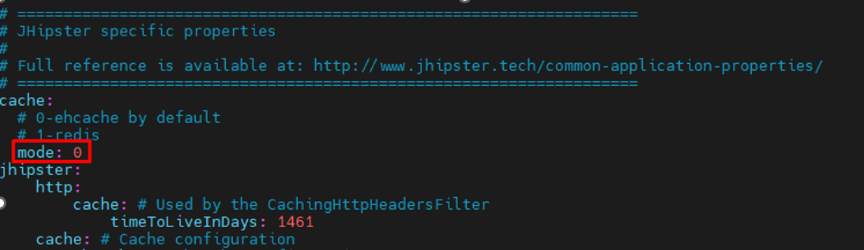
+ Update server variable’s value:
If your Redis service requires a password, then server variable’s value is:
server: redis://:<REDIS-PASSWD>@<REDIS-IP>:6379
otherwise, server variable’s value is:
server: redis://<REDIS-IP>:6379

3. Save changes and exit
Press ESC then type: “:wq”
4. Configure for the file application-dev.yml
a. Open the file application-dev.yml
sudo vi application-dev.yml
b. Repeat the same from step 2 to step 3 to configure the file application-dev.yml
F. Configure ElasticSearch connection
1. Open the file application.yml
cd /opt/tomcat/webapps/ROOT/WEB-INF/classes/config/
sudo vi application.yml
2. Add below code to the end of the file as below:
elasticsearch:
enabled: true
clustername: elasticsearch
index: filebeat-*
host: <IP_ES>
port: 9200
user:
password:
index-max-result-window: 20000000
In which: <IP_ES> is the IP address of ElasticSearch server.
3. Save changes and exit
Press ESC then type: :wq
G. Configure the folder path to store Nuget packages
1. Open the file application-prod.yml
cd /opt/tomcat/webapps/ROOT/WEB-INF/classes/config/
sudo vi application-prod.yml
2. Comment out the below code to turn off Tomcat default setting:
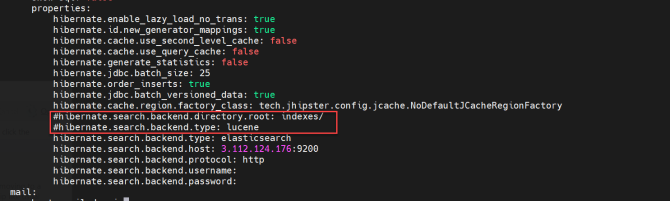
3. Uncomment the below code to turn on the elastic search settings:
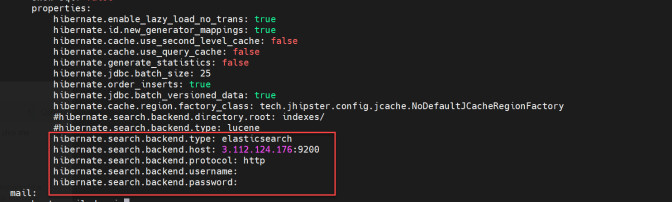
4. Update below line:
hibernate.search.backend.host: <IP_ES>:9200
In which: <IP_ES> is the IP address of ElasticSearch server.
5. Save changes and exit
Press ESC then type: “:wq”
6. Configure for the file application-dev.yml
a. Open the file application-dev.yml
sudo vi application-dev.yml
b. Repeat the same from step 2 to step 5 to configure the file application-dev.yml
2.4.3.3. Step 3 – Start Tomcat Service and Test out akaBot Center
1. Start Tomcat service
sudo systemctl start tomcat
2. Test to see if akaBot Center is running successfully.
curl localhost:8080
Success case:

If not success, please follow section 3. Troubleshoot issue to self-troubleshoot issues.
2.5 Install NGINX Load Balancer
2.5.1. Step 1 - Install Nginx package
1. Install Nginx package
cd apps/
sudo rpm -ivh <package name>
Ex: sudo rpm -ivh nginx-1.22.1-1.el8.ngx.x86_64.rpm
2. Start and enable Nginx server
sudo systemctl enable nginx
sudo systemctl start nginx
3. Verify Nginx version
nginx -v

sudo systemctl status nginx

2.5.2. Step 2 - Configure Nginx service
2.5.2.1. Configure Nginx Load Balancing
1. Stop Nginx service (if running)
sudo systemctl stop nginx
2. Open the configuration file
sudo vi /etc/nginx/sites-available/default
3. Copy below code into the file
upstream akaBotCenter {
server <IP-SRV-CENTER-01>:8080;
server <IP-SRV-CENTER-02>:8080;
}
# This server accepts all traffic to port 80 and passes it to the upstream. Notice that the upstream name and the proxy_pass need to match.
server {
listen 80;
server_name <YOUR-DOMAIN>;
client_max_body_size 200M;
location / {
proxy_pass http://akaBotCenter;
proxy_set_header X-Real-IP $remote_addr;
proxy_set_header Host $host;
proxy_set_header X-Forwarded-For $proxy_add_x_forwarded_for;
# WebSocket support (nginx 1.4)
proxy_http_version 1.1;
proxy_set_header Upgrade $http_upgrade;
proxy_set_header Connection "upgrade";
}
}
4. Update the variable in file
<IP-SRV-CENTER-01>: IP address of akaBot Center server 01
<IP-SRV-CENTER-02>: IP address of akaBot Center server 02
<YOUR-DOMAIN>: akaBot Center domain.
5. Set the load balancing mode
In order to distribute the request from end user to appropriate akaBot Center server, you need to set the load balancing mode for Nginx as one of below modes:
+ Round robin mode: the requests will be distributed sequentially for each server.
You don’t need to change the file setting and go to step 6 to exit the setting.
+ Weighted round robin mode: based on request processing capacity of each server and its priority, you will assign a weight of priority. The requests will be distributed by servers’ priority.
You add weight setting after server address in upstream configuration as below:
upstream akaBotCenter {
server <IP-SRV-CENTER-01>:8080;
server <IP-SRV-CENTER-02>:8080 weight:2;
}
In this example, request traffic to akaBot Center server 02 will be doubled than server 01.
+ Least Connections: The requests will be distributed in priority order of servers from least to highest active connections. To use it, add below contanst into the upstream configuration:
upstream akaBotCenter {
least_conn;
server <IP-SRV-CENTER-01>:8080;
server <IP-SRV-CENTER-02>:8080;
}
+ IP Hash: The IP Hash policy uses an incoming request's source IP address as a hashing key to route non-sticky traffic to the same backend server. The load balancer routes requests from the same client to the same backend server as long as that server is available. To use it, add below contanst into the upstream configuration:
upstream akaBotCenter {
ip_hash;
server <IP-SRV-CENTER-01>:8080;
server <IP-SRV-CENTER-02>:8080;
}
6. Save changes and exit
Press ESC key and type :wq!
2.5.2.2. Configure Nginx SSL
If you use SSL service from provider, please follow the provider’s guides to install and configure it.
Otherwise, please follow below steps to deploy your own Self-Signed SSL.
1. Create SSL Certificate (Self-Signed SSL)
sudo mkdir /etc/ssl/private
sudo chmod 700 /etc/ssl/private
sudo openssl req -x509 -nodes -days 365 -newkey rsa:2048 -keyout /etc/ssl/private/nginx-selfsigned.key -out /etc/ssl/certs/nginx-selfsigned.crt
2. Create Diffie-Hellman
sudo openssl dhparam -out /etc/ssl/certs/dhparam.pem 2048
3. Create configuration file
sudo vi /etc/nginx/conf.d/default.conf
4. Copy below code into the configuration file:
server {
listen 443 http2 ssl;
listen [::]:443 http2 ssl;
server_name <YOUR-DOMAIN>;
client_max_body_size 200M;
ssl_certificate /etc/ssl/certs/nginx-selfsigned.crt;
ssl_certificate_key /etc/ssl/private/nginx-selfsigned.key;
ssl_dhparam /etc/ssl/certs/dhparam.pem;
########################################################################
# from https://cipherlist.eu/ # ########################################################################
ssl_protocols TLSv1.3;# Requires nginx >= 1.13.0 else use TLSv1.2
ssl_prefer_server_ciphers on;
ssl_ciphers EECDH+AESGCM:EDH+AESGCM;
ssl_ecdh_curve secp384r1; # Requires nginx >= 1.1.0
ssl_session_timeout 10m;
ssl_session_cache shared:SSL:10m;
ssl_session_tickets off; # Requires nginx >= 1.5.9
ssl_stapling on; # Requires nginx >= 1.3.7
ssl_stapling_verify on; # Requires nginx => 1.3.7
resolver 8.8.8.8 8.8.4.4 valid=300s;
resolver_timeout 5s;
# Disable preloading HSTS for now. You can use the commented out header line that includes
# the "preload" directive if you understand the implications.
#add_header Strict-Transport-Security "max-age=63072000; includeSubDomains; preload";
add_header X-Frame-Options DENY;
add_header X-Content-Type-Options nosniff;
add_header X-XSS-Protection "1; mode=block";
##################################
# END https://cipherlist.eu/ BLOCK #
##################################
location / {
proxy_pass http://akaBotCenter;
proxy_set_header X-Real-IP $remote_addr;
proxy_set_header Host $host;
proxy_set_header X-Forwarded-For $proxy_add_x_forwarded_for;
# WebSocket support (nginx 1.4)
proxy_http_version 1.1;
proxy_set_header Upgrade $http_upgrade;
proxy_set_header Connection "upgrade";
}
}
5. Update server_name variable in file as your akaBot Center domain.
server_name <YOUR-DOMAIN>;
6. Configure redirect from HTTP to HTTPS (optional)
server {
listen 80;
listen [::]:80;
server_name <YOUR-DOMAIN>;
return 301 https://$host$request_uri;
}
8. Save changes and exit
Press ESC key and type :wq!
9. Enable configuration change for Nginx service and restart nginx
sudo nginx -t
sudo systemctl restart nginx
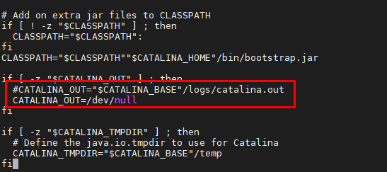
2.6. Configure Catalina.out
By default, Tomcat will write out the logs into catalina.out file which may cause dramatic increasing of the file size and decrease the performance. To stop this, change the configuration in Catalina.out as below:
1. Open the file
sudo vi /opt/tomcat/bin/catalina.sh
2. Press ESC then type: “:229” to the line 229
3. Comment out this line to stop writing log to catalina.out.
#CATALINA_OUT="$CATALINA_BASE"/logs/catalina.out
4. Add below line affer the commented line.
CATALINA_OUT=/dev/null
5. Save changes and close the file
Press ESC then type: “:wq”
DONE!!! You have successfully completed the akaBot Center installation and configuration in High Availability model.
Wish you a wonderful experience with akaBot Center in your automation journey!!
3. Troubleshoot issues
The installation may encounter various issues due to a variety of akaBot Center machine environments, account permission and regulative settings in each organization context. This section aims to guide you to self-troubleshoot some typical issues (continuously updated) and provide akaBot contact information for expert’s support.
3.1. Self-Troubleshoot
If any raised issue during your installation, please follow below actions to self-troubleshoot.
3.1.1 Step 1 - Detect issue
Please use the logs to detect the issue.
- Issues related to Tomcat service start, please use Tomcat log file: /opt/tomcat/logs/catalina.out
- Issues related to akaBot Center, please use Center log file: /opt/tomcat/logs/center/akaCenter.yyyy—mm-dd.0.log
1. Remove the log of previous run by navigating to log folder then remove all the log files.
2. Start service again to generate log.
3. Open the log file to detect the issue.
3.1.2 Step 2 – Troubleshoot issue
3.1.2.1. Issue 1: Could not commit with auto-commit
Issue: Could not commit with auto-commit as below image:
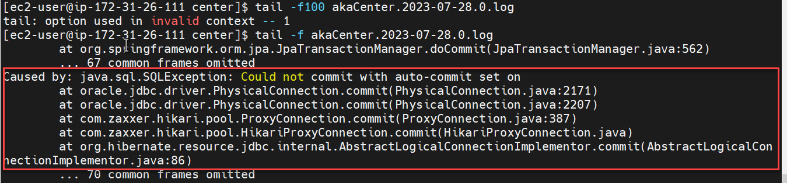
Solution:
1. At step 2.2.4 Step 4: Configure Tomcat service, please add below option into the JAVA-OPTS variable into service configuration file.
-Doracle.jdbc.autoCommitSpecCompliant=false
2. Continue to follow the next steps in the guide.
3.2. Contact akaBot team for Expert’s support
If your self-troubleshooting endeavor does not work, akaBot team is always here to support your installation success, please contact akaBot team to get our expert’s support through:
- contacting your project coordinator (if have)
- or sending an email to [email protected]
- or leaving a message on akaBot website.