Introduction
The akaBot Center is a server-based application that lets you control and manage your Agents. It runs on a server and connects to all the Agents within the network and executes your repetitive workflow based on different requirements. It has a browser-based interface that enables the management of hundreds of Agents with just a few clicks.
The akaBot Center lets you manage the creation, monitoring, and deployment of resources in your environment, acting in the same way as an integration point with third-party applications.
This document aims to guide you on how to use the functionalities in the AkaBot Center.
Using akaBot Center
1. Center Overview
a. The User Interface

| No | Panel | Description |
|---|---|---|
| 1 | Feature menu | Show all the main functionality of akaBot Center |
| 2 | Main screen | Display the details of each functionality |
| 3 | Organization Unit Selection Menu | Change the active Organization Unit |
| 4 | Language | Change the display language of Akabot Center. Support English, Korean, Japanese, Vietnamese and Taiwanese. |
| 5 | User Menu | Access the following options and pages: Settings: On this page, you can change the user details such as First Name, Last Name, Email and the display language. Password: On this page, you can change the password that used to log in to Center. * Sign out: Click here to sign out. |
| 6 | Version | Show the version of akaBot Center |
b. akaBot Center – Navigation
In the Feature menu, you can see all the functionality that akaBot provided.

| No | Tab | Description |
|---|---|---|
| 1 | Dashboard | Charts and statistics for akaBot Center components |
| 2 | Organization Unit | Organizational management and resource allocation |
| 3 | Agent Group | Grouping of Agent for deployment purposes |
| 4 | Agent | Software agent that automates rule-based processes in the same manner as humans do |
| 5 | Workflow | Represents the association between a package and an agent group. Each time a package is linked to an agent group, it is automatically distributed to all the Agent machines that belong to that Agent group. |
| 6 | Task | Execution instances of processes assigned to Agent |
| 7 | Schedule | Triggers for scheduled job execution |
| 8 | Packages Repository | Business process definition packages published by developers |
| 9 | Asset | Shared variables or configurations that can be invoked in the design processes by developers and used in your processes |
| 10 | Queue | Work queues are used to distribute work items to robot. Overview of queues and transactions statuses, and SLA predictions |
| 11 | Log | Execution reports generated by Agent while executing automation processes |
| 12 | Report | Activity statistics of Agents and Workflow |
| 13 | Administration | User Management Role Management: Authorization based on access rights mapping License: Activate, renew, remove, and allocate licenses and view historical licensing data. Webhook: allow external systems to subscribe and listen to Akabot Center |
c. Getting Started with akaBot Center
Before stating exploring all the main function of akaBot Center, please follow the instruction to install and Activate akaBot Center here.
During the usage of akaBot Center, there are many instances where you need to input data to perform certain actions, such as Create/Edit or Filter for specific data. Below are different type of input data and method along with what they mean:
| Type | |
|---|---|
| String | This field accept text value |
| Int32 | This field only accept integers number. Int32 range is from - 2,147,483,648 to 2,147,483,647 |
| Boolean | This field only accept 2 value: TRUE or FALSE |
| Date & Time | This field only accept value reflected Date and Time. It could be manually input or select from a calendar. |
| Input searching | This field allows user to search by inputting text value as well as select items from a list. |
| Drop down list | A list in which the selected item is always visible, and the others are visible on demand by clicking a drop-down button. |
| Single Choice | This section have different choices but only users only allows to select one. |
| Multiple Choice | This section have different choices but users allows to select more than one options. |
2. akaBot Operation Functions
a. Dashboard

akaBot's home page is a dashboard that enables you to see all the statistical charts of a single Organizational Unit containing useful information for all the following components:
- Number of Agent (Available, Busy, Disconnected, Nonresponse)
- Number of Task (Successful, Running, Stopped, Faulted)
- Schedule (Calculated by Hour, Day, Week and Month basis)
- Package (Active, Inactive)
- Task Statistics (Daily, Weekly, Monthly, Yearly view available)
- Upcoming Tasks
- Recent Tasks

You can filter the data based on the Agent Group and Agent Name
| No | Column/Label | Description | Type | Maximum | Input Requirement |
|---|---|---|---|---|---|
| 1 | Select Agent Group | Select the agent group of which you want to see statistics | Input searching | No limit (2,147,483,647 char) | |
| 2 | Select Agent | Select the agent of which you want to see statistics | Input searching | No limit |
You can also view the Task Statistics by selecting the corresponding tab: Daily, Weekly, Monthly, Yearly.

| No | Column /Label | Description | Type | Maximum | Is Mandatory ? | Input Requirement |
|---|---|---|---|---|---|---|
| Daily / Weekly / Monthly / Yearly | Select the type you want to see task statistics | Tab | Yes | |||
| Choose Day | Select the day you want to see task statistics | Date & Time | Yes | Only available if you chose daily | ||
| Choose Week | Select the week you want to see task statistics | Date & Time | Yes | Only available if you chose daily | ||
| Choose Month | Select the month you want to see task statistics | Date & Time | Yes | Only available if you chose daily | ||
| Choose Year | Select the year you want to see task statistics | Date & Time | Yes | Only available if you chose daily |
b. Organization Unit
Organization Units (OU) provide the separation of Orchestrator components into tenants for designated users. The user's perspective of akaBot Center is determined by the organization unit in which they are placed, as well as the role(s) appointed to them. The following categories of entities make up an organization unit:
- Agent group
- Agents
- Workflows
- Tasks
- Schedules
- Packages Repository
- Assets
- Queue
- Logs
- Report
! Statistics are produced for each organizational unit and shown on the Dashboard.
Notes:
A user with no assigned Organization Unit does not have access to any type of resources.
The same agent cannot be provisioned on two different Organization Units. Resources cannot be moved from one organization unit to another.
A drop-down list displays all of the units assigned to a user located at the header of the page, available at all times. User can also use this to switch between OU.

To access the OU page, click on the OU tab in the left menu. All previously created OU shall be in display there as below:

As an Admin, you may view the details of specific OU, create, update, or remove or filter the OU, as well as manage the users that are allocated to them.
- View an OU
In order to view all the details of an OU, you can click on the name of the OU in the listing.

Once clicking, you will be redirected to the Details page.

| No | Column/Label | Description |
|---|---|---|
| Name | The name of the OU | |
| *Description | The description of the OU | |
| User | The list of all the Users assigned in this OU. This list included: Username * Assigned roles |
- Filter OU
The filter option allows you to look for your OU a lot quicker. Click on the Filter option, available next to the Create new button.

Filter pop-up appeared. You can filter the OU by Name or Description

| No | Column /Label | Description | Type | Maximum | Input Requirement |
|---|---|---|---|---|---|
| 1 | Name | Enter the name of the OU you want to search | String | 255 char | |
| 2 | Description | Enter the description of the OU you want to search | String | 1000 char |
- Create/edit an OU
To create a new organization unit, you click "Create New” button.

If you want to edit an OU, select the edit option from Action next to the corresponding OU Name.

After clicking, the system shows a pop-up form for you to fill the information:

| No | Column /Label | Description | Type | Maximum | Is Mandatory ? | Input Requirement |
|---|---|---|---|---|---|---|
| 1 | Name | Enter the custom name of the OU you want to create/edit | String | 255 char | Yes | |
| 2 | Description | Enter the description of the OU you want to create/edit | String | 1000 char | No | |
| 3 | User | Select user you want to add into the OU that you are creating/editing | Input searching | No limit | Yes | You can add many users, but you can only add one by one |
If you want to unassign a user from an organization unit, open the Edit windows and hit the bin icon in the action field. Once all the information is filled/edited, hit Save. Your OU is created
- Remove an OU
Important! Delete an Organization Unit will delete all resources within the unit. To remove an OU, click the corresponding Delete button next to the Organization Unit name on the Organization Unit page.

A confirmation pop-up will appear. Select Delete to finish the operation.

c. Agent Group
An Agent Group is a grouping of agents that is used to deploy processes. The Agent Group page displays all previously created groups and enables you to manage Agents within them. The Agent Group page allows you to search and filter agent groups by name and description.
You can go to Agent Group page by clicking the Agent Group tab on the left of the interface. You will see a list of Agent groups created within the particular OU.

| No | Column/Label | Description |
|---|---|---|
| 1 | Action | Available actions to manage the Agent Group. Included: Edit : allows you to edit the details of each Agent Group Delete: allows you to delete selected Agent Group By selecting the Checkbox corresponding to each Agent, the delete option will appear beside the Filter option and allow you to delete the Agent from Center ! Selecting the Checkbox next to Action will select all Agent Group in display and allow you to bulk delete selected them |
| 2 | Name | The name of the Agent Group. You can click the name of the Agent Group the view its details |
| 3 | Description | The description of the Agent Group |
| 4 | Created by | You can see the username that created the Agent Group |
To view the details of the Agent Group, click on the name

You will be greeted with the Details of the Agent Group:

| No | Column/Label | Description |
|---|---|---|
| 1 | Name | The name of the Agent Group. You can click the name of the Agent Group the view its details |
| 2 | Description | The description of the Agent Group |
| 3 | Created by | You can see the username that created the Agent Group |
| 4 | Agent | This section will list all Agents that are assigned to this Agent Group. Here, you can view details of each agent, including its version, status, machine name, machine username, type, description and the user who created it. |
- Create/Edit an Agent Group
To create a new agent group, you should click “Create New” button on the top right corner of the screen.

When you want to edit the Agent Group information, click the Edit button in the Action column.

When you click on Create New/Edit button, the system will show a form for you to fill in. Details are in the table below.
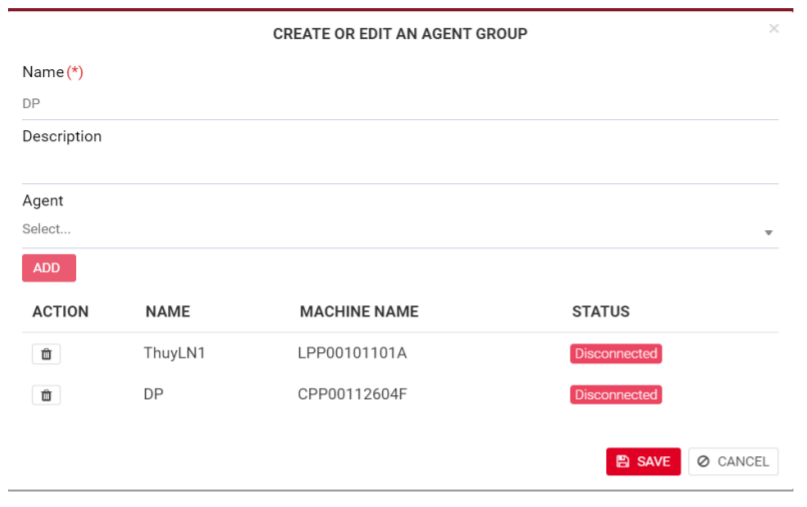
| No | Column /Label | Description | Type | Maximum | Is Mandatory? | Input Requirement |
|---|---|---|---|---|---|---|
| 1 | Name | Enter the name of the agent group you want to create/edit | String | 100 char | Yes | |
| 2 | Description | Enter the description of the agent group you want to create/edit | String | 255 char | No | |
| 3 | Agent | Select the agent you want to add to the agent group that you are creating/editing. You can click the bin icon next to the Agent to remove it if needed. | Input searching | No limit | Yes | You can add many agents into agent group, but you can only add one by one |
Once all information is filled, hit Save.
- Filter Agent group
When you click on Filter button, the system will show a form for you to fill in. Details are in the table below.

| No | Column /Label | Description | Type | Maximum | Input Requirement |
|---|---|---|---|---|---|
| 1 | Name | Enter the name of the agent group that you want to search | String | 100 char | |
| 2 | Description | Enter the description of the agent group that you want to search | String | 255 char |
Hit OK and the filtered result will be displayed.
- Remove Agent Group
To delete an agent group, you should click the Delete button of the agent group you want to remove from the Agent Group list.

Alternatively, you can hit the checkbox before each Agent and the Delete option will appear next to the Filter option at the top. Click the Checkbox next to Action will allow you to select all Agents for deletion.

After clicking, if the agent group has no Agent attached to, the system will allow you to delete and need your confirmation before deleting.

Otherwise, an error message will be shown up to let you know it’s forbidden to delete the selected agent group.
d. Agent
An Agent is an execution host that runs processes that are built in akaBot Studio.
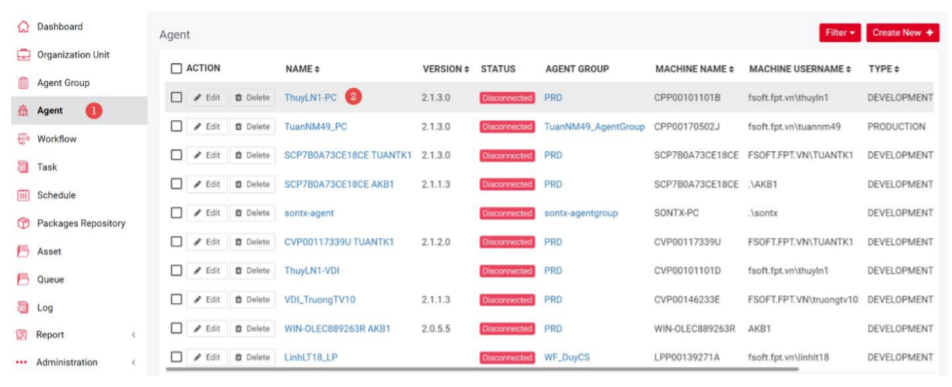
The Agents page allows you to add Agents, edit them, and examine their status as well as the change runtime settings and the Agent Group to which they are assigned.

| No | Column/Label | Description |
|---|---|---|
| 1 | Action | Available actions to manage the Agent. Includes: Edit: allows you to edit the details of each Agent Delete: allows you to remove selected Agent from the Center By selecting the Checkbox on each Agent, the delete option will appear beside the Filter option and allow you to delete the Agent from the Center ! Selecting the Checkbox next to Action will select all Agents in display and allow you to bulk delete selected them. |
| 2 | Name | The name of the Agent. You can click the name of the Agent the view its details. |
| Version | The installed version of the akaBot Agent tool in the local machine | |
| Status | The current status of the Agent. AVAILABLE - the Agent is connected to the Center, not running any process and is free to be used BUSY - the Agent is running a process. DISCONNECTED- the Agent and Center have not communicated in the last 10 seconds. | |
| Agent Group | The Agent Group to which the Agent belongs. | |
| Machine name | The name of the machine the Agent is registered on. | |
| Machine Username | The username used to log in to the Agent machine | |
| Type | The type of Agent. This can be only Development, Assistant, Staging, or Production. It is possible to filter the page according to the Agent type. | |
| Description | Description of the Agent | |
| Created by | The user who created the Agent |
- View an Agent
You can view the details of the Agent by clicking the name of the Agent. Details can be viewed below:

| No | Column/Label | Description |
|---|---|---|
| 1 | Agent Group | The Agent Group to which the Agent belongs. |
| 2 | Name | The name of the Agent. You can click the name of the Agent the view its details. |
| 3 | Machine name | The name of the machine the Agent is registered on. |
| 4 | Machine Username | The username used to log in to the Agent machine |
| 5 | Type | The type of Agent. This can be only Development, Assistant, Staging, Production. It is possible to filter the page according to the Agent type. |
| 6 | Status | The current status of the Agent. AVAILABLE - the Agent is connected to Center, not running any process and is free to be used BUSY - the Agent is running a process. DISCONNECTED - the Agent and Center have not communicated in the last 10 seconds. |
| 7 | Description | Description of the Agent |
| 8 | Version | The installed version of the akaBot Agent tool in the local machine |
| 9 | Created by | The user which created the Agent. |
Besides details regarding the Agent, all the tasks, logs, and connection verification status of the Agent can also be found here.
- View an Agent’s tasks
At the bottom of the Details page, you can see a list of all the tasks that are executed by this specific Agent

Details regarding Tasks shall be explained in the Task sections.
Here, you can filter the Task list by Start Time, Package Name, State, and Source of the tasks. Once you filled in the criteria, hit OK to view your result. Hit Clear to start over or Cancel to terminate the action.

- View an Agent’s log
To view the Agent’s logs from the Agent Details page, click the Log tab next to the Task tab to switch the view.
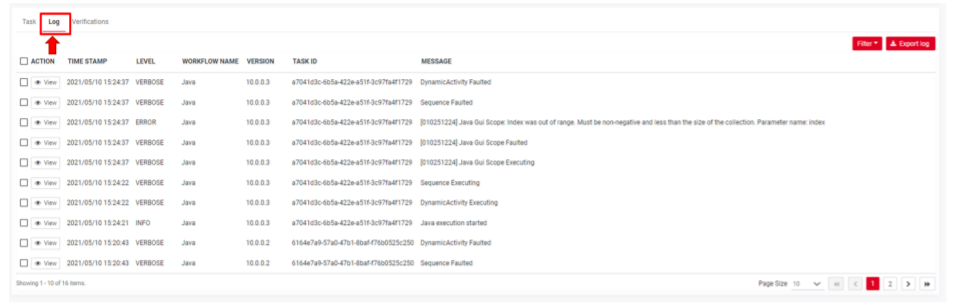
You can also filter the log item by the Date of Executed, the Task ID, the Workflow Name, the Log Level, or filter string. Once you filled in the criteria, hit OK to view your result. Hit Clear to start over or Cancel to terminate the action.

You can also Export Log for further investigation by clicking the Export Log option next to the Filter button. You can export all Logs or specific filtered Log Items.

- Verify the Agent Connection
To make sure the Center and Agent are correctly connected with a valid username and password, you can click on the Verify button next to the Edit button.
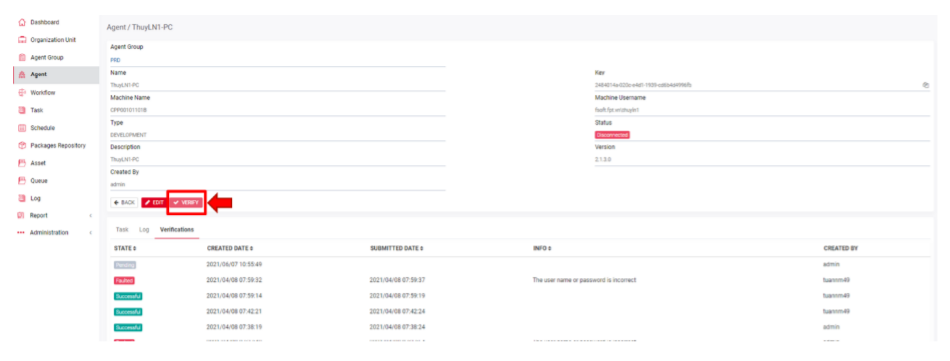
If the user clicks this button when the Agent is connected, an ID/Password authentication check will be performed to determine if the ID/Password is correct and can be logged in.
There are three possible verification task states:
- PENDING: the verification task was created and waiting for verification from the agent
- SUCCESSFUL: the agent was verified and the username password was correct
- FAULTED: the agent was verified and the username password was incorrect
Verification tasks and verify button will be updated in real-time. When there is a pending verification task on the verification tab, verify button will be disabled.
When the user clicks on verify button, the verification tab will be opened automatically and there is also a "Verifying..." notification shown in the top right corner.
To view all the Verification requests created, go to the Agent tab > Select the Agent.
On the Agent Detail page > Select Verification tab.

- Create/Update an Agent
The first step of connecting an Agent to the Center is to create an Agent in the Center.

To edit an Agent, you should click the Edit button of one Agent in the list. Alternatively, you can click the Edit button on the Detail Page of the Agent.

After clicking, the system shows a popup allowing you to fill properties to create/edit a new Agent. You need to fill in all the necessary info in the form below.

Agent tab
| No | Column /Label | Description | Type | Maximum | Is Mandatory? | Input Requirement |
|---|---|---|---|---|---|---|
| 1 | Key | This is the identification of one agent. You will input this key into the Agent Key field in your local Agent. | String | 50 char | Yes | This field is auto-generated by the system |
| 2 | Name | Enter the name of the agent you want to create/edit | String | 50 char | Yes | |
| 3 | Machine Name | Enter the name of the computer on which the Agent is deployed | String | 50 char | Yes | |
| 4 | Machine Username | Enter the username used to log in to the computer which is mentioned above | String | 50 char | No | |
| 5 | Machine Password | Enter the password used to log in to the computer which is mentioned above | String | 255 char | No | |
| 6 | Type | Select the type of the agent you want to create/edit. There are 4 different types you can choose: DEVELOPMENT, ASSISTANT, STAGING and PRODUCTION. | Dropdown list, SingleChoice | Yes | ||
| 7 | Description | Enter the description of the agent you want to create/edit | String | 500 char | No |
Agent Settings Tab
| No | Column /Label | Description | Type | Maximum | Is Mandatory? | Input Requirement |
|---|---|---|---|---|---|---|
| 1 | Console / RDP | akaBot executes workflow in an interactive Windows session. There are two types of Windows sessions the Robot can start: Console Session RDP Session | SingleChoice | Yes | ||
| 2 | Login To Console | This option allows the Agent connects to a Console session Only available if you chose RDP | Checkbox | No | ||
| 3 | Font Smoothing | This option enhances text recognition. Only available if you chose RDP | Checkbox | No limit | Optional | |
| 4 | Resolution Width / Height / Depth | This option allows users to set a custom resolution if the automation process is required. Only available if you chose rdp | Int32 (Number) | Optional | Greater than 0 | |
| 5 | Others | Other specific parameter for this Agent | String | No limit | Optional |
After filling the form, you click the Save button to record the Agent to the system.
Follow the instruction to connect the Agent to the Center using the Agent Key to complete the connection.
- Filter for Agent
To filter for the Agents you need, click on the Filter option on the top of the page:

When you click on Filter button, the system will show a form for you to fill in. Details in the table below.

| No | Column /Label | Description | Type | Maximum | Input Requirement |
|---|---|---|---|---|---|
| 1 | Name | Enter the name of the agent that you want to search | String | No limit | |
| 2 | Machine Name | Enter the name of the machine on which the agent that you want to search is deployed | String | No limit | |
| 3 | Agent Group | Enter the name of the agent group that the agent you want to search belongs to | String | ||
| Status | Select the status of the agent you want to search. Status included: AVAILABLE BUSY DISCONNECTED UNRESPONSIVE | SingleChoice | |||
| Type | Select the type of the agent you want to search | Dropdown list, SingleChoice | |||
| Description | Enter the description of the agent you want to search |
Once all the criteria are filled, hit the OK button to view your results.
- Delete an Agent
To delete, you need to click the Delete button of one Agent in the Agent list.

Alternatively, you can select the checkbox before each Agent and the Delete button will show up next to the Filter button. Tick the Checkbox next to Action will allow users to select all displayed Agent for bulk delete.
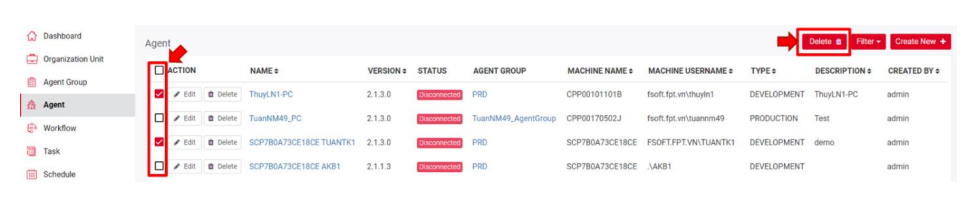
After clicking, if the Agent is not in use, the system will allow you to delete and need your confirmation before deleting. If you want to delete Agent information in Agent Group, Tasks, Schedule, Queue, and Logs, select Delete related items? option

e. Workflow
A Workflow represents the association between a Package and an Agent Group. Each time a package is linked to an Agent Group, it is automatically distributed to all the Agent machines that belong to that Agent Group.
The Workflows page enables you to deploy an uploaded package to Agent Groups, manage previously created associations and keep all your workflows up to date. This helps you distribute packages on the Agent machines and execute works faster from the Tasks page. To access the Workflows page, you click the Workflow tab at the left menu. After clicking, the system shows the Workflow page listing all existed Workflow as below:

| No | Column/Label | Description |
|---|---|---|
| 1 | Action | Available actions to manage the Log of said Workflow. Includes: * VIEW: allows you to be redirected to the Task Detail page. * EDIT: allows you to edit the details of each Workflow * DELETE: allows you to remove selected Workflow from Center By selecting the Checkbox corresponding to each Workflow, the delete option will appear beside the Filter option and allow you to delete the Workflow ! Selecting the Checkbox next to Action will select all Workflow in display and allow you to bulk delete selected them |
| 2 | Workflow Name | The name of the Workflow. For organization purposes, it is best to create Workflow Name with the format: Package Name_Agent Group Name. |
| 3 | Package Name | The name of the Package that was published to akaBot Center |
| 4 | Package Version | The version of the package that was published to akaBot Center. The package version will be decided when you choose the publish option in akaBot Studio. |
| 5 | Agent Group | Agent Group which the workflows will be deployed in |
| 6 | Description | The current version of Package’s published description |
| 7 | Created by | The user who creates this Workflow. |
- View a Workflow
To view a workflow, you can click on the Workflow Name of the selected workflow in the workflow list.

The system shows the details of workflow as below:
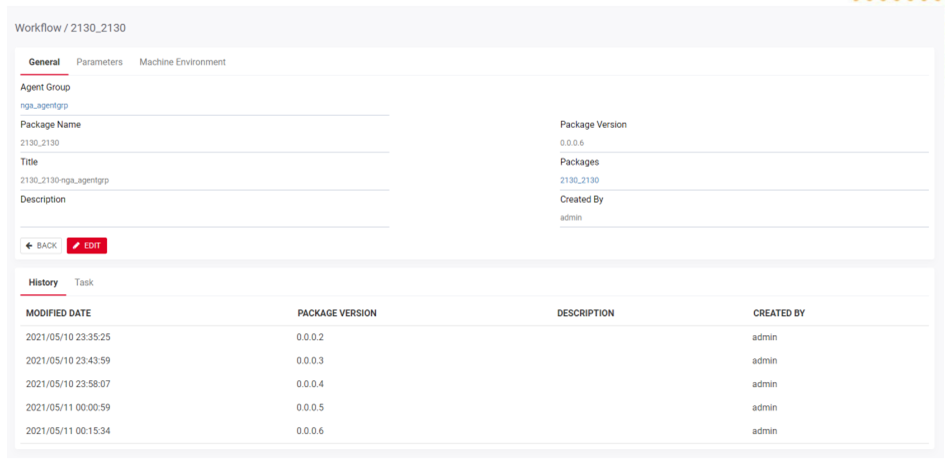
Besides all the general information displayed on the Workflow Listing page, the Workflow Details page also included Parameters and Machine Environment information generated when creating/editing the Workflow.
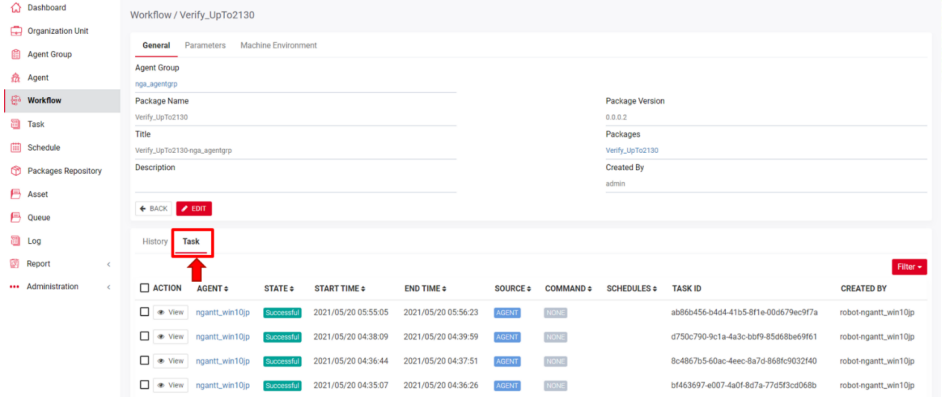
Furthermore, you can see the update history as well as a list of Tasks executed by said Workflow. Details regarding Tasks shall be explained in the Tasks section.
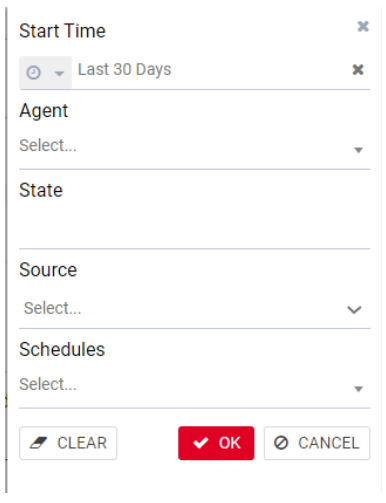
Here, you can filter the Task list by Start Time, Agent, State, Source, and Schedule of the tasks. Once you filled in the criteria, hit OK to view your result. Hit Clear to start over or Cancel to terminate the action.
Users can also delete executed instances of this Workflow by selecting the Checkbox at the beginning of each Task. The Delete button will show up next to the Filter button.

Tick the Checkbox next to Action will allow the user to select all displayed Agent for bulk delete.
- Filter Workflow
When you click on the Filter button, the system will show a form for you to fill in. Details are in the table below.

| No | Column /Label | Description | Type | Maximum | Input Requirement |
|---|---|---|---|---|---|
| 1 | Workflow Name | Enter the name of the workflow you want to search | String | No limit | |
| 2 | Agent Group | Select the agent group that the workflow you want to search is attached to | Input searching | No limit | |
| 3 | Description | Enter the description of the workflow you want to search | String | No limit |
Once all the criteria are filled, hit OK button to view your results.
- Create/Edit a workflow
To create a workflow, you click the “Create New” button at the top of the page.

To edit a workflow, you click the Edit button of the selected workflow in the workflow list.

Alternatively, users can click the Workflow Name to go to Details Page and select the Edit button there.

After clicking, the system shows a form allowing you to create or edit the info of the workflow.

| No | Column /Label | Description | Type | Maximum | Is Mandatory? | Input Requirement |
|---|---|---|---|---|---|---|
| 1 | Package Name | Select the package you want for the workflow you are creating | Input searching | No limit | Yes | |
| 2 | Package Version | Depends on the package that you chose above Select the version of the package you chose | Dropdown list | Yes | ||
| 3 | Agent Group | Depends on the package version that you chose Select the agent group that you want to attach the workflow that you are creating to | Input searching | No limit | Yes | |
| 4 | Description | Enter the description of the workflow you are creating/editing | String | 255 char | No |
Once filled in all the General information, you can add further Parameters and Machine Environment variables to the Workflow. You can add multiple variables, but you can only add one by one.

| No | Column /Label | Description | Type | Maximum | Is Mandatory ? | Input Requirement |
|---|---|---|---|---|---|---|
| Parameter Name | Enter the name of the parameter | String | 255 char | Yes | ||
| Type | Select the type of the parameter | Drop down list | Yes | |||
| Value | Depends on the type that you chose Enter/select the value of the parameter | |||||
| If you chose string | String | 500 char | Yes | |||
| If you chose bool | Boolean, SingleChoice | Yes | ||||
| If you chose integer | Int32 | 500 char | Yes |

| No | Column /Label | Description | Type | Maximum | Is Mandatory? | Input Requirement |
|---|---|---|---|---|---|---|
| 1 | Variable Name | Enter the name of the variable | String | 255 char | Yes | |
| 2 | Type | Select the type of the variable | Dropdown list | Yes | ||
| 3 | Value | Depends on type that you chose Enter/select the value of the variable | Yes | |||
| If you chose string | String | 500 char | Yes | |||
| If you chose bool | Boolean, SingleChoice | Yes | ||||
| If you chose integer | Int32 | 500 char | Yes |
For added variables, you can edit by selecting the pen icon in the Action column or delete them by selecting the bin icon
- Delete a workflow
To delete, you need to click the Delete button of one workflow on the Workflow listing page.

Alternatively, you can select the checkbox before each Workflow and the Delete button will show up next to the Filter button. Tick the Checkbox next to Action will allow the user to select all displayed Agent for bulk delete.

After clicking, a system will show a confirmation message for you to confirm.

f. Tasks
A task is an execution instance of a process on one or multiple Agents. After creating a workflow (deploying a package to an agent group), the next step is to execute it with the assigned Agents. This can be done manually from the Tasks page or in a preplanned manner, from the Schedules page.
The Tasks page displays by default all the tasks that are running, and the ones placed in a pending state, regardless of whether they were started manually or through a schedule. On this page, you can also manually Create or Edit a task, Start or Stop a task, and display the logs generated by it with just a click of the button. More details can be shown in the Task Details window, to help you with troubleshooting faulted tasks. To access the Task page, you click the Task tab in the left menu. After clicking, the system shows the Task page listing all existed tasks as below:

| No | Column | Description |
|---|---|---|
| 1 | Actions/View | Depending on the status of the task, the system will allow you to perform some actions to manage the tasks: VIEW: to view the properties of a task and task log. STOP: Stop a running task. DELETE: Remove the task CLONE: Create an identical task from the existing task By selecting the Checkbox corresponding to each Task, the delete option will appear beside the Filter option and allow you to delete the Task from the Center. ! Selecting the Checkbox next to Action will select all Tasks in display and allow you to bulk delete selected them |
| 2 | Workflow | The name of the workflow which will be used to run the task |
| 3 | Version | The version of the Package that was published to akaBot Center. |
| 4 | Agent | The Agent who the task will be executed. |
| 5 | Agent Group | Grouping of Agent for deployment purposes where the Agent is located. |
| 6 | State | Current status of the tasks. Available statuses are: FAULTED: the tasks have encountered an error and have been stopped abruptly. RUNNING: the task is running. You can stop or kill the task. PENDING: the task has not been run. You can start to run it. STOPPED: the task has been stopped. * SUCCESSFUL: the task has been completed successfully. You can see the log to see the result. Terminating: the task has been aborted and terminated. |
| 7 | Start Time | If a task has been started, the system will show up the start time for you to see. |
| 8 | End Time | If a task has been started and ended, the system will show up the end time for you to see. |
| 9 | Source | To indicate the source of the tasks. Manual - the task has been created and configured from the Tasks/Schedule pages, using the Create New/Clone button. Agent - the task has been started in attended mode from the akaBot Agent. Schedule –The task was initiated as a result of a trigger, which is utilized for preplanned task execution. |
| 10 | Command | There are 4 commands user can send: PENDING: When the task is scheduled to run but not yet run. START: when the task is being initiated. STOP: When the task is being stopped. NONE: When the tasks have finished running |
| 11 | Schedule | The name of the Schedule which the task is being scheduled from. If the task is created manually, the Schedule field is empty. |
| 12 | Task ID | Unique ID of the execution instance of the mentioned workflow. |
- View a task
There are a few ways to view the details of the task:
From the Task page: This allows you to view all the created tasks. Click the View button on the left, next to the Task name.

From the Workflow Details page: This allows you to view all the created tasks of a specific Workflow. Click the Workflow tab > Select the Workflow > Select the Task tab and select the task item.
From the Agent Details page: This allows you to view all the created tasks of a specific Agent. Click the Agent tab > Select the Agent > Select the Task tab at the bottom and select the task item.

From the Schedule Detail page: This allows you to view all the created tasks of a specific Schedule. Click the Schedule tab > Select the Schedule > Select the Task tab at the bottom and select the task item.
Once clicking, you will be redirected to the Detail page. Details can be viewed below:

Besides the General information which can also be found on the Listing page, the Task Details page also included special Parameters and Log Details of each task.

| No | Column | Description |
|---|---|---|
| 1 | Action | Available actions to manage the Log of said Task. Included: View: allows you to be redirected to the Log Detail page. Delete: by selecting the Checkbox on each Log Item, the delete option will appear beside the Filter option and allow you to delete the Log Item. ! Selecting the Checkbox next to Action will select all Logs in display and allow you to bulk delete selected log items. |
| Timestamp | The exact time the action was executed at | |
| Level | The severity level at which the message was logged. The following options are available: OFF, FATAL, ERROR WARNING, INFORMATION, DEBUG AND VERBOSE. | |
| Message | The logged message. This can also be a message logged through the Log Message activity in Studio. |
Furthermore, users can also filter the logs of this task using the Log Level and Message of the log.

- Filter a task
akaBot Center allows you to filter the task list by Date, Agent Group, Package Name, Agent Name, Source, State, and the Schedule of Tasks. Click the “Filter” button on the top right corner of the screen, and the filter wizard will dropdown.

| No | Column /Label | Description | Type | Maximum | Input Requirement |
|---|---|---|---|---|---|
| 1 | Start Time | Select the start time of the task you want to search | Date & Time | ||
| 2 | Agent Group | Select the agent group that is attached to the workflow of the task you want to search | Input searching | No limit | |
| 3 | Package Name | Select the package that is attached to the workflow of the task you want to search | Input searching | No limit | |
| 4 | Agent | Select the agent which is assigned to run the task you want to search | Input searching | No limit | |
| 5 | State | Select the state of the task you want to search | Input searching | No limit | |
| 6 | Source | Select the source of the task you want to search If the task you want to search is created manually, choose manual If the task you want to search is scheduled, choose scheduled | Input searching | No limit | |
| 7 | Schedules | Select the schedules of the task you want to search | Input searching | No limit |
Then, select the criteria to filter your tasks list and hit OK.
- Create/Edit a task
There are three ways tasks can be created:
- When you create a Schedule on the Schedule page or executed an Agent locally, tasks will be created automatically.
- You can also manually create a task on the Tasks page.
- Clone an existing task.
To manually create a task:
Click Create New button on the top right of the page. The System will display the form for you to create the task.


| No | Column/Label | Column/Label | Type | Maximum | Is Mandatory? | Input Requirement |
|---|---|---|---|---|---|---|
| Workflow | Select the workflow for the task you want to create | Input searching | No limit | Yes | ||
| Search | Enter the name of the agent you want to search | String | No limit | No | ||
| Agent | Depends on the workflow that you chose, select agents you want to run the task you are creating. | CheckBox, MultipleChoice | No limit | Yes | ||
| Parameters | Other parameters | No |
Alternatively, you can click the Action button and select Clone option to create an identical task. This feature allows you to rapidly perform a task from the tasks list without having to go through the whole configuration process.
This process assumes you previously initiated a task that has already attained a final state. First, select Clone after clicking the corresponding Action button at the beginning of each task.

Once you click the option, the CLONE A TASK window appears, with the task's default parameters.

Feel free to make the necessary modifications and then Save your work by clicking the Save button. The CLONE A TASK window closes, and the execution begins.
- Stop a task
To stop a running task, click on the Action button on the left of each task, then select Stop. The automation process is forcefully stopped immediately; the task is marked as Stopped.
- Delete a task
To delete a task, you click the Delete button of one task in the list.
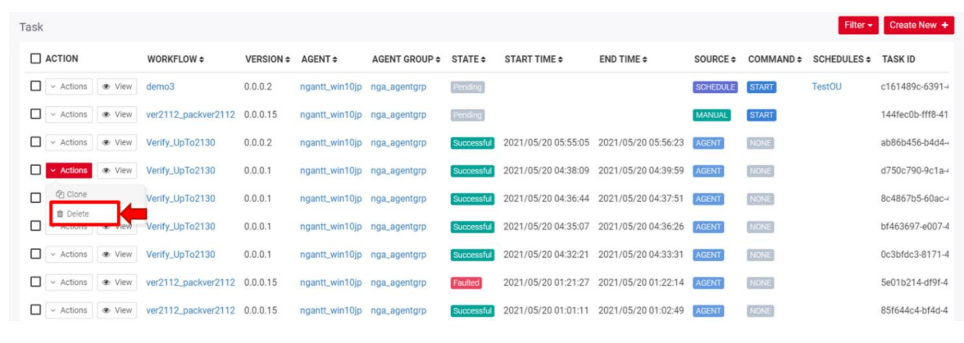
Alternatively, you can select the checkbox before each Task and the Delete button will show up next to the Filter button. Tick the Checkbox next to Action will allow users to select all displayed Tasks for bulk delete.
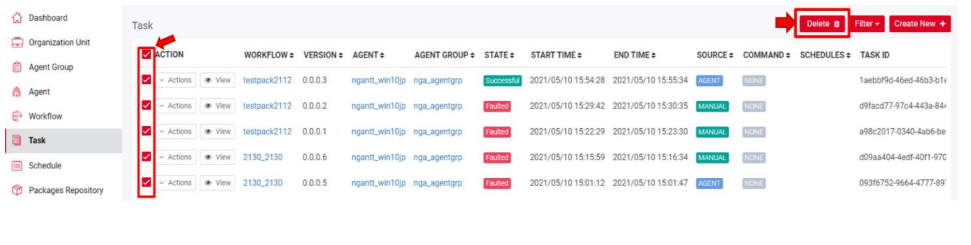
The System will show a message to get your confirmation. Hit Confirm to remove the task.

g. Schedule
Scheduling allows us to perform tasks in a preplanned way. You can execute tasks by commanding Agents to perform different schedules and times according to your needs. The Schedule page enables us to create new schedules. It also displays all previously created schedules, which can be further edited, enabled, or disabled. To access the Schedule page, click the Schedule tab in the left menu. After clicking, the system opens the Schedule Listing page that included all schedules we have created previously.

| No | Column | Description |
|---|---|---|
| 1 | Action | Options off all actions that can be performed on the schedule. This includes: Start now: Start the Robot immediately Disabled: Disable the current schedule * Delete: Delete the schedule. By selecting the Checkbox corresponding to each Schedule, the delete option will appear beside the Filter option and allow you to delete the Schedule. ! Selecting the Checkbox next to Action will select all Schedule in display and allow you to bulk delete them. |
| Name | The name of the schedule. | |
| Agent Group | Grouping of Agent for deployment purposes. | |
| Workflow | The workflow that is going to be scheduled to execute. | |
| Version | The version of the Package Repository that is published to akaBot Center shall be executed by the Schedule. For more details, visit the Package Repository section. | |
| Status | Status of the schedule. There are 3 common statuses: SCHEDULED – When the schedule is set up but not yet executed. DISABLED – When the schedule is being disabled * COMPLETED – When the schedule has been executed successfully | |
| Start time | The first time the schedule is executed. | |
| End time | The final run time of the schedule. | |
| Next run time | The next run time of the schedule. | |
| Last run time | The last run time of the schedule. | |
| Trigger Details | The details of the recurrent time which the schedule will execute. | |
| Created by | The user who created the schedule. |
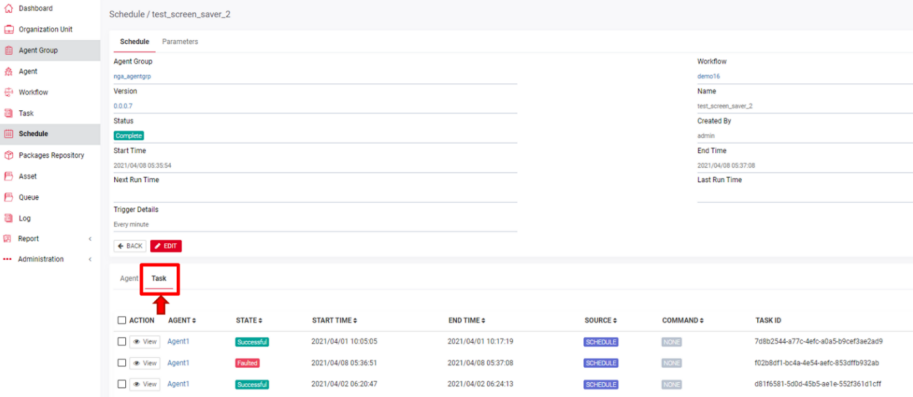
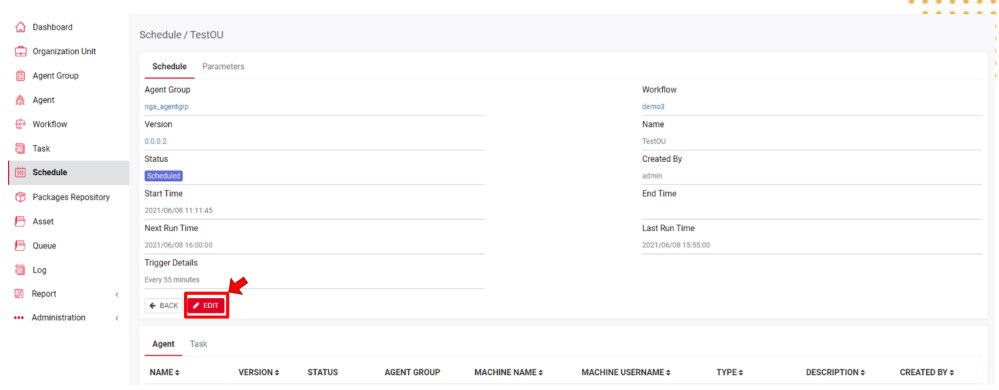
- View a schedule

Besides the General information above, the Details page also shows the Parameters of said Schedule. From here, you can also see a list of Agents and Tasks associated with this Schedule. Details about Agents and Tasks shall be explained in their respective sections.
- Filter Schedule
To filter for the Schedule you need, click on the Filter option at the top of the page:
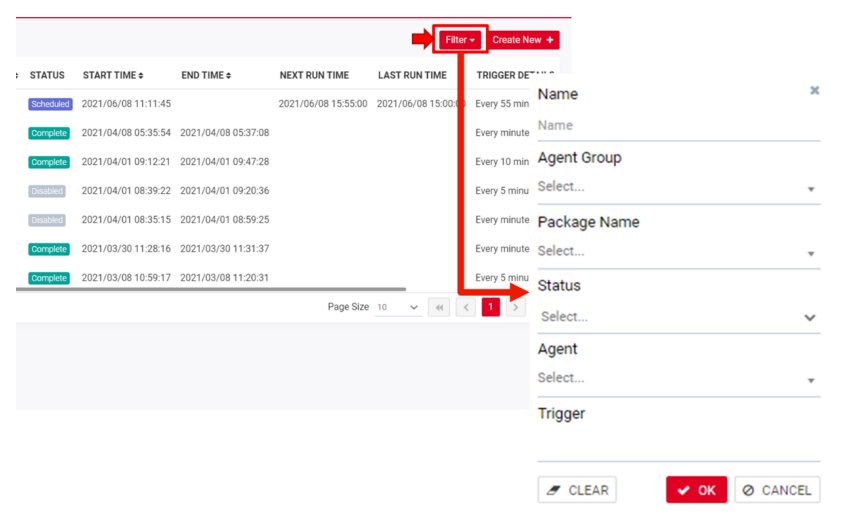
| No | Column /Label | Description | Type | Maximum | Input Requirement |
|---|---|---|---|---|---|
| 1 | Name | Enter the name of the schedule you want to search | String | No limit | |
| 2 | Agent Group | Select the agent group that is attached to the schedule you want to search | Input searching | No limit | |
| 3 | Package Name | Select the package that is attached to the schedule you want to search | Input searching | No limit | |
| 4 | Status | Select the status of the schedule you want to search | Dropdown list, SingleChoice | ||
| 5 | Agent | Select the agent that is assigned to run the schedule you want to search | Input searching | No limit | |
| 6 | Trigger | Select the trigger of the schedule you want to search | Dropdown list, Multiple choice |
Once you filled in the criteria, hit OK to view your result. Hit Clear to start over or Cancel to terminate the action.
- Create/Edit a Schedule
To create a schedule, you click Create New button. The system will display the form for you to create a schedule.

When you want to edit the Schedule information, click the Edit button in the Action column.

Alternatively, you can access the Details page of said schedule and select the Edit button.
| No | Column /Label | Description | Type | Maximum | Is Mandatory? | Input Requirement |
|---|---|---|---|---|---|---|
| 1 | Name | Enter the name of the schedule you want to create/edit | String | 50 char | Yes | |
| 2 | Workflow | Select the workflow you want for the schedule you are creating/editing | String | No limit | No | |
| 3 | Time Zone | Select the time zone for the schedule. | Dropdown list | No | ||
| Trigger | ||||||
| 6 | Start Time | Select the time at which the schedule will start | Date & Time | Yes | ||
| 7 | End Time | Select the time at which the schedule will end | Date & Time | No | ||
| 8 | Minutes Hourly Daily Weekly Monthly Advance | Select the cycle for the schedule | SingleChoice | Yes | ||
| If you chose Minutes | ||||||
| 8 | Every | Select the exact cycle for the schedule by minutes | SingleChoice | No | ||
| If you chose Hourly | ||||||
| 9 | Times | Select the exact cycle for the schedule by hours and minutes. | Int32 | 23 hours, 59 minutes | No | Greater than 0 |
| If you chose Daily | ||||||
| 10 | Times | Select the exact cycle for the schedule by hours and minutes. | Int32 | 23 hours, 59 minutes | No | Greater than 0 |
| If you chose Weekly | ||||||
| 11 | Times | Select the exact cycle for the schedule by hours, minutes and days. | Int32 | 23 hours, 59 minutes | No | Greater than 0 |
| Monday Tuesday Wednesday Thursday Friday Saturday Sunday | Select the exact cycle for the schedule by hours, minutes and days. | SingleChoice | No | |||
| If you chose Monthly | ||||||
| 12 | Times | Select the exact cycle for the schedule by hours, minutes and days. | Int32 | 23 hours, 59 minutes | Optional | Greater than 0 |
| 13 | Every | Select the exact cycle for the schedule by hours, minutes and days | Int32 | 12 | Optional | Greater than 0 |
| 14 | Monday Tuesday Wednesday Thursday Friday Saturday Sunday | Select the exact cycle for the schedule by hours, minutes and days | SingleChoice | No | ||
| If you chose Advance | ||||||
| 15 | Cron Expression | A string comprised of 6 or 7 fields separated by white space allows users to create a CronTrigger to trigger a schedule that recurs based on calendar. | String | No limit | No | Valid syntax of cron expression |
| Execution Target | ||||||
| 17 | Search | Allow you to search for a specific Agent to assign the Schedule to. | String | No limit | No | |
| 18 | Execution Target | Depends on the workflow that you chose, all the Robots that are related to the selected process are displayed by default. If you search for a specific Agent, the result will be displayed. | MultipleChoice | No | ||
| 19 | Parameters | No |
After filling the form, click the Save button to save it, and the schedule is created. You can also cancel the creation of the schedule by clicking the Cancel button.
- Start/Stop a Schedule
To Force Start/ Stop a Schedule, the user can click the Action button and select the Start Now button or Stop button if the Schedule is running.

Once selected, the Schedule will be run immediately and the Status will change to Running.
- Disable/Enable a Schedule
To disable a schedule, click corresponding Action button and then select Disable.

After clicking, the system will ask for your confirmation to switch status:
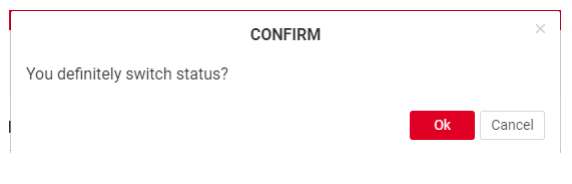
When the schedule is disabled, the status of said schedule changes to Disable.
Similarly, to enable a schedule, click the corresponding Action button and then select Enable.

- Delete a Schedule
To delete, you need to click The Action button of the corresponding Schedule and select the Delete button.

Alternatively, you can hit the checkbox before each Schedule and the Delete option will appear next to the
Filter option at the top. Click the Checkbox next to Action will allow you to select all displayed Schedule
for delete.

After clicking, the system will allow you to delete and need your confirmation before deleting.

Hit Delete to complete the operation.
h. Package Repository
Packages Repository page displays all the projects published from akaBot Studio, as well as the ones that were manually uploaded. A project becomes a package when it is published to akaBot Center.
To access the Packages page, you click the Packages Repository tab in the left menu. After clicking, the system opens the Package Listing page that includes all Packages we have published to the Center.

| No | Column | Description |
|---|---|---|
| Name | The name of the package that published to akaBot Center | |
| Version | The latest version of the package that published to akaBot Center. Package version will be decided when you choose the publish option in akaBot Studio. | |
| Tool version | The version of the installed Studio from which the Package published | |
| Created Date | The date when the project is published | |
| Status | The status of the newest version of the mentioned project. A package version can have the following statuses: ACTIVE - it is currently deployed to a process; INACTIVE - it is not currently deployed to a process (only these can be deleted). | |
| Description | The description that you created for your project. | |
| Release Note | The note was added in the Studio for the respective Package version. | |
| Created by | The User/Agent who created the Package on Center |
- View a Package
To view the detail of a Package, the user can click on the Package Name. On the detail page, you will see a list containing all versions of the selected package which were uploaded/published to the Center.

| No | Column | Description |
|---|---|---|
| Name | The name of the package that published to akaBot Center | |
| Status | The status of the package version. A package version can have the following statuses: Active - it is currently deployed to a process; Inactive - it is not currently deployed to a process (only these can be deleted). | |
| Created Date | The date when the version is published | |
| Version | The version of the package that was published to akaBot Center. | |
| Tool version | The version of the installed Studio from which the Package published | |
| Description | The description that you created for your project. | |
| Release Note | The note added in Studio for the respective Package version when it is published | |
| Created by | The User/Agent who created the Package on Center |
- Filter Package
This option allows you to filter the packages by Agent Group, Agents deploy the package, and the status of the packages. To filter your packages, you can:
On the Packages Repository page, click the Filter option.

When you click on the Filter button, the system will show a form for you to fill in. Details in the table below.

| No | Column /Label | Description | Type | Maximum | Input Requirement |
|---|---|---|---|---|---|
| 1 | Name | Enter the name of the package you want to search | String | No limit | |
| 2 | Description | Enter the description of the package you want to search | String | No limit | |
| 3 | Release Note | Enter the release note of the package you want to search | String | No limit | |
| 4 | Agent Group | Select the agent group that is attached to the package you want to search | Input searching | No limit | |
| 5 | Agent | Select the agent that is attached to the package you want to search | Input searching | No limit | |
| 6 | Status | Select the status of the package you want to search | Dropdown list | No limit |
Once you filled in the criteria, hit OK to view your result. Hit Clear to start over or Cancel to terminate the action.
- Upload a Package
Typically, when you publish a workflow to the Center, a package will be uploaded to the Center automatically. However, you can also Manually upload a package to Center using the Create New button located at the top right of the Listing page.

The system will display the window for you to upload the Packages.
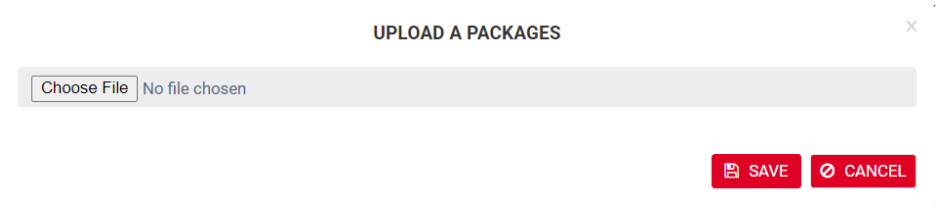
Click Choose File and select the packages (with the .nupkg extension) and hit Open.
Once you select the Package to upload from your local machine, hit Save to finish the upload, Cancel to terminate the operation.
- Delete a Package
On the Packages Repository page, click on the Name of the package. The Package information and a list of all versions will be displayed.

Select Delete action corresponding with the version of the package you want to delete. A confirming popup will display. Hit Delete to complete the operation.

The selected package version is removed. If Delete related items? is selected, any Tasks, Log, Schedules and Workflow linked to this package shall also be removed.
i. Assets
Assets usually represent shared variables or credentials that can be used in different automation projects. They allow you to store specific information so that the Robots can easily have access to it.
Additionally, an extra level of security is provided, as all credentials stored here are encrypted with the AES 256 algorithm. They can be invoked by RPA developers when designing a process, but their values can be hidden from them. The Assets page enables you to create new assets. It also displays all previously created assets, which can
be edited or deleted.
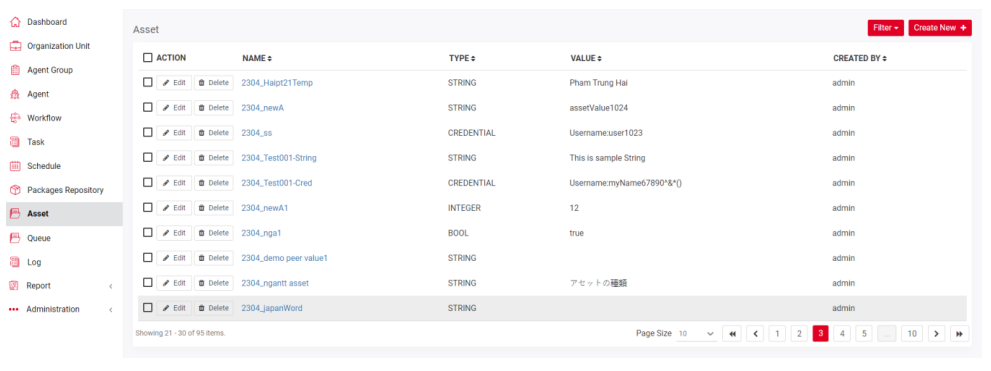
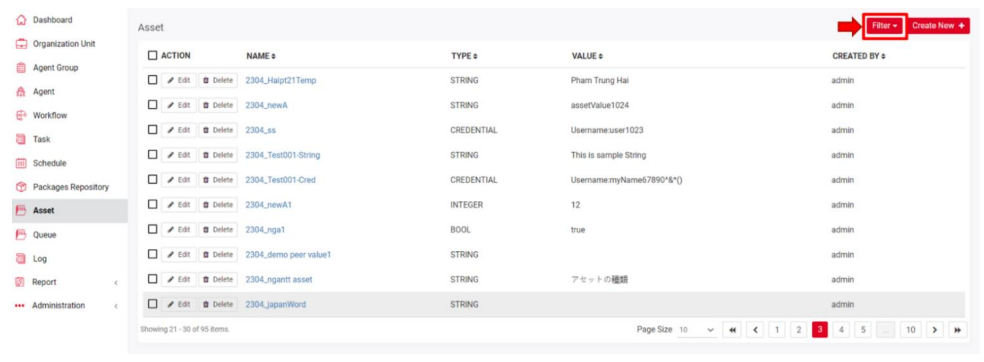
To access the Asset page, you click Assets tab in the left menu. After clicking, the system opens an Asset Listing where all the Assets are located.
| No | Column | Description |
|---|---|---|
| 1 | Action | Available actions to manage the Assets. Includes: Edit: allows you to edit the details of each Assets Delete: allows you to delete selected Asset By selecting the Checkbox corresponding to each Asset, the delete option will appear beside the Filter option and allow you to delete the Asset from the Center ! Selecting the Checkbox next to Action will select all Assets in display and allow you to bulk delete selected them |
| 2 | Name | The name of the assets |
| 3 | Type | Mandatory. The following options are available: Text - assets that can store string values. This is the default option. Bool - assets that can store a true or false value. If you select this option, the Value field displays two radio buttons (True, False). Integer - assets that can store integers. Credential - assets that can store credentials. If you select this option the Value field is replaced by two others: Username and Password. |
| 4 | Value | The value assigned to an asset: Common Value - the default value received by every agent, unless a specific value is assigned to an agent. Value Per Agent - a value received only by the specified agent. If Common Value is disabled, at least one agent value must be provided |
| 5 | Created by | The user who created the Assets. |
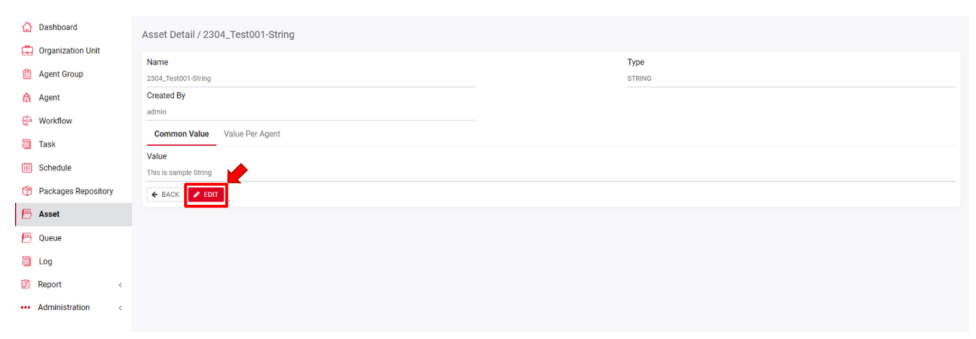
- View an Asset
To view an Asset, you click Asset Name of the selected Asset in the list.

The system shows the details of workflow as below:

- Filter Asset
This option allows you to filter the Assets based on Asset Name, Type, Kind of Value, and Value.
To filter your Assets, you can click the Filter button on the top of the Asset Listing page
When you click on the Filter button, the system will show a form for you to fill in. Details are in the table below.

| No | Column /Label | Description | Type | Maximum | Input Requirement |
|---|---|---|---|---|---|
| 1 | Name | Enter the name of the asset you want to search | String | 255 char | |
| 2 | Type | Select the type of the asset you want to search | Dropdown list | ||
| 3 | Kind | Select the kind of the asset you want to search | Dropdown list | ||
| 4 | Value | Enter the value of the asset you want to search | String |
When you click on the Filter button, the system will show a form for you to fill in. Details are in the table below.
- Create/edit an Asset
In order to create an Asset, on the Assets page, click Create new.

When you want to edit an existing Asset, click the Edit button in the Action column.
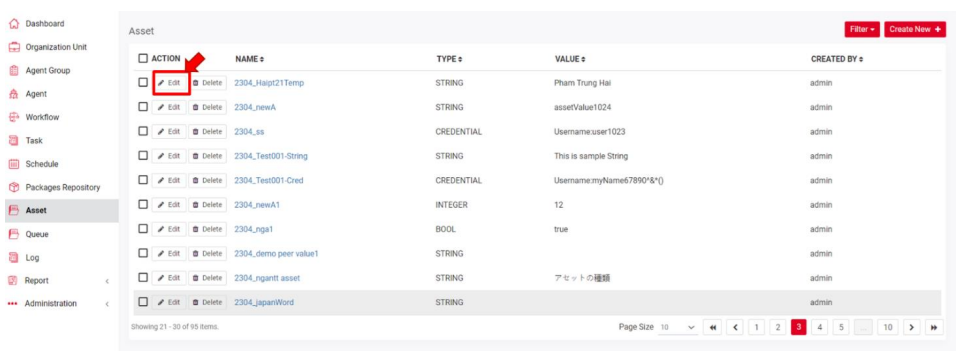
Alternatively, you can access the Details page of said Asset and select the Edit button.
The system will display the form for you to create an Asset:

| No | Column/ Label | Description | Type | Maximum | Is Mandatory? | Input Requirement |
|---|---|---|---|---|---|---|
| 1 | Name | Enter the name of the asset you want to create/edit | String | 255 char | Yes | |
| 2 | Type | Select the type of the asset you want to create/edit | Dropdown list | Yes | ||
| 3 | Common Value | This means every agent can access the asset you are creating/editing | ||||
| 4 | Value | Depending on the type you chose Enter/select the value of the asset | String | 500 char | Yes | |
| Bool | Yes | By default, True is selected. | ||||
| Int32 | 500 char | Yes | ||||
| Credentials | Yes | Both User and Password needed to be filled | ||||
| 5 | Value Per Agent | This means only agents that are chosen by you can access the asset you are creating/editing | You can add multiple choices, but you can only add one by one | |||
| 6 | Agent | Select the agent you want to give rights to access the asset you are creating/editing | Input searching | No limit | Yes | |
| 7 | Value | Depends on the type you chose Enter/select the value of the asset you are creating/editing | String | 500 char | Yes | |
| Bool, SingleChoice | Yes | |||||
| Int32 | 500 char | Yes | ||||
| Credentials | Yes | Both User and Password needed to be filled |
- Delete an Asset
To delete a task, you click the Delete button of the corresponding Asset.

Alternatively, you can select the checkbox before each Asset and the Delete button will show up next to the Filter button. Tick the Checkbox next to Action will allow users to select all displayed Assets for bulk delete.

A confirming pop-up will display. Hit Delete to complete the operation.

The selected Asset will be deleted.
j. Queue
A Queue in simple terms is a container that holds a set of items that you want to be processed by akaBot Agents. Queue items can store different types of data, such as customer details. This information can be processed in other systems - SAP or Salesforce, for instance.
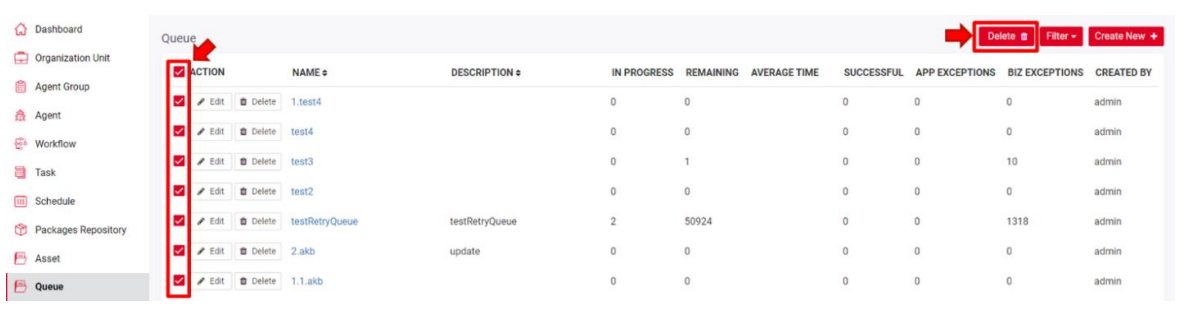
Queues enable you to create large automation projects underlined by complex logic. New queues created in akaBot Center are empty by default. To populate queues with items, to change their status and process them, you have to use Studio activities. As soon as queue items are processed, they become transactions. To access the Queue page, you click Queue tab in the left menu. After clicking, the system opens Queue Listing Page where all the Queues are located.

| No | Column | Description |
|---|---|---|
| 1 | Action | Available actions to manage the Queue. Includes: Edit: allows you to edit the details of each Queue Delete: allows you to remove selected Queue from Center. By selecting the Checkbox corresponding to each Queue, the delete option will appear beside the Filter option and allow you to delete the Queue. ! Selecting the Checkbox next to Action will select all Queue in display and allow you to bulk delete selected ones. |
| 2 | Name | Mandatory. The name of the queue. |
| 3 | Description | Mandatory. The description of the queue. |
| 4 | In progress | The item was processed with the Get Transaction Item or the Add Transaction Item activity; when an item has this status, your custom progress status is also displayed, in the Progress column. |
| 5 | Remaining | The number of queue items that have not been processed yet, and have a New status. |
| 6 | Average time | The average time that was required to process the queue items, was expressed in seconds. |
| 7 | Successful | The total number of transactions that were processed successfully. |
| 8 | App Exceptions | The total number of transactions that failed with an application exception. |
| 9 | Biz Exception | The total number of transactions that failed with a business exception. |
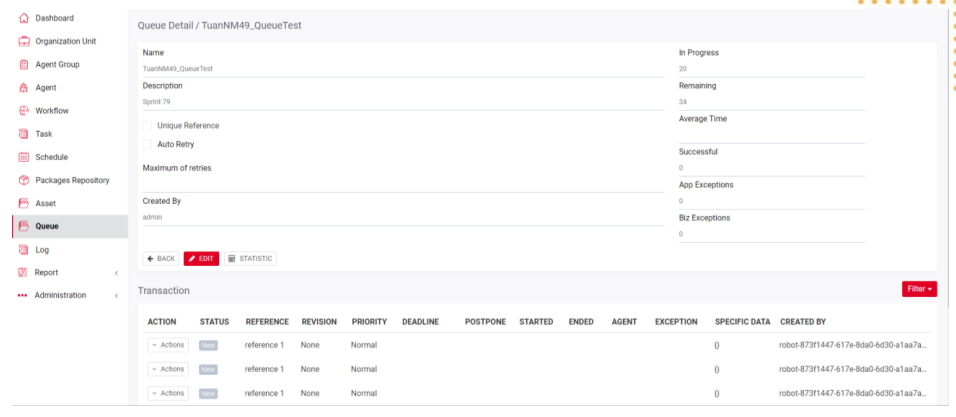
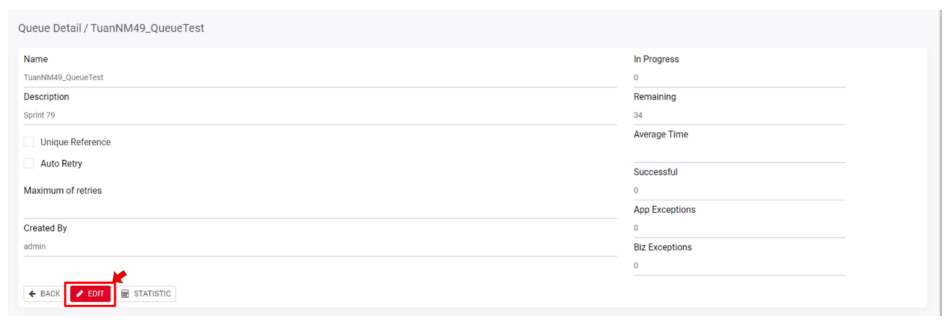
- View a Queue
To view a Queue, you click Queue Name of the selected queue in the list.

The system shows the details of the queue as below:
| No | Column | Description |
|---|---|---|
| 1 | Name | The name of the queue. |
| 2 | Description | The description of the queue. |
| 3 | In progress | The item was processed with the Get Transaction Item or the Add Transaction Item activity; when an item has this status, your custom progress status is also displayed, in the Progress column. |
| 4 | Remaining | The number of queue items that have not been processed and have a New status. |
| 5 | Average time | The average time that was required to process the queue items, was expressed in seconds. |
| 6 | Successful | The total number of transactions that were processed successfully. |
| 7 | App Exceptions | The total number of transactions that failed with an application exception. |
| 8 | Biz Exception | The total number of transactions that failed with a business exception. |
- Transaction
Once a Queue item was in proceed, it becomes a transaction. You can check the details of the processing
queue items in the details of the queue.
| No | Field | Description |
|---|---|---|
| 1 | Action | Available actions to manage the Queue. Includes: View: allows you to view information of each Transaction. Edit: allows you to edit the details of each Transaction. Clone: allow users to create an identical Transaction. Delete: allows you to delete selected Transaction. By selecting the Checkbox corresponding to each Queue, the delete option will appear beside the Filter option and allow you to delete the Queue from the Center. ! Selecting the Checkbox next to Action will select all Queue in display and allow you to bulk delete selected them |
| 2 | Status | These statuses let you know if an item has been processed or not, and the stage of the process at a particular time. Queues items can have these statuses: NEW IN PROGRESS FAILED SUCCESSFUL ABANDONED RETRIED * DELETED |
| 3 | Reference | A custom identifier for a transaction or a group of transactions. It supports all special characters, except double-quoted. This is set for the automation project, using the Add Queue Item or Add Transaction Item activity. The reference can be unique, depending on what you chose in the Unique Reference field when you created the queue. |
| 4 | Revision | This allows you to know the status of the revision of those queue items that have been abandoned or have failed with an application or business exception. |
| 5 | Priority | The processing priority level of the transaction item. This field is populated according to the priority level set in the Add Queue Item activity (Low, Normal, High), in Studio. |
| 6 | Deadline | The latest time at which the queue item should be processed. This field is populated according to how you configured the Deadline property of the Postpone Transaction Item activity, in Studio. |
| 7 | Postpone | The earliest time at which the queue item is available for processing. This field is populated according to how you configured the Postpone property of the Postpone Transaction Item activity, in Studio. |
| 8 | Started | The amount of time that passed since the processing started. |
| 9 | Ended | The amount of time that passed since the processing stopped. |
| 10 | Agent | The name of the Agent that has processed a transaction. |
| 11 | Exception | The type of exception that caused an item to fail. This is populated according to the error type selected in the Set Transaction Status activity in Studio. |
| 12 | Specific data | JSON Schema data. |
Users can filter Transaction based on different criteria.
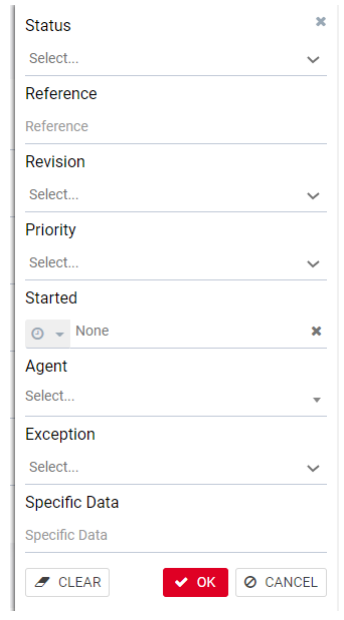
| No | Column/ Label | Description | Type | Maximum | Input Requirement |
|---|---|---|---|---|---|
| 1 | Status | The Status of the Transaction | Dropdown list | No limit | |
| 2 | Reference | A custom identifier for a transaction or a group of transactions. | String | 128 char | |
| 3 | Revision | The status of the revision of those queue items | Dropdown list | No limit | |
| 4 | Priority | The processing priority level of the transaction item. | Dropdown list | No limit | |
| 5 | Stated | The date range user wants to look for transactions | Date & Time | ||
| 6 | Agent | The name of the Agent that has processed a transaction. | Input searching | No limit | |
| 7 | Exception | The type of exception that caused an item to fail | Dropdown list | No limit | |
| 8 | Specific Data | JSON Schema data | String |
- Filter Queue
Users can filter Queue using Queue Name.

Once you filled in the criteria, hit OK to view your result. Hit Clear to start over or Cancel to terminate the
action.
d. Create/Edit a Queue
In order to create a Queue, on the Queue Listing page, click Create new

To edit an existing Queue, select the Edit button corresponding to the Queue you want to edit:

Alternatively, you can access the Details page of said Queue and select the Edit button
The system will display the form for you to create/edit a Queue

| No | Column /Label | Description | Type | Maximum | Is Mandatory? | Input Requirement |
|---|---|---|---|---|---|---|
| 1 | Name | Enter the name of the queue you want to search | Input searching | 255 char | Yes | |
| 2 | Unique Reference | Check the checkbox if you want to enforce unique references in all the transactions that are to be added to the queue. | No | This option cannot be edited and displays if the current queue enforces unique references or not. | ||
| 3 | Auto Retry | Indicates if the Center should retry to process items in the queue when an Application Exception is encountered. | No | |||
| 4 | Maximum of retries | Only appear if the Auto Retry option is selected. | Int32 | 50 char | No | Greater than 0 |
| 5 | JSON Schema | When creating or editing a queue, you can upload a custom JSON. | ||||
| 6 | Specific Data | JSON schema for the specific data of all transactions in the queue. | File size limited to 256kb by default. | No | ||
| 7 | Output Data | JSON schema for the output data of all transactions in the queue. | File size limited to 256kb by default. | No | ||
| 8 | Analytics Data | JSON schema for the output data of all transactions in the queue. | File size limited to 256kb by default. | No |
After filling the form, click the Save button to save it, and the Queue is created. You can also cancel the creation of the queue by clicking the Cancel button.
- Delete Queue
To delete a queue, you click the Delete button of the corresponding Queue.

Alternatively, you can select the checkbox before each Queue and the Delete button will show up next to the Filter button. Tick the Checkbox next to Action will allow users to select all displayed Queue for bulk delete.
A confirming pop-up will display. Hit Delete to complete the operation.

k. Logs
Logs provides details about each task that has been run previously. The Logs page displays logs generated by different Agents for different Workflow.
If akaBot Center is unavailable, logs are stored in a local database, within the available disk space, until the connection is restored. When the connection is restored, the logs are sent in batches in the order they had been generated.
The status of a task is stored in the memory of the akaBot Agent service. When the Center becomes available, the information regarding the task status is synced between the two. However, if the Center is not available and you restart the Agent service, the information is lost. This means that whenever Center becomes available the task is executed again.
To access the Log page, you click the Log tab in the left menu. After clicking, the system opens a Log Listing page:

| No | Column | Description |
|---|---|---|
| 1 | Action | Available actions to manage the Logs. Includes: View: allows users to view the details of the logs. Delete: allows users to delete selected Log item By selecting the Checkbox Corresponding to each Log item, the delete option will appear beside the Filter option and allow you to delete the Log from the Center ! Selecting the Checkbox next to Action will select all Log items in display and allow you to bulk delete selected them. |
| 2 | Timestamp | The exact time the action was executed at. |
| 3 | Level | The severity level at which the message was logged. The following options are available: OFF, FATAL, ERROR WARNING, INFORMATION, DEBUG AND VERBOSE |
| 4 | Agent name | The name of the Agent that generated a given message log. |
| 5 | Workflow name | The name of the workflow that generated a given log message. |
| 6 | Version | The version of the workflow currently being used. |
| 7 | Task ID | The ID of the execution instance of the mentioned workflow. |
| 8 | Message | The logged message. This can also be a message logged through the Log Message activity in Studio. |
- View a Log item
To view a Log Details, you click on the View button on the Action column of the corresponding Log.

Alternatively, you can view Logs of a task. Go to Task tab > Select a task > Select Log Details tab and select View.

You can also view Logs of an Agent: Go to Agent tab > Select an Agent > Select the Log tab.

The system shows the details of the log as below:

| No | Column | Description |
|---|---|---|
| 1 | Timestamp | The exact time the action was executed at. |
| 2 | Level | The severity level at which the message was logged. The following options are available: OFF, FATAL, ERROR WARNING, INFORMATION, DEBUG AND VERBOSE |
| 3 | Agent Name | The name of the Agent that generated a given message log. |
| 4 | Workflow Name | The name of the workflow that generated a given log message. |
| 5 | Version | The version of the workflow currently being used. |
| 6 | Task ID | The ID of the execution instance of the mentioned workflow. |
| 7 | Message | The logged message. This can also be a message logged through the Log Message activity in Studio. |
| 8 | Raw Message | The raw logged message. |
- Filter Log item
This filter enables you to filter all the logs based on your desired criteria. Click the “Filter” button on the top right corner of the screen.

The system will show you a Filter window:

| No | Column /Label | Description | Type | Maximum | Input Requirement |
|---|---|---|---|---|---|
| 1 | Date | Select the date of the log you want to search. You can filter based on a specific date range or custom range of timeframe | Date & Time | ||
| 2 | Task ID | Enter the task id of the log you want to search | String | ||
| 3 | Agent | Select the agent involved in the log you want to search | Input searching | No limit | |
| 4 | Workflow Name | Select the workflow involved in the log you want to search | Input searching | No limit | |
| 5 | Level | Select the level of the log you want to search | Dropdown list, MultipleChoice | ||
| 6 | Filter | The message of the log | String | No limit |
Once you filled in the criteria, hit OK to view your result. Hit Clear to start over or Cancel to terminate theaction.
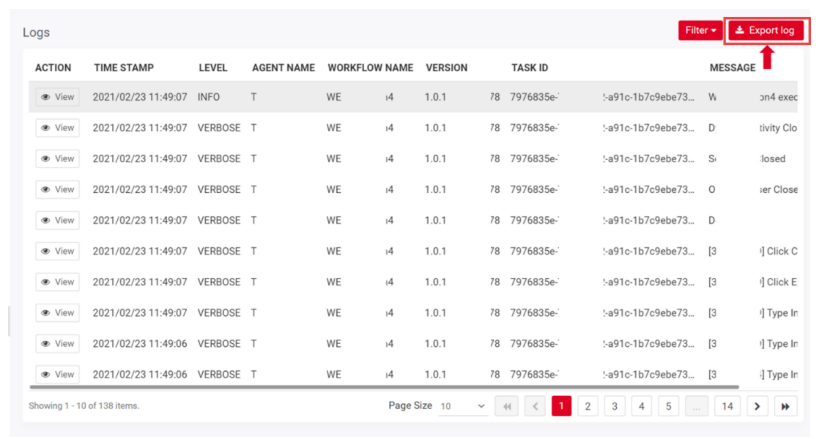
- Export Logs
All logs can be exported to a .xls file, by clicking the Export button. The filters applied to this page are taken into account when this file is generated. For example, if you set to view logs only from the last 30 days with an Info severity level, only the entries that meet these criteria are downloaded.

You can export the filtered log list to an excel file. Click “Export log”.

After the export, a .xlsx file will be downloaded to your computer and shall be open:

- Delete the Logs
You can select the checkbox before each Log item and the Delete button will show up next to the Filter button. Tick the Checkbox next to Action will allow users to select all displayed Queue for bulk delete.

A confirming pop-up will display. Hit Delete to complete the operation.

l. Report
Report provides activity statistic information about the Agents & Workflows which are currently being connected to Center. Here, you can get information such as the number of successful tasks, a number of tasks that are running, stopped, or faulted. You can also check the total number of task that was run by the selected Agent or Workflows
You can get your reports by Agent and Workflow. To access the Report page, click on the Report tab in the left menu.
- Report for Agent
Users can view Agent Report by going to Report tab > Select Agent tab.

| No | Column | Description |
|---|---|---|
| 1 | Agent Name | The name of the Agent which activities is reported |
| 2 | Workflow Name | The name of the Workflow which activities is reported |
| 3 | Task Successful | The total number of tasks that are successfully executed. |
| 4 | Task Running | The total number of tasks that are currently executing |
| 5 | Task Stopped | The total number of tasks that have been stopped |
| 6 | Task Faulted | The total number of tasks that experienced errors during execution |
| 7 | Total | The total number of tasks that are initiated until now. |
To get the report, you can use the filter at the top of the page.

| No | Column /Label | Description | Type | Maximum | Input Requirement |
|---|---|---|---|---|---|
| 1 | Start Time | From which date you want to get the agent’s activity statistics. | Date & Time | ||
| 2 | End Time | To which date you want to get the agent’s activity statistics. | Date & Time | ||
| 3 | Select Agent Group | Select the agent group in which you want to see activity statistics. | Input searching | No limit | |
| 4 | Select Agent | Select the agent of which you want to see activity statistics | Input searching | No limit |
After that, click View for the report to be generated. If you wish to download the report, click on the Export button.
The Report will be downloaded to your local machine and shall be open:

- Report for Workflow
Similarly, you can view the Activity Report for each Workflow too. Go to Report tab > Select the Workflow tab.

| No | Column | Description |
|---|---|---|
| 1 | Workflow Name | The name of the Workflow in which activities are reported. |
| 2 | Workflow Version | The version of the workflow in which activities are reported. |
| 3 | Total Agent | Number of Agents that executed this workflow. |
| 4 | Task Successful | The total number of tasks that are successfully executed. |
| 5 | Task Running | The total number of tasks that are currently executing. |
| 6 | Task Stopped | The total number of tasks that have been stopped. |
| 7 | Task Faulted | The total number of tasks that experienced errors during execution. |
| 8 | Total | The total number of tasks that are initiated until now. |
You can also filter the Report using a date range, Agent group, or Workflow Name
| No | Column /Label | Description | Type | Maximum | Input Requirement |
|---|---|---|---|---|---|
| Start Time | From which date you want to get the agent’s activity statistics. | Date & Time | |||
| End Time | To which date you want to get the agent’s activity statistics. | Date & Time | |||
| Select Agent Group | Select the agent group in which you want to see activity statistics. | Input searching | No limit | ||
| Select Workflow | Select the workflow in which you want to see activity statistics. | Input searching | No limit |
After that, click View for the report to be generated. If you wish to download the report, click on the Export button.

m. Administrator
m.1. User Management
A user is an entity with access-dependent capabilities whose perspective and control of akaBot Center are contingent on the roles they have been designated. Users can be created in the Center.
This page displays all available users and allows admin to add or delete, as well as update users’ information.
After selecting the User management tab, the system displays the following page:
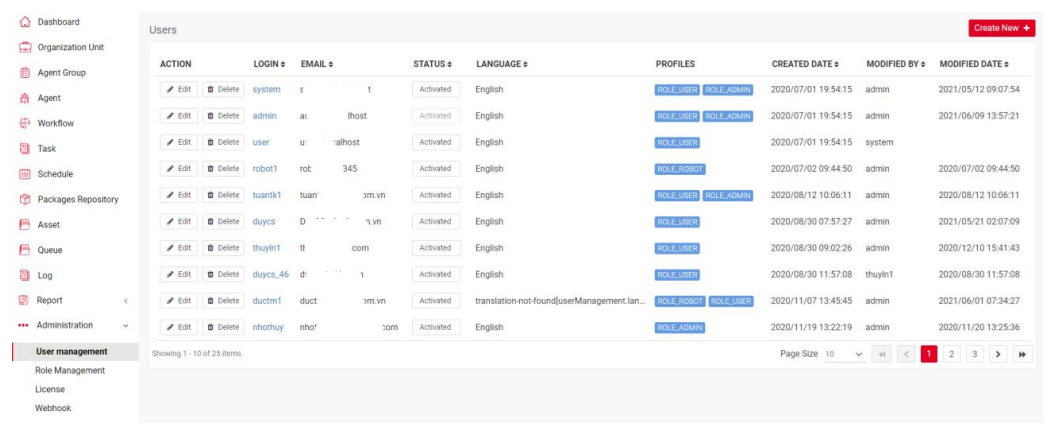
| No | Column | Description |
|---|---|---|
| 1 | Action | Available actions to manage the User. Includes: Edit: allows users to view the details of the User. Delete: allows users to delete selected User. |
| 2 | Login | The username credentials that will be used to sign in. |
| 3 | The email address of the user. Can be used to log in to akaBot Center. | |
| 4 | Status | The status of the user. Can be Activated or Deactivated. |
| 5 | Language | The display language of akaBot Center for user. |
| 6 | Profiles | The role(s) assigned to the user. There are 3 default roles: ROLE_ADMIN ROLE_USER * ROLE_ROBOT A user can have more than one role. Details about permission for each role will be explained in Role Management. |
| 7 | Created date | The date when the user is created |
| 8 | Modified by | The last person who modified the user’s information |
| 9 | Modified date | The last date on which the user’s information was modified |
- View a User
To view a user’s details, click on the Username (Login Column) in the list.


| No | Column | Description |
|---|---|---|
| Login | The username credentials that will be used to sign in. | |
| Status | The status of the user. Can be Activated or Deactivated. | |
| First name | The first name of the user. | |
| Last name | The last name of the user. | |
| The email address of the user. Can be used to log in to akaBot Center. | ||
| Language | The display language of akaBot Center for each user. | |
| Created by | The user who created this user. | |
| Created date | The date when the user is created. | |
| Modified by | The last person who modified the user’s information. | |
| Modified date | The last date on which the user’s information was modified | |
| Profiles | The role(s) assigned to the user. There are 3 default roles: ROLE_ADMIN ROLE_USER * ROLE_ROBOT A user can have more than one role. Details about permission for each role will be explained in the Role Management section. |
- Create/Edit a User
To create a new user, click the Create new at the top of the User page.


When you click on Create New/Edit button, the system will show a form for you to fill in. Details in the table below.

| No | Column /Label | Description | Type | Maximum | Is Mandatory? | Input Requirement |
|---|---|---|---|---|---|---|
| 1 | Login | Enter the username used to log in to the system of the user you are creating/editing | String | 50 | Yes | |
| 2 | First Name | Enter the first name of the user | String | 50 | Yes | |
| 3 | Last Name | Enter the last name of the user | String | 50 | Yes | |
| 4 | Enter the email of the user | String | 100 | Yes | ||
| 5 | Password | Only available in create new Enter the password of the user | String | 50 | Yes | |
| 6 | Confirm Password | Only available in create new Reenter the password of the user | String | 50 | Yes | |
| 7 | Activated | Select this if you want this user to be activated upon creation | Check Box | No | ||
| 8 | Language | Select the language of the user | Dropdown list, SingleChoice | Yes | ||
| 9 | Profiles | Select roles for the user | MultipleChoice | Yes |
After filling the form, click the Save button to save it, and the User is created. You can also cancel the creation of the queue by clicking the Cancel button.
- Delete a User
To delete a User, you click the Delete button of the corresponding User.

A confirming pop-up will display. Hit Delete to complete the operation.

m.2. Role Management
akaBot incorporates a role and permission-based access-control framework. Roles are sets of permission, which means that the permissions required to access and control specific Center resources are assigned to roles. In other words, Users were not given permission to certain resources but will get the permit through a role. Depending on their roles, users have access to the resources listed below:
| No | Resource |
|---|---|
| 1 | ADMIN RESOURCE |
| 2 | ENVIRONMENT RESOURCE |
| 3 | ROBOT RESOURCE |
| 4 | PACKAGE RESOURCE |
| 5 | WORKFLOW RESOURCE |
| 6 | JOB RESOURCE |
| 7 | SCHEDULE RESOURCE |
| 8 | ORGANIZATION UNIT RESOURCE |
| 9 | ASSET RESOURCE |
| 10 | QUEUE RESOURCE |
| 11 | LOG RESOURCE |
| Permissions | Category |
|---|---|
| None | Users won’t see the resource in the Center interface. |
| View | Users can see the resources but can’t interact with it. |
| Edit | Users can see and edit the resources. |
| Create | Users can see and create new resources. |
| Delete | Users can delete the resources. |
This Role Management page displays all available roles and allows admin to add or delete, as well as update roles’ information. After selecting the Role Management tab, the system displays the following page:

| No | Column | Description |
|---|---|---|
| 1 | Action | Available actions to manage the User. Includes: Edit: allows users to view the details of the Roles. Delete: allows users to delete selected role |
| 2 | Name | The title of the role |
- Default Roles
In akaBot Center, there are 3 default roles:
- ROLE_ADMIN
- ROLE_USER
- ROLE_ROBOT
ROLE_ADMIN
By default, the role has all the rights to all resources and this cannot be changed.
ROLE_USER
By default, the role has the following rights, but they can be edited.

ROLE_ROBOT
By default, the role has the following rights, but they can be edited:

- Create/edit a Role
To create a new Role for your Center, click the Create New button at the top of the page:

To edit an existing Role, click the Edit button corresponding to the Role in the Action column.

When you click on Create New/Edit button, the system will show a form for you to fill in. Details in the table below

| No | Column /Label | Description | Type | Maximum | Is Mandatory? | Input Requirement |
|---|---|---|---|---|---|---|
| 1 | Name | Enter the role name | String | 100 char | Yes | |
| 2 | Resources | You can only choose one option for each row Select the rights for the role | SingleChoice | Yes |
- Delete a role
To delete a role, you click the Delete button of the corresponding role.
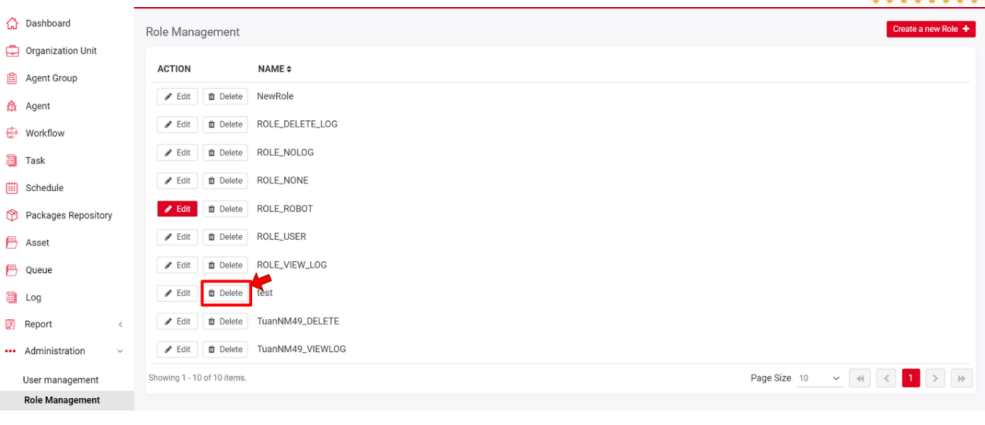
A confirming pop-up will display. Hit Delete to complete the operation.
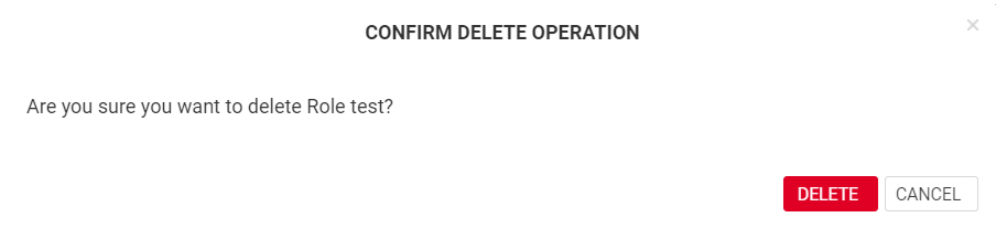
m.3. License Management
Agent/Studio license is accessible on Organization Unit based on the License page in the Center. This allows you to accelerate deployment and manage activation from a single place. With the press of a button, you may activate, renew, or cancel licenses. You may also track license usage throughout the year.
After selecting the License Management tab, the system displays the following page:

- Add license
https://docs.akabot.com/docs/network-activation
- b. Renew license
https://docs.akabot.com/docs/akabot-center-renew
- Deactivate
https://docs.akabot.com/docs/network-activation
m.4. Webhook
Webhooks allow you to integrate your akaBot Platform with your whole application ecosystem more effectively. You may subscribe to Center events and forward them to any external DCM, BPM, or CRM solution to notify various users, such as when a new queue item is ready for processing, a trigger fails, or a process is changed.
After selecting the Webhook tab, the system displays the following page.
| No | Column | Description |
|---|---|---|
| 1 | Action | Available actions to manage the Webhook. Includes: Edit: allows users to edit a particular webhook. Delete: allows users to delete selected webhook |
| 2 | URL | The URL of your application |
| 3 | Subscribed Event | The events will be forwarded to your application. |
| 4 | Enable | The status of the webhook. There are two possible statuses: Enabled or Disabled |
Create/edit a Webhook
To create a webhook

| No | Column /Label | Description | Type | Maximum | Is Mandatory? | Input Requirement |
|---|---|---|---|---|---|---|
| 1 | URL | Enter the url of the system that you want to give rights to subscribe and listen to akabot center | String | 1000 char | Yes | |
| 2 | Enabled | Tick this box if you want for this Webhook to work | Check Box | No | ||
| 3 | Choose All Events / Choose Events | Allow you to choose between send all events to your application or only send selected Events. | SingleChoice | Yes | ||
| 4 | Filter | Select the Events you want to forward to your application. You can choose multiple events from the list. | MultipleChoice | Yes | Only available if you select Choose Events option |