Desktop trigger Overview
After installing, and opening Desktop Trigger, the home screen will be shown as below:

| No | Panel | Description |
|---|---|---|
| 1 | Add new trigger | Click here to create a new trigger |
| 2 | Edit Trigger | Choose a trigger at the table below, then click this button to edit that trigger |
| 3 | Enable/ Disable/ Delete trigger | Choose a trigger at the table below, then click this button to enable/disable/delete a trigger |
| 4 | Refresh | Refresh the system in case of unexpected events that cause the system to stop working, to ensure that the system is running smoothly again |
| 5 | Trigger list | List of created triggers by status, name, type, description |
Create a new trigger
1. Create a File trigger
Step 1: At the home screen, click the "New Trigger" button. The list of trigger types will be shown as below:

Step 2: Choose the File trigger option, the configuration screen of file trigger will be open as below:

Step 3: Fill the information in the tab: Basic
| No | Column/Label | Description | Type | Maximum | Is Mandatory? |
|---|---|---|---|---|---|
| 1 | Trigger Name | Fill the trigger name | String | 255 | Yes |
| 2 | Status | Click to set the first status for trigger: enable/disable | Toggle | Auto enable | |
| 3 | Trigger Description | Write description for the trigger | String | 555 | No |
Step 4: Fill the information in the tab: Action

| No | Column/Label | Description | Type | Maximum | Is Mandatory? |
|---|---|---|---|---|---|
| 1 | Action type | Choose option workflow | Dropdown list | Yes | |
| 2 | Workflow | Choose a workflow in the list | Dropdown list | Yes | |
| 3 | Workflow Arguments | Click button New to add argument name and value | Input info | Yes |
Step 5: Fill the information in the tab: Detail

| No | Column/Label | Description | Type | Maximum | Is Mandatory? |
|---|---|---|---|---|---|
| 1 | Monitoring folder | Choose the folder where the event will occur at | Folder input | Yes | |
| 2 | Include subfolders | Click this box if you would like to set this trigger for subfolders in the folder you choose | Check box | No | |
| 2 | Event type | Choose event types that will occur in that folder | Check box | Yes | |
| 3 | File Filter | Gets or sets the filter string used to determine what files are monitored in a directory. | String | Yes |
After filling in all the mandatory fields, click OK button to save the trigger.
2. Create a Folder trigger
Step 1: At the home screen, click the "New Trigger" button. The list of trigger types will be shown as below:
Step 2: Choose the Folder trigger option, the configuration screen of Folder trigger will be opened as below:

Step 3: Fill the information in the tab: Basic

| No | Column/Label | Description | Type | Maximum | Is Mandatory? |
|---|---|---|---|---|---|
| 1 | Trigger Name | Fill the trigger name | String | 255 | Yes |
| 2 | Status | Click to set the first status for trigger: enable/disable | Toggle | Auto enable | |
| 3 | Trigger Description | Write description for the trigger | String | 555 | No |
Step 4: Fill the information in the tab: Action
| No | Column/Label | Description | Type | Maximum | Is Mandatory? |
|---|---|---|---|---|---|
| 1 | Action type | Choose option workflow | Dropdown list | Yes | |
| 2 | Workflow | Choose a workflow in the list | Dropdown list | Yes | |
| 3 | Workflow Arguments | Click button New to add argument name and value | Input info | Yes |
Step 5: Fill the information in the tab: Detail

| No | Column/Label | Description | Type | Maximum | Is Mandatory? |
|---|---|---|---|---|---|
| 1 | Monitoring folder | Choose the folder where the event will occur at | Folder input | Yes | |
| 2 | Include subfolders | Click this box if you would like to set this trigger for subfolders in the folder you choose | Check box | No | |
| 3 | Event types | Choose event types that will occur in that folder | Check box | Yes |
After filling all the mandatory field, click OK button to save the trigger.
3. Create a Hotkey trigger
Step 1: At the home screen, click the "New Trigger" button. The list of trigger types will be shown as below:
Step 2: Choose the Hotkey trigger option, the configuration screen of Hotkey trigger will be open as below:

Step 3: Fill the information in the tab: Basic
| No | Column/Label | Description | Type | Maximum | Is Mandatory? |
|---|---|---|---|---|---|
| 1 | Trigger Name | Fill the trigger name | String | 255 | Yes |
| 2 | Status | Click to set the first status for trigger: enable/disable | Toggle | Auto enable | |
| 3 | Trigger Description | Write description for the trigger | String | 555 | No |
Step 4: Fill the information in the tab: Action
| No | Column/Label | Description | Type | Maximum | Is Mandatory? |
|---|---|---|---|---|---|
| 1 | Action type | Choose option workflow | Dropdown list | Yes | |
| 2 | Workflow | Choose a workflow in the list | Dropdown list | Yes | |
| 3 | Workflow Arguments | Click button New to add argument name and value | Input info | Yes |
Step 5: Fill the information in the tab: Detail

Use the checkbox and drop-down menu to select key from the keyboard.
After filling in all the mandatory fields, click OK button to save the trigger.
4. Create an Email trigger
Step 1: At the home screen, click the "New Trigger" button. The list of trigger types will be shown as below:
Step 2: Choose the Email trigger option, the configuration screen of Email trigger will be open as below:

Step 3: Fill the information in the tab: Basic

| No | Column/Label | Description | Type | Maximum | Is Mandatory? |
|---|---|---|---|---|---|
| 1 | Trigger Name | Fill the trigger name | String | 255 | Yes |
| 2 | Status | Click to set the first status for trigger: enable/disable | Toggle | Auto enable | |
| 3 | Trigger Description | Write description for the trigger | String | 555 | No |
Step 4: Fill the information in the tab: Action
| No | Column/Label | Description | Type | Maximum | Is Mandatory? |
|---|---|---|---|---|---|
| 1 | Action type | Choose option workflow | Dropdown list | Yes | |
| 2 | Workflow | Choose a workflow in the list | Dropdown list | Yes | |
| 3 | Workflow Arguments | Click button New to add argument name and value | Input info | Yes |
Step 5: Fill the information in the tab: Detail

| No | Column/Label | Description | Type | Maximum | Is Mandatory? |
|---|---|---|---|---|---|
| 1 | Interval | Set the interval for checking email in seconds. This is how often the Email Trigger will automatically check your inbox | Number | 600 | Yes |
| 2 | Email Protocol | A set of rules that governs how email messages are sent and received over the Internet. Choose the protocol: IMAP/ POP3 | Dropdown | Yes | |
| 3 | Host | Insert your email host | Yes | ||
| 4 | Port | Choose the port number | Number | Yes | |
| 5 | Credential | Click set credential to insert the credential for the trigger to use/ Click remove credential to set the trigger without credential | Yes |
After filling in all the mandatory fields, click OK button to save the trigger.
5. Create a Window trigger
Step 1: At the home screen, click the "New Trigger" button. The list of trigger types will be shown as below:
Step 2: Choose the Window trigger option, the configuration screen of window trigger will be open as below:

Step 3: Fill the information in the tab: Basic

| No | Column/Label | Description | Type | Maximum | Is Mandatory? |
|---|---|---|---|---|---|
| 1 | Trigger Name | Fill the trigger name | String | 255 | Yes |
| 2 | Status | Click to set the first status for trigger: enable/disable | Toggle | Auto enable | |
| 3 | Trigger Description | Write description for the trigger | String | 555 | No |
Step 4: Fill the information in the tab: Action
F
| No | Column/Label | Description | Type | Maximum | Is Mandatory? |
|---|---|---|---|---|---|
| 1 | Action type | Choose option workflow | Dropdown list | Yes | |
| 2 | Workflow | Choose a workflow in the list | Dropdown list | Yes | |
| 3 | Workflow Arguments | Click button New to add argument name and value | Input info | Yes |
Step 5: Fill the information in the tab: Detail
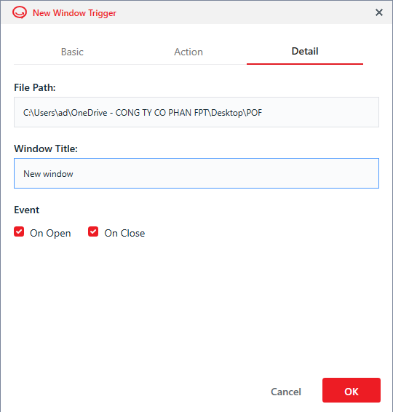
| No | Column/Label | Description | Type | Maximum | Is Mandatory? |
|---|---|---|---|---|---|
| 1 | File path | Link to executable file | String | Yes | |
| 2 | Window title | Insert the name that appears at the top of the window | String | Yes | |
| 3 | Event | Choose to use the trigger when the window open/ close or both | Check box | Yes |
After filling in all the mandatory fields, click OK button to save the trigger.
6. Create a Service trigger
Step 1: At the home screen, click the "New Trigger" button. The list of trigger types will be shown as below:
Step 2: Choose the Service trigger option, the configuration screen of Service trigger will be open as below:

Step 3: Fill the information in the tab: Basic

| No | Column/Label | Description | Type | Maximum | Is Mandatory? |
|---|---|---|---|---|---|
| 1 | Trigger Name | Fill the trigger name | String | 255 | Yes |
| 2 | Status | Click to set the first status for trigger: enable/disable | Toggle | Auto enable | |
| 3 | Trigger Description | Write description for the trigger | String | 555 | No |
Step 4: Fill the information in the tab: Action
| No | Column/Label | Description | Type | Maximum | Is Mandatory? |
|---|---|---|---|---|---|
| 1 | Action type | Choose option workflow | Dropdown list | Yes | |
| 2 | Workflow | Choose a workflow in the list | Dropdown list | Yes | |
| 3 | Workflow Arguments | Click button New to add argument name and value | Input info | Yes |
Step 5: Fill the information in the tab: Detail

| No | Column/Label | Description | Type | Maximum | Is Mandatory? |
|---|---|---|---|---|---|
| 1 | Service nam | Insert the service name. Example: akaBotSvc
| String | Yes | |
| 2 | Event | Choose the event to initiate the workflow | Check box | Yes |

After filling in all the mandatory fields, click OK button to save the trigger.
7. Create a Process trigger
Step 1: At the home screen, click the "New Trigger" button. The list of trigger types will be shown as below:
Step 2: Choose the Process trigger option, the configuration screen of Process trigger will be open as below:
Step 3: Fill the information in the tab: Basic

| No | Column/Label | Description | Type | Maximum | Is Mandatory? |
|---|---|---|---|---|---|
| 1 | Trigger Name | Fill the trigger name | String | 255 | Yes |
| 2 | Status | Click to set the first status for trigger: enable/disable | Toggle | Auto enable | |
| 3 | Trigger Description | Write description for the trigger | String | 555 | No |
Step 4: Fill the information in the tab: Action
| No | Column/Label | Description | Type | Maximum | Is Mandatory? |
|---|---|---|---|---|---|
| 1 | Action type | Choose option workflow | Dropdown list | Yes | |
| 2 | Workflow | Choose a workflow in the list | Dropdown list | Yes | |
| 3 | Workflow Arguments | Click button New to add argument name and value | Input info | Yes |
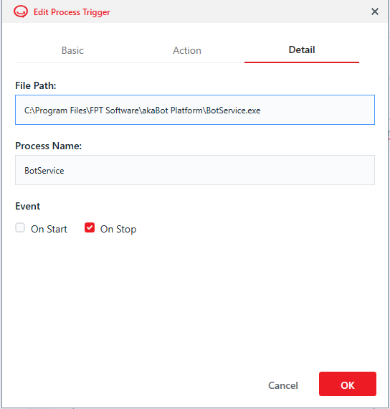
Step 5: Fill the information in the tab: Detail
| No | Column/Label | Description | Type | Maximum | Is Mandatory? |
|---|---|---|---|---|---|
| 1 | File path | The link to executable file | String | Yes | |
| 2 | Process Name | Insert Process name. Example: BotService | String | Yes | |
| 3 | Event | Choose the event to initiate the workflow | Check box | Yes |
After filling in all the mandatory fields, click OK button to save the trigger.
8. Create an Interface trigger
Step 1: At the home screen, click the "New Trigger" button. The list of trigger types will be shown as below:
Step 2: Choose the Interface trigger option, the configuration screen of Interface trigger will be open as below:

Step 3: Fill the information in the tab: Basic

| No | Column/Label | Description | Type | Maximum | Is Mandatory? |
|---|---|---|---|---|---|
| 1 | Trigger Name | Fill the trigger name | String | 255 | Yes |
| 2 | Status | Click to set the first status for trigger: enable/disable | Toggle | Auto enable | |
| 3 | Trigger Description | Write description for the trigger | String | 555 | No |
Step 4: Fill the information in the tab: Action
| No | Column/Label | Description | Type | Maximum | Is Mandatory? |
|---|---|---|---|---|---|
| 1 | Action type | Choose option workflow | Dropdown list | Yes | |
| 2 | Workflow | Choose a workflow in the list | Dropdown list | Yes | |
| 3 | Workflow Arguments | Click button New to add argument name and value | Input info | Yes |
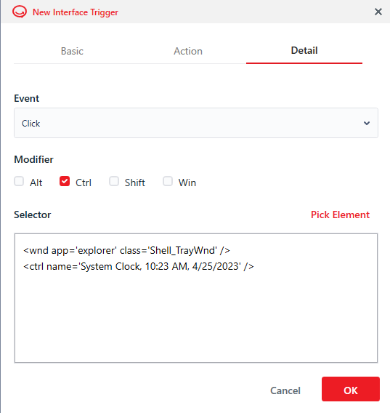
Step 5: Fill the information in the tab: Detail
| No | Column/Label | Description | Type | Maximum | Is Mandatory? |
|---|---|---|---|---|---|
| 1 | Event | Choose the event to initiate the workflow | Dropdown list | Yes | |
| 2 | Modifier | Select the key that you want to press along with clicking an object on the screen to initiate the workflow | Check box | Yes | |
| 3 | Selector | click "pick element" to choose an object on the screen that you will click to initiate the workflow | Yes |
After filling in all the mandatory fields, click OK button to save the trigger.