Center Installation Guide for Standalone Model on Redhat v9.x
1. Before you start
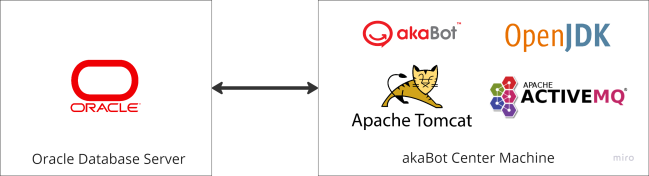
This document aims to guide you to install akaBot Center in Standalone model (all-in-one” model) which means that all necessary packages will be installed in only one machine as below image:
For other models, please contact the project coordinator (if have) or send email to [email protected] to get the guidance. akaBot team is always here to support your installation success.
Please read below sections CAREFULLY and prepare necessary resources/information before you start to achieve a successful installation.
1.1. Hardware Requirements
To install and use akaBot Center, your machine which installs akaBot Center (hereby, call it as akaBot Center machine) needs to fulfill below requirements:
- Physical server or Virtual Machine
- RAM: 32GB or more
- Core: 8 CPU or more
- SSD: 500GB
1.2. Database connection
Your akaBot Center machine needs to be connected with your Database server.
Moreover, please prepare below information for akaBot Center to connect to your database:
# Information Description 1 DB-SERVER Database IP Address.
Ex: 3.112.124.1762 DB-USER Database user name.
Ex: AKA_CENTER_013 DB-PASSWORD User name's password
Ex: akaBot1234 DB-PORT Database port.
Ex: 15215 DB-SID/SERVICE NAME Database SID/Service Name
Ex: Orcl1.3. Permission requirement
Your user account on akaBot Center machine to run installation needs to have Run permission as Sudo.
1.4. Prepare Installation Packages
Please make sure that your akaBot Center machine has below installation packages with exact version.
# Platform name Package name Version Description Download 1 JDK/JRE openlogic-openjdk-11.0.16+8-linux-x64-el.rpm 11.0.16 OpenJDK Download 2 Apache tomcat apache-tomcat-8.5.57.tar.gz 8.5.57 Web server Apache Tomcat Download 3 ActiveMQ apache-activemq-5.15.1-bin.tar.gz 5.15.1 ActiveMQ is used for queue-related features in akaBot Center Download 4 akaBot Center akaBot-center-x.x.x.x.war 3.0.1.2 or later akaBot Center installation package akaBot provided. Please contact project coordinator or [email protected] Notes:
- You should place all the installation packages into one folder (call as installation folder) to prevent future errors. Example: /apps
1.5. Other notes
Please pay attention to below notes to prevent future errors during installation:
- Please make sure that your folder names do not have spaces.
- You should copy the command lines from this guide to your akaBot Center machine to run for convenience and preventing syntax errors.
- Due to different character encoding modes, please copy the commands into Notepad file before copying again to the akaBot Center machine to prevent syntax errors.
- When updating configuration files, please follow strictly the syntax of the file to prevent syntax errors.
2. Installation
Please follow the package installation order as JDK à Apache Tomcat web server à Apache ActiveMQ service à akaBot Center package.
2.1. Install JDK
1. Step 1: Move to installation folder by using below command:
cd apps/
2. Step 2: Run installation command:
sudo yum install openlogic-openjdk-11.0.16+8-linux-x64-el.rpm
3. Step 3: Verify if successful installation by running below command:
java -version

Note: Please upgrade Java version to Java 11 if former Java version has been installed.
2.1. Install Apache Tomcat Web Server
2.1.1. Step 1: Extract installation file
1. Move to installation folder:
cd apps/
2. Create a folder: /opt/tomcat
sudo mkdir /opt/tomcat
3. Extract Apache Tomcat installation package
sudo tar xzvf apache-tomcat-8*tar.gz -C /opt/tomcat --strip-components=1
2.1.2. Step 2: Create group and user Tomcat
You need to create another account and run the Tomcat installation by this account instead of using Root account to prevent permission-related errors during execution.
1. Create Tomcat group
sudo groupadd tomcat
2. Create account Tomcat under group Tomcat and home link: /opt/tomcat
sudo useradd -s /bin/false -g tomcat -d /opt/tomcat tomcat
3. Configure account Tomcat to get Machine code for later use of license activation for akaBot Center.
- Open vi editor
sudo visudo /etc/sudoers
- Add below command into the end of file:
tomcat ALL= NOPASSWD: ALL

- Save changes and exit vi editor.
Press ESC key and type: “:wq”
4. Add current user (using to ssh to akaBot Center machine) to group Tomcat.
sudo usermod -g tomcat [current_user_logged]
2.1.3 Step 3: Configure folder access rights
1. Change ownership of Tomcat folder:
cd /opt
sudo chown tomcat:tomcat tomcat
ls -l

2. Configure access permission on Tomcat folder:
cd /opt/tomcat
sudo chgrp -R tomcat /opt/tomcat
sudo chmod -R g+r conf
sudo chmod g+x conf
sudo chown -R tomcat webapps/ work/ temp/ logs/
ls -l
2.1.4 Step 4: Configure Tomcat service running
1. Get Java Installation folder
sudo update-alternatives --list | grep java

à %JAVA_HOME% = /usr/lib/jvm/openlogic-openjdk-11-hotspot (WITHOUT /bin/java)
2. Create tomcat.service file
sudo vi /etc/systemd/system/tomcat.service
3. Copy below code into the file
[Unit]
Description=Apache Tomcat Web Application Container
After=network.target
[Service]
Type=forking
Environment=JAVA_HOME=/usr/lib/jvm/openlogic-openjdk-11-hotspot
Environment=CATALINA_PID=/opt/tomcat/temp/tomcat.pid
Environment=CATALINA_HOME=/opt/tomcat
Environment=CATALINA_BASE=/opt/tomcat
Environment='CATALINA_OPTS=-Xms1G -Xmx2G -server -XX:+UseParallelGC'
Environment='JAVA_OPTS=-Djava.awt.headless=true -Djava.security.egd=file:/dev/./urandom'
WorkingDirectory=/opt/tomcat
ExecStart=/opt/tomcat/bin/startup.sh
ExecStop=/opt/tomcat/bin/shutdown.sh
User=tomcat
Group=tomcat
RestartSec=10
Restart=always
[Install]
WantedBy=multi-user.target
4. Update Java Home variable:
Environment=JAVA_HOME=%JAVA_HOME%
Environment=JAVA_HOME=/usr/lib/jvm/openlogic-openjdk-11-hotspot
5. Change Java Heap memory size:
Environment='CATALINA_OPTS=-Xms1G -Xmx2G -server -XX:+UseParallelGC'
- Parameter -Xms: minimum Java heap size. Please set the number <= ¼ RAM capacity.
Ex: If your akaBot Center machine’s RAM = 4G, then set -Xms1G.
- Parameter -Xmx: maximum Java heap size. Please set the number <= ½ RAM capacity.
Ex: If your akaBot Center machine’s RAM = 4G, then set -Xms2G.
6. Save changes and exit
Press ESC then type: “:wq”
7. Reload Daemon
sudo systemctl daemon-reload
8. Start Tomcat service
Note: Please make sure that there is only ROOT folder in /opt/tomcat/webapps folder before starting Tomcat service.
sudo systemctl start tomcat
9. Enable Tomcat service
sudo systemctl enable tomcat
10. Check Tomcat status
sudo systemctl status tomcat

curl localhost:8080

11. Change owner and group ownership to logs folder.
sudo chown -R tomcat /opt/tomcat/logs
sudo chgrp -R tomcat /opt/tomcat/logs
2.2. Install ActiveMQ
2.2.1. Step 1: Extract installation file
1. Move to installation folder:
cd apps/
2. Create a folder: /opt/activemq
sudo mkdir /opt/activemq
3. Extract Apache ActiveMQ installation package then move to /opt/activemq folder.
sudo tar -xvzf apache-activemq-*-bin.tar.gz
sudo mv apache-activemq-5.15.1 /opt/activemq
2.2.2 Step 2: Create group and ActiveMQ user
Create another account and run the ActiveMQ installation by this account instead of using Root account.
1. Create ActiveMQ group
sudo groupadd activemq
2. Create account ActiveMQ under group ActiveMQ and home link: /opt/activemq
sudo useradd -s /bin/false -g activemq -d /opt/activemq activemq
3. Phân quyền cho thư mục ActiveMQ
sudo chown -R activemq:activemq /opt/activemq
2.2.3 Step 3: Configure ActiveMQ Service
1. Create configuration file: activemq.service
sudo vi /etc/systemd/system/activemq.service
2. Copy below content into this file
[Unit]
Description=Apache ActiveMQ
After=network.target
[Service]
Type=forking
User=activemq
Group=activemq
ExecStart=/bin/bash /opt/activemq/bin/activemq start
ExecStop=/bin/bash /opt/activemq/bin/activemq stop
[Install]
WantedBy=multi-user.target
3. Save changes and exit
Press ESC then type: “:wq”
4. Reload Daemon
sudo systemctl daemon-reload
5. Start ActiveMQ service
sudo systemctl start activemq
6. Enable ActiveMQ service
sudo systemctl enable activemq
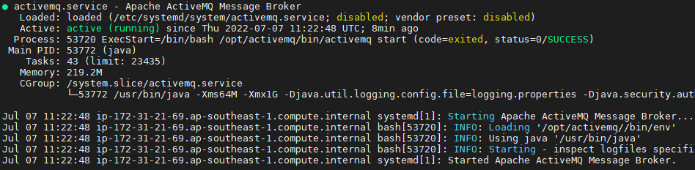
7. Check ActiveMQ status
sudo systemctl status activemq
2.2.4. Step 4 - Configure Java Heap Memory of ActiveMQ Service
1. Stop ActiveMQ service
sudo systemctl stop activemq
2. Update value of Java Heap memory
- Open environment file
sudo vi /opt/activemq/bin/env
- Update below line
ACTIVEMQ_OPTS_MEMORY="-Xms1G -Xmx2G"
Note:
-
- Parameter -Xms: minimum Java heap size. Please set the number <= ¼ RAM capacity.
Ex: If your akaBot Center machine’s RAM = 4G, then set -Xms1G.
-
- Parameter -Xmx: maximum Java heap size. Please set the number <= ½ RAM capacity.
Ex: If your akaBot Center machine’s RAM = 4G, then set -Xms2G.

- Save changes and exit
Press ESC then type: “:wq”
3. Start again ActiveMQ service
sudo systemctl start activemq
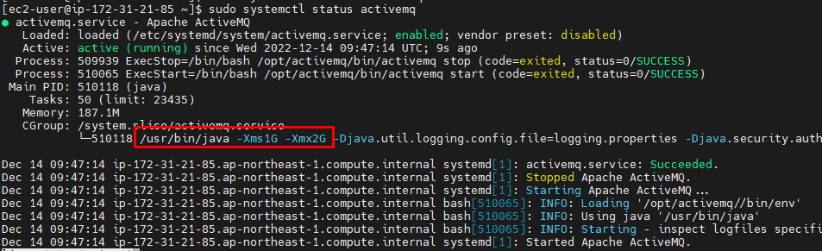
4. Verify ActiveMQ service’s status
sudo systemctl status activemq
2.4. Install akaBot Center
2.4.1. Step 1 - Extract installation folder
1. Stop Tomcat service (if running)
sudo systemctl stop tomcat
2. Remove all folders inside /opt/tomcat/webapps
sudo rm -rf /opt/tomcat/webapps/*
3. Copy akaBot-center-x.x.x.x.war into /opt/tomcat/webapps/ then change its name to ROOT.war.
Note: x.x.x.x is akaBot Center version
cd ~/apps
sudo cp akaBot-center-3.0.1.2.war /opt/tomcat/webapps/ROOT.war
4. Start Tomcat service and wait for Tomcat running to extract the file ROOT.war out to ROOT folder.
sudo systemctl start tomcat
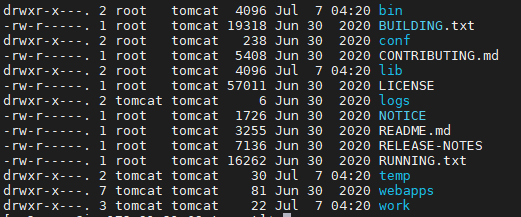
cd /opt/tomcat/webapps
ls –l
5. Stop Tomcat service and delete ROOT.war file.
sudo systemctl stop tomcat
sudo rm /opt/tomcat/webapps/ROOT.war
2.4.2 Step 2 - Configure akaBot Center
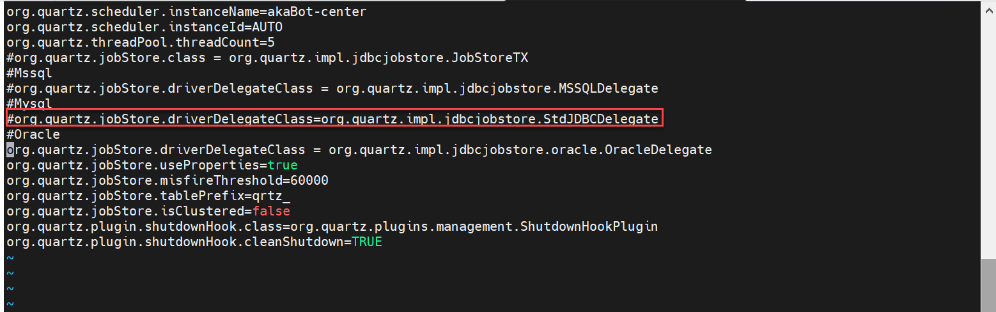
2.4.2.1. Configure file quartz.properties
- Open file quartz.properties
sudo vi /opt/tomcat/webapps/ROOT/WEB-INF/classes/quartz.properties
- Comment out the line of default MySQL Delegate setting:
- Uncomment out to turn on the setting of Oracle Delegate:
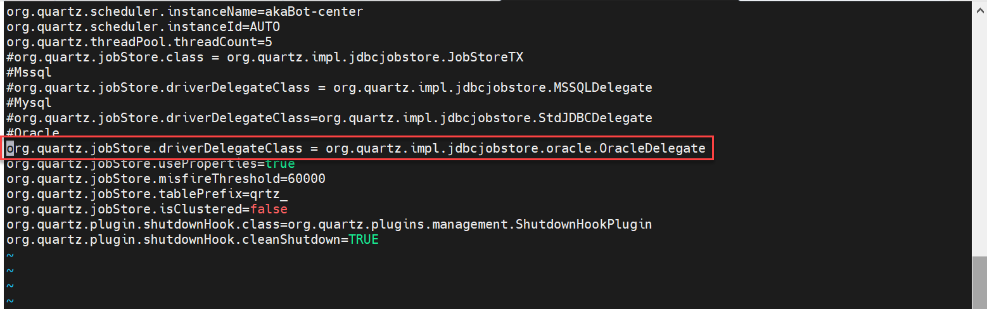
- Save changes and exit
Press ESC then type: “:wq”
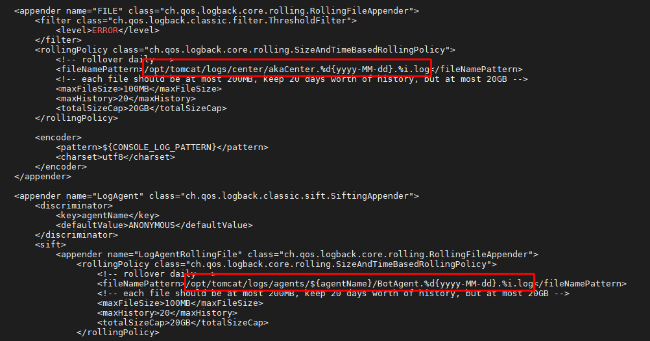
2.4.2.2. Configure Logback Setting
1. Open the logback setting file
sudo vi /opt/tomcat/webapps/ROOT/WEB-INF/classes/logback-spring.xml
2. Update the line:
${application.home:-.}/logs/center/akaCenter.%d{yyyy-MM-dd}.%i.log
To:
/opt/tomcat/logs/center/akaCenter.%d{yyyy-MM-dd}.%i.log
3. Update the line
${application.home:-.}/logs/agents/${agentName}/BotAgent.%d{yyyy-MM-dd}.%i.log
To:
/opt/tomcat/logs/agents/${agentName}/BotAgent.%d{yyyy-MM-dd}.%i.log
4. Save changes and exit
Press ESC then type: “:wq”
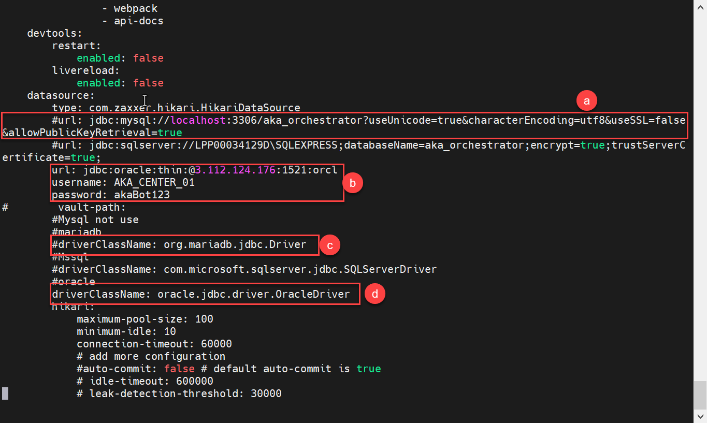
2.4.2.3. Configure Oracle Database connection
1. Open the file application-prod.yml
cd /opt/tomcat/webapps/ROOT/WEB-INF/classes/config/
sudo vi application-prod.yml
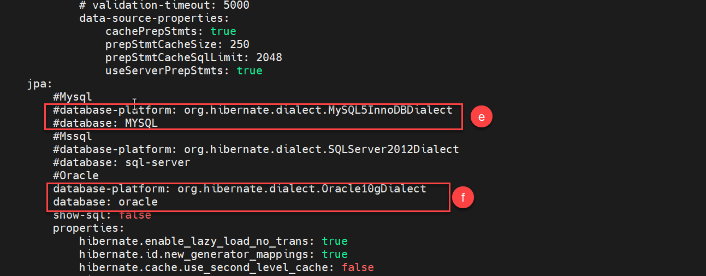
2. Update the file as below image:
- Comment out the MySQL database’s URL setting.

- Uncomment Oracle database’s URL and update database connection info as below:
- JDBC URL
+ If you use service’s SID, then JDBC URL format should be:
url: jdbc:oracle:thin:@<DB-SERVER>:<DB-PORT>:<DB-SID>

+ If you use service’s name, then JDBC URL format should be:
url: jdbc:oracle:thin:@//<HOST>:<PORT>/<SERVICE NAME>

2. Database’s username & password

- Comment out MariaDB’s driver.
- Uncomment Oracle database’s driver.
- Comment out MySQL Dialect & database name setting
- Uncomment Oracle Dialect & database name settting
3. Save changes and exit
Press ESC then type: “:wq”
4. Configure for the file application-dev.yml
a. Open the file application-dev.yml
sudo vi application-dev.yml
b. Repeat the same from step 2 to step 3 to configure the file application-dev.yml
2.4.3 Step 3 – Start Tomcat Service and Test out akaBot Center
1. Start Tomcat service
sudo systemctl start tomcat
2. Test to see if akaBot Center is running successfully.
curl localhost:8080
Success case:
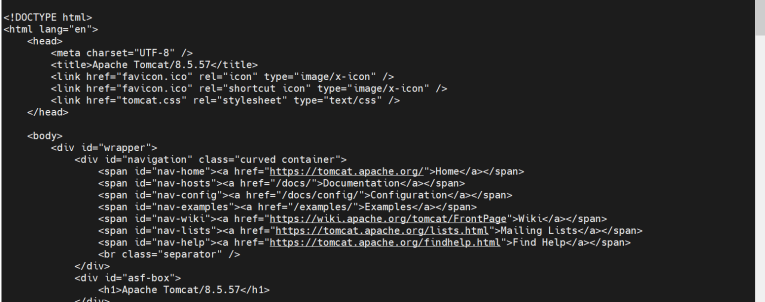
If not success, please follow section 3. Troubleshoot issue to self-troubleshoot issues.
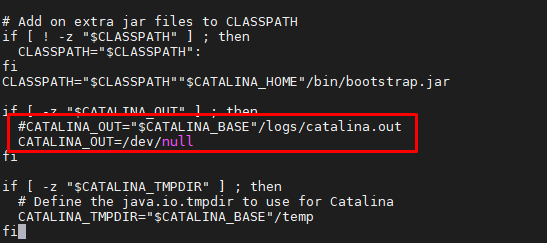
2.4.4. Step 4 - Configure Catalina.out
By default, Tomcat will write out the logs into catalina.out file which may cause dramatic increasing of the file size and decrease the performance. To stop this, change the configuration in Catalina.out as below:
1. Open the file
sudo vi /opt/tomcat/bin/catalina.sh
2. Press ESC then type: “:229” to the line
3. Comment it out to stop writing log to catalina.out.
#CATALINA_OUT="$CATALINA_BASE"/logs/catalina.out
4. Add below line affer the commented line.
CATALINA_OUT=/dev/null
5. Save changes and close the file
Press ESC then type: “:wq”
DONE!!! You have successfully completed the akaBot Center installation and configuration in Standalone model.
Wish you a wonderful experience with akaBot Center in your automation journey!!
3. Troubleshoot issues
The installation may encounter various issues due to a variety of akaBot Center machine environments, account permission and regulative settings in each organization context. This section aims to guide you to self-troubleshoot some typical issues (continuously updated) and provide akaBot contact information for expert’s support.
3.1. Self-Troubleshoot
If any raised issue during your installation, please follow below actions to self-troubleshoot.
3.1.1 Step 1 - Detect issue
Please use the logs to detect the issue.
- Issues related to Tomcat service start, please use Tomcat log file: /opt/tomcat/logs/catalina.out
- Issues related to akaBot Center, please use Center log file: /opt/tomcat/logs/center/akaCenter.yyyy—mm-dd.0.log
1. Remove the log of previous run by navigating to log folder then remove all the log files.
2. Start service again to generate log.
3. Open the log file to detect the issue.
3.1.2 Step 2 – Troubleshoot issue
3.1.2.1. Issue 1: Could not commit with auto-commit
Issue: Could not commit with auto-commit as below image:
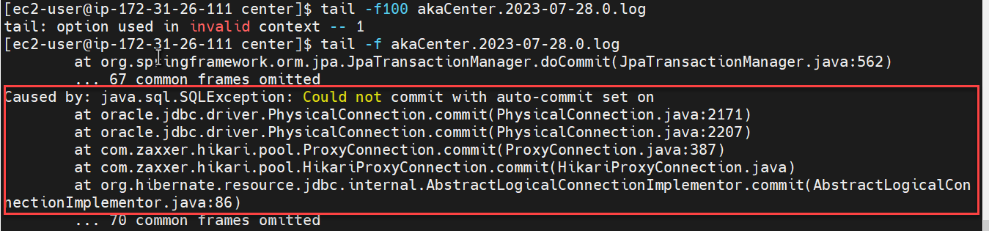
Solution:
1. At step 2.2.4 Step 4: Configure Tomcat service, please add below option into the JAVA-OPTS variable into service configuration file.
-Doracle.jdbc.autoCommitSpecCompliant=false
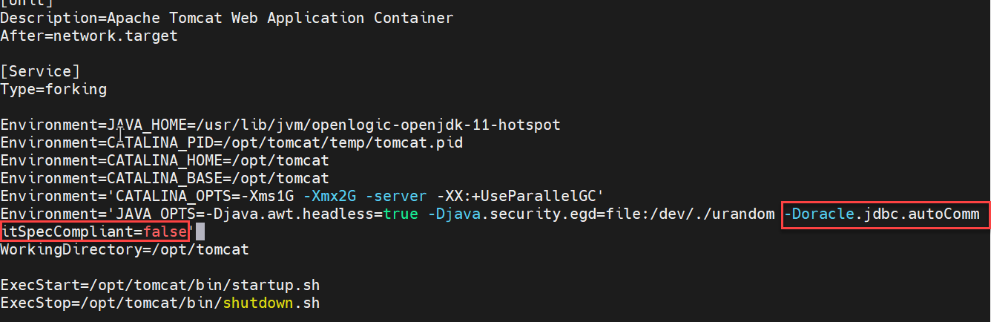
2. Continue to follow the next steps in the guide.
3.2. Contact akaBot team for Expert’s support
If your self-troubleshooting endeavor does not work, akaBot team is always here to support your installation success, please contact akaBot team to get our expert’s support through:
- contacting your project coordinator (if have)
- or sending an email to [email protected]
- or leaving a message on akaBot website.