A Queue in simple terms is a container that holds a set of items that you want to be processed by akaBot Agents. Queue items can store different types of data, such as customer details. This information can be processed in other systems - SAP or Salesforce, for instance.
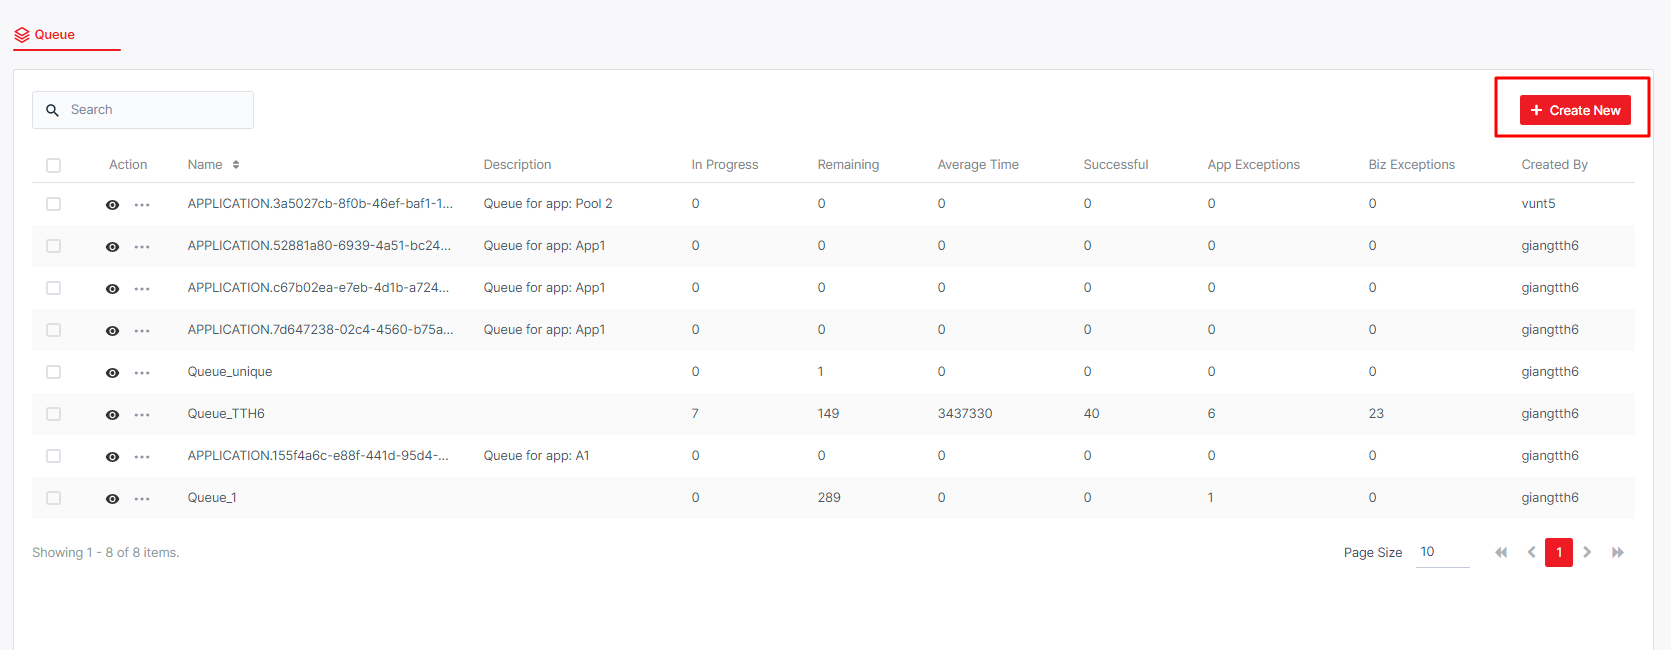
Queues enable you to create large automation projects underlined by complex logic. New queues created in akaBot Center are empty by default. To populate queues with items, to change their status and process them, you have to use Studio activities. As soon as queue items are processed, they become transactions. To access the Queue page, you click Queue tab in the left menu. After clicking, the system opens Queue Listing Page where all the Queues are located.
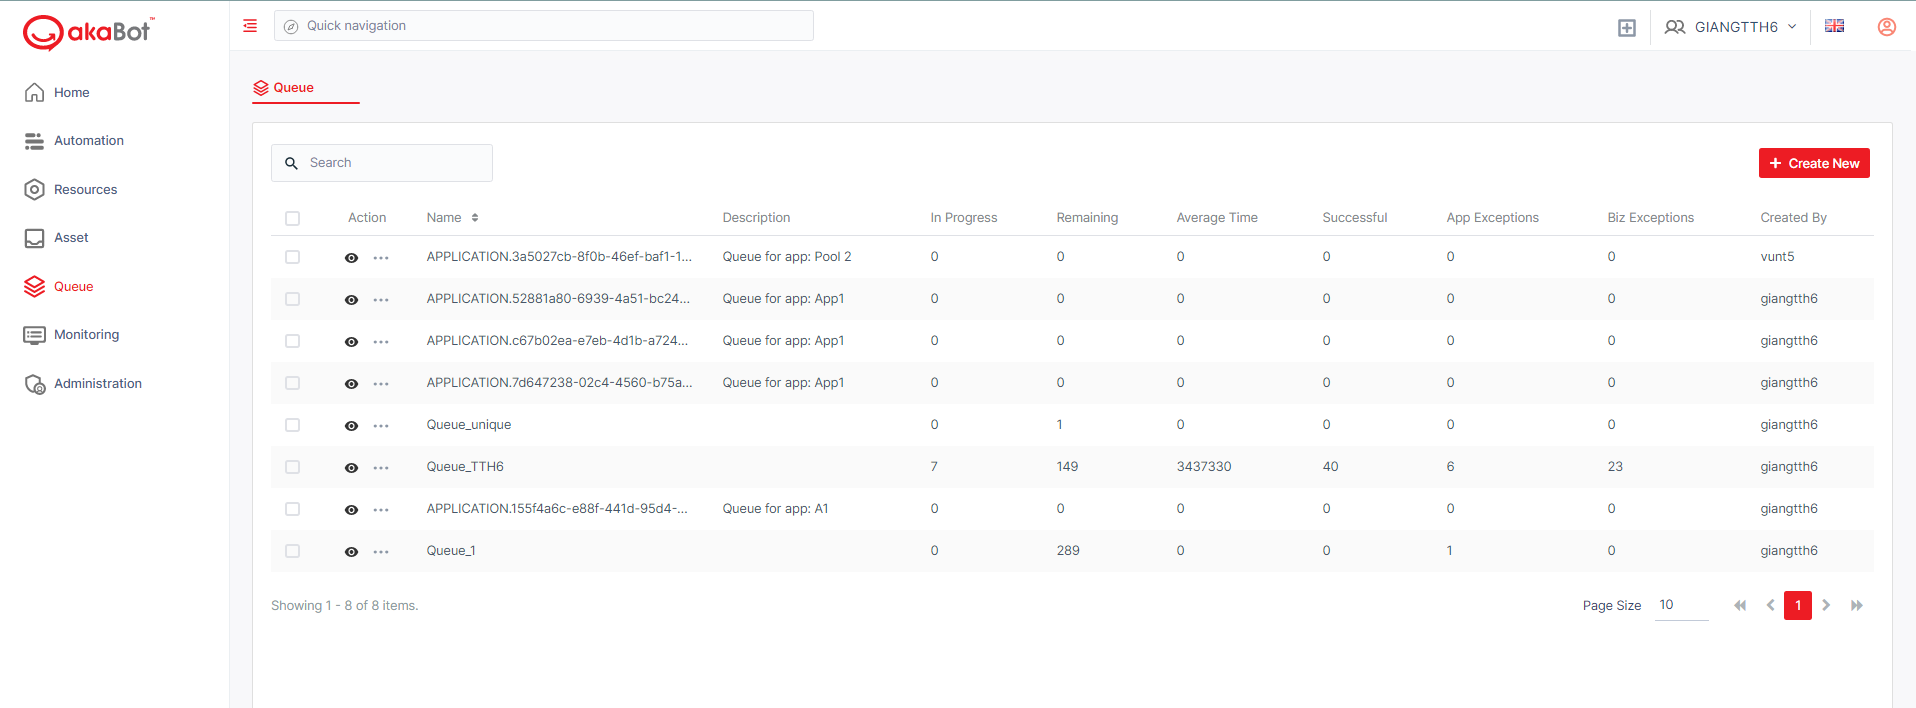
| No | Column | Description |
|---|---|---|
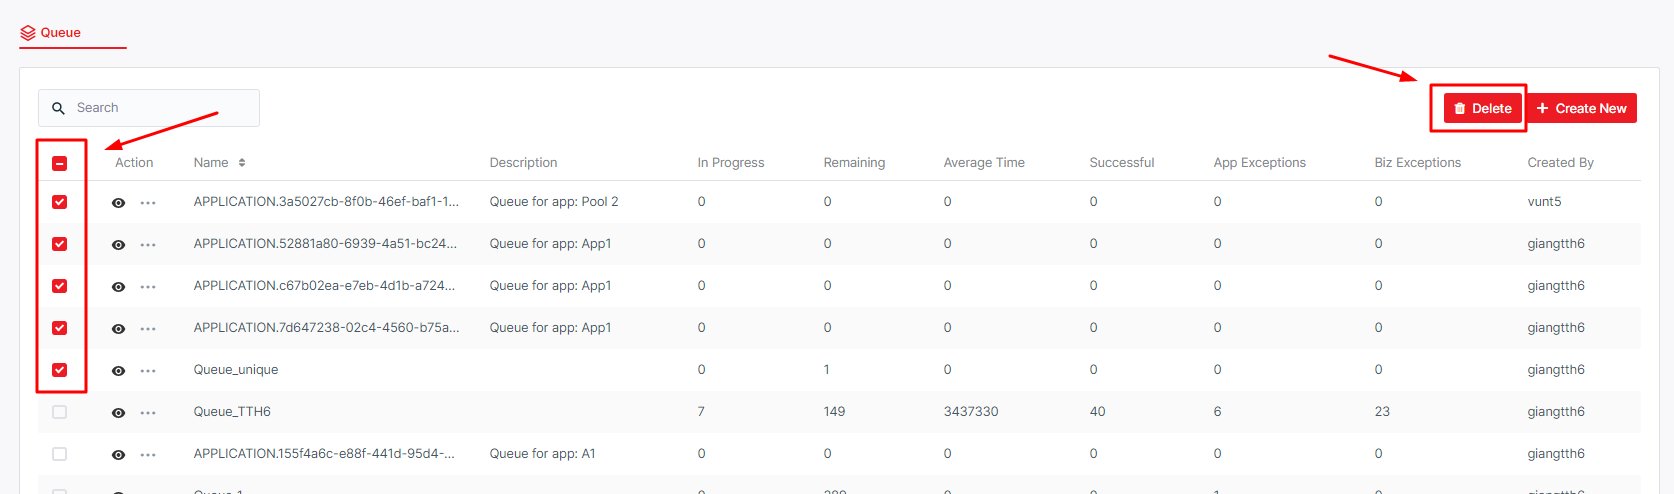
| 1 | Action | Available actions to manage the Queue. Includes: Edit: allows you to edit the details of each Queue Delete: allows you to remove selected Queue from Center. By selecting the Checkbox corresponding to each Queue, the delete option will appear beside the Filter option and allow you to delete the Queue. ! Selecting the Checkbox next to Action will select all Queue in display and allow you to bulk delete selected ones. |
| 2 | Name | Mandatory. The name of the queue. |
| 3 | Description | Mandatory. The description of the queue. |
| 4 | In progress | The item was processed with the Get Transaction Item or the Add Transaction Item activity; when an item has this status, your custom progress status is also displayed, in the Progress column. |
| 5 | Remaining | The number of queue items that have not been processed yet, and have a New status. |
| 6 | Average time | The average time that was required to process the queue items, was expressed in seconds. |
| 7 | Successful | The total number of transactions that were processed successfully. |
| 8 | App Exceptions | The total number of transactions that failed with an application exception. |
| 9 | Biz Exception | The total number of transactions that failed with a business exception. |
a. View a Queue
To view a Queue, you click Eye button.
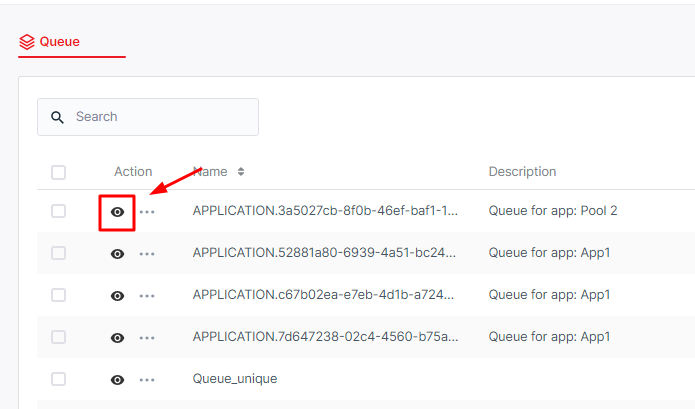
The system shows the details of the queue as below:
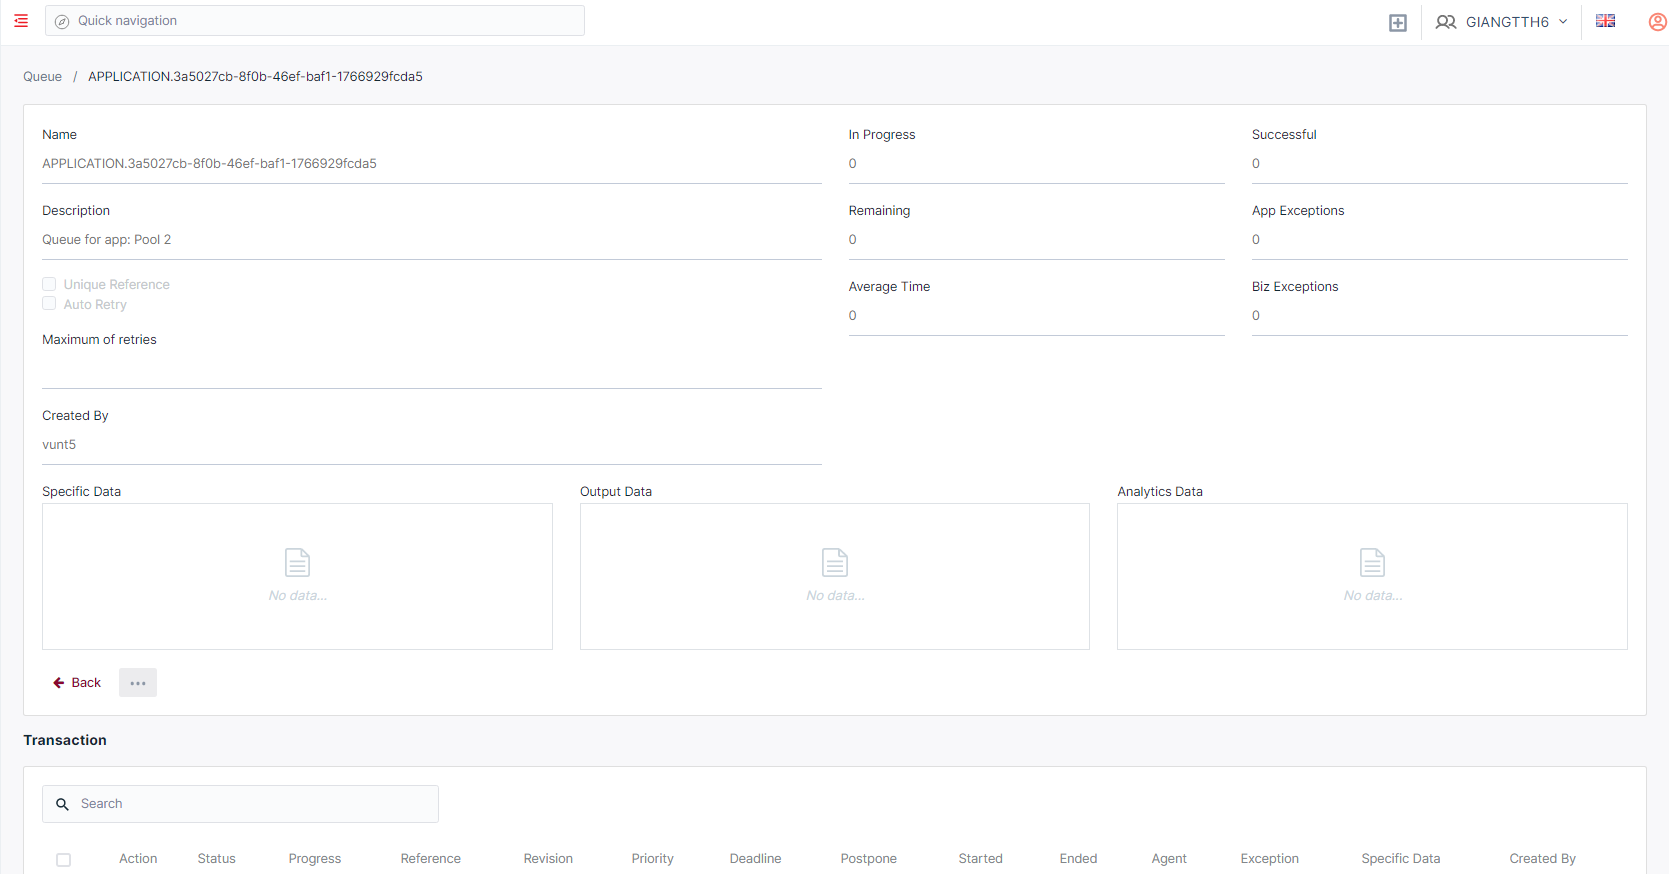
| No | Column | Description |
|---|---|---|
| 1 | Name | The name of the queue. |
| 2 | Description | The description of the queue. |
| 3 | In progress | The item was processed with the Get Transaction Item or the Add Transaction Item activity; when an item has this status, your custom progress status is also displayed, in the Progress column. |
| 4 | Remaining | The number of queue items that have not been processed and have a New status. |
| 5 | Average time | The average time that was required to process the queue items, was expressed in seconds. |
| 6 | Successful | The total number of transactions that were processed successfully. |
| 7 | App Exceptions | The total number of transactions that failed with an application exception. |
| 8 | Biz Exception | The total number of transactions that failed with a business exception. |
- Transaction
Once a Queue item was in proceed, it becomes a transaction. You can check the details of the processing
queue items in the details of the queue.
| No | Field | Description |
|---|---|---|
| 1 | Action | Available actions to manage the Queue. Includes: View: allows you to view information of each Transaction. Edit: allows you to edit the details of each Transaction. Clone: allow users to create an identical Transaction. Delete: allows you to delete selected Transaction. By selecting the Checkbox corresponding to each Queue, the delete option will appear beside the Filter option and allow you to delete the Queue from the Center. ! Selecting the Checkbox next to Action will select all Queue in display and allow you to bulk delete selected them |
| 2 | Status | These statuses let you know if an item has been processed or not, and the stage of the process at a particular time. Queues items can have these statuses: NEW IN PROGRESS FAILED SUCCESSFUL ABANDONED RETRIED * DELETED |
| 3 | Reference | A custom identifier for a transaction or a group of transactions. It supports all special characters, except double-quoted. This is set for the automation project, using the Add Queue Item or Add Transaction Item activity. The reference can be unique, depending on what you chose in the Unique Reference field when you created the queue. |
| 4 | Revision | This allows you to know the status of the revision of those queue items that have been abandoned or have failed with an application or business exception. |
| 5 | Priority | The processing priority level of the transaction item. This field is populated according to the priority level set in the Add Queue Item activity (Low, Normal, High), in Studio. |
| 6 | Deadline | The latest time at which the queue item should be processed. This field is populated according to how you configured the Deadline property of the Postpone Transaction Item activity, in Studio. |
| 7 | Postpone | The earliest time at which the queue item is available for processing. This field is populated according to how you configured the Postpone property of the Postpone Transaction Item activity, in Studio. |
| 8 | Started | The amount of time that passed since the processing started. |
| 9 | Ended | The amount of time that passed since the processing stopped. |
| 10 | Agent | The name of the Agent that has processed a transaction. |
| 11 | Exception | The type of exception that caused an item to fail. This is populated according to the error type selected in the Set Transaction Status activity in Studio. |
| 12 | Specific data | JSON Schema data. |
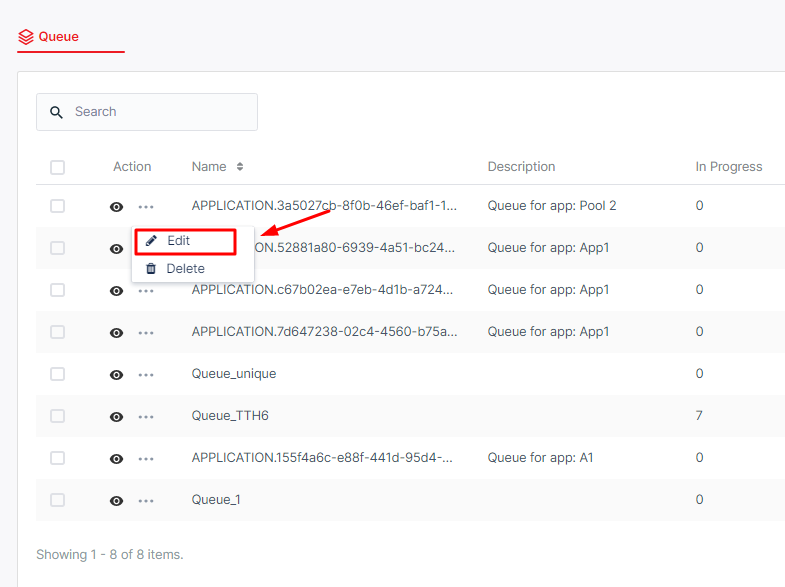
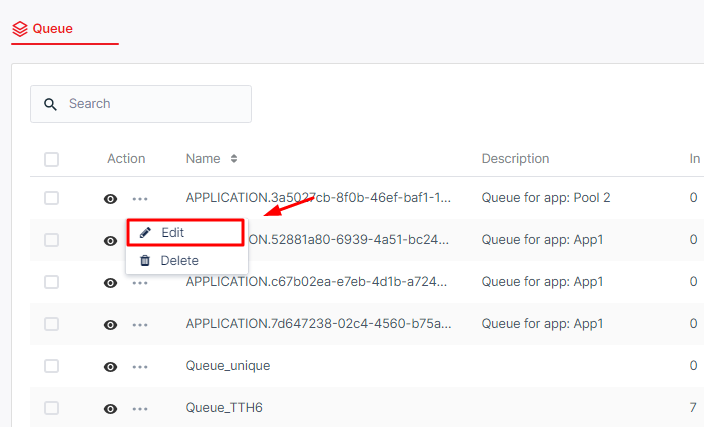
b. Create/Edit a Queue
In order to create a Queue, on the Queue Listing page, click Create new
To edit an existing Queue, select the Edit button corresponding to the Queue you want to edit:
The system will display the form for you to create/edit a Queue
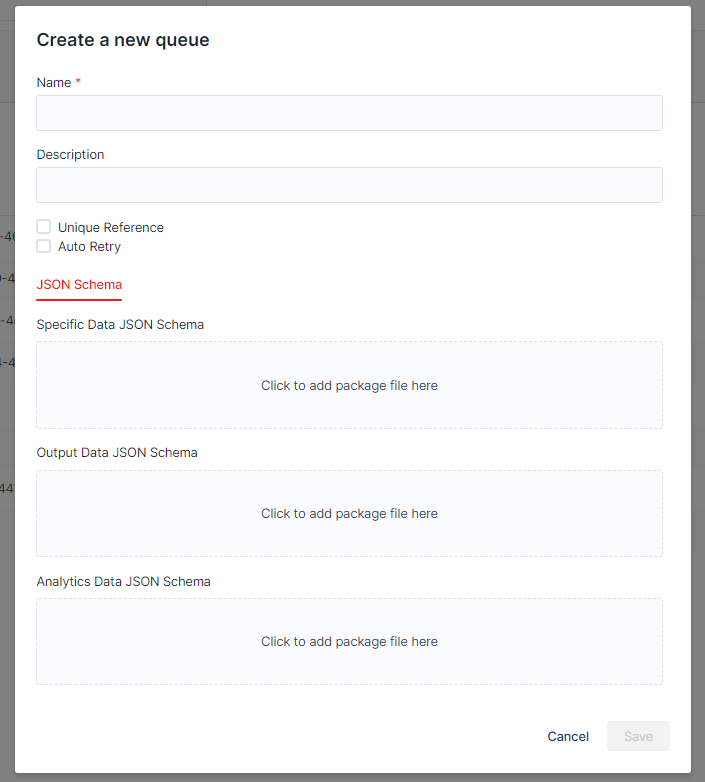
| No | Column /Label | Description | Type | Maximum | Is Mandatory? | Input Requirement |
|---|---|---|---|---|---|---|
| 1 | Name | Enter the name of the queue you want to search | Input searching | 255 char | Yes | |
| 2 | Unique Reference | Check the checkbox if you want to enforce unique references in all the transactions that are to be added to the queue. | No | This option cannot be edited and displays if the current queue enforces unique references or not. | ||
| 3 | Auto Retry | Indicates if the Center should retry to process items in the queue when an Application Exception is encountered. | No | |||
| 4 | Maximum of retries | Only appear if the Auto Retry option is selected. | Int32 | 50 char | No | Greater than 0 |
| 5 | JSON Schema | When creating or editing a queue, you can upload a custom JSON. | ||||
| 6 | Specific Data | JSON schema for the specific data of all transactions in the queue. | File size limited to 256kb by default. | No | ||
| 7 | Output Data | JSON schema for the output data of all transactions in the queue. | File size limited to 256kb by default. | No | ||
| 8 | Analytics Data | JSON schema for the output data of all transactions in the queue. | File size limited to 256kb by default. | No |
After filling the form, click the Save button to save it, and the Queue is created. You can also cancel the creation of the queue by clicking the Cancel button.
c. Delete Queue
To delete a queue, you click the Delete button of the corresponding Queue.
Alternatively, you can select the checkbox before each Queue and the Delete button will show up next to the Filter button. Tick the Checkbox next to Action will allow users to select all displayed Queue for bulk delete.